Oh man, this post is definitely long overdue! We’ve had so many people lately ask “Where’s your bathroom vanity from?!” or “Do you have the plans on how to build it?”. Well! Guess what? I finally sat down and gathered all the plans, photos and notes that we took when we DIYed the bathroom vanity in our guest bathroom!
One of the reasons I’ve been so hesitant to write this post is because this was our first “furniture” build. So, is it perfect? Nope. But, we knocked it out of the park for what we were expecting! The one part of the vanity that is, as I like to say, “janky” is the drawer. We really had NO idea on what we were doing there ?. Now, a year later, (and a ton more projects under our belt) it dawned on me that we could have approached it a different way. Don’t worry, I’ll go into those details later on.
I did actually spend a lot of time drawing up the plans for the vanity itself, to make it easier to have something to refer to when we were building it. Especially when I have more interest in a project than Brad does. LOL. We bicker less when working on a project together when he has something visually to refer to when building. So, I made these plans to help guide us through the vanity project – and to keep our marriage intact 😉 – so why not share them with you to help you with your project as well?!
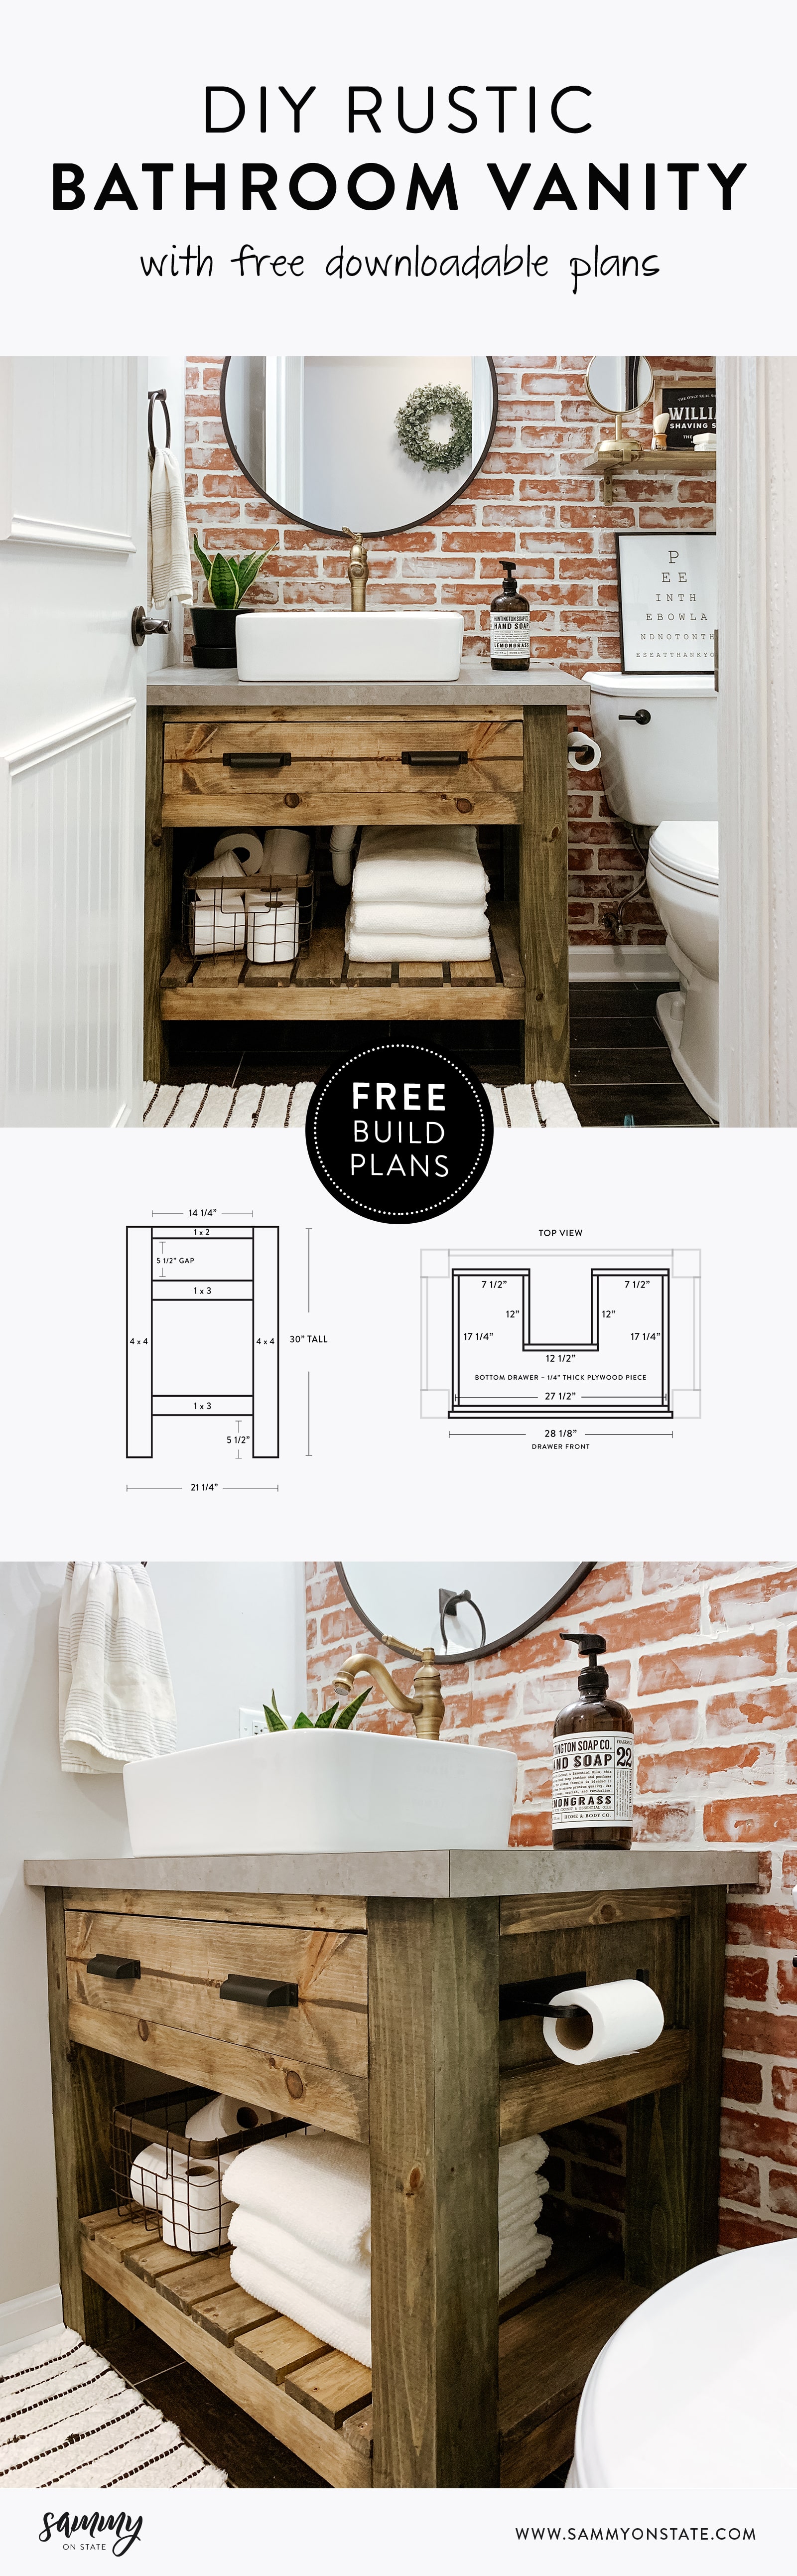
These plans and measurements are made to build a 36″ wide (35 1/4″ to be exact, we based this off the size of the 36″ vanity that was in our bathroom previously) vanity, with a vessel sink.
DIY Bathroom Vanity – Free Plans
THE SUPPLIES
- (2) – 4 x 4 x 8′
- (1) – 1 x 2 x 8′
- (2) – 1 x 3 x 8′
- (1) – 1 x 6 x 8′
- (3) – 1 x 4 x 8′
- 1/4″ x 2′ x 4′ Sanded Plywood Sheet
- 2 1/2″ screws
- 1 1/4″ screws
- 3/4″ screws (optional)
- Wood Glue (optional)
- 18″ Side Mount Drawer Slide
- Vanity Top (We chose this Pearl Soapstone laminate that resembles a concrete look)
THE CUT LIST
Note: We like to make our cuts as we go, just to be sure that everything fits correctly as we build. This also saves some potential headaches later on 😉
- 4 – 4x4s cut to 30″
- 2 – 1x2s cut to 28 1/4″
- 2 – 1x2s cut to 14 1/4″
- 4 – 1x3s cut to 28 1/4″
- 4 – 1x3s cut to 14 1/4″
- 6 – 1x4s cut to 21 1/4″
- 2 – 1x6s cut to 21 1/4″
- 1 – 1×6 cut to 28 1/8″
- 2 – 1x4s cut to 7 1/2″
- 1 – 1×4 cut to 27 1/2″
- 2 – 1x4s cut to 17 1/4″
- 2 – 1x4s cut to 12″
- 1 – 1×4 cut to 12 1/2″
- 2 – plywood pieces cut to 9 1/4″ x 14 1/4″
- Drawer base using the 1/4″ plywood (measurements based on drawer shape)
THE TOOLS
- Miter Saw
- Circular Saw
- Jigsaw
- Kreg Jig (we have this Kreg pocket hole jig)
- Nail Gun
- Sander
- Drill
- Pencil
- Speed Square
- Tape Measure
- Level
- Safety Goggles
Instructions
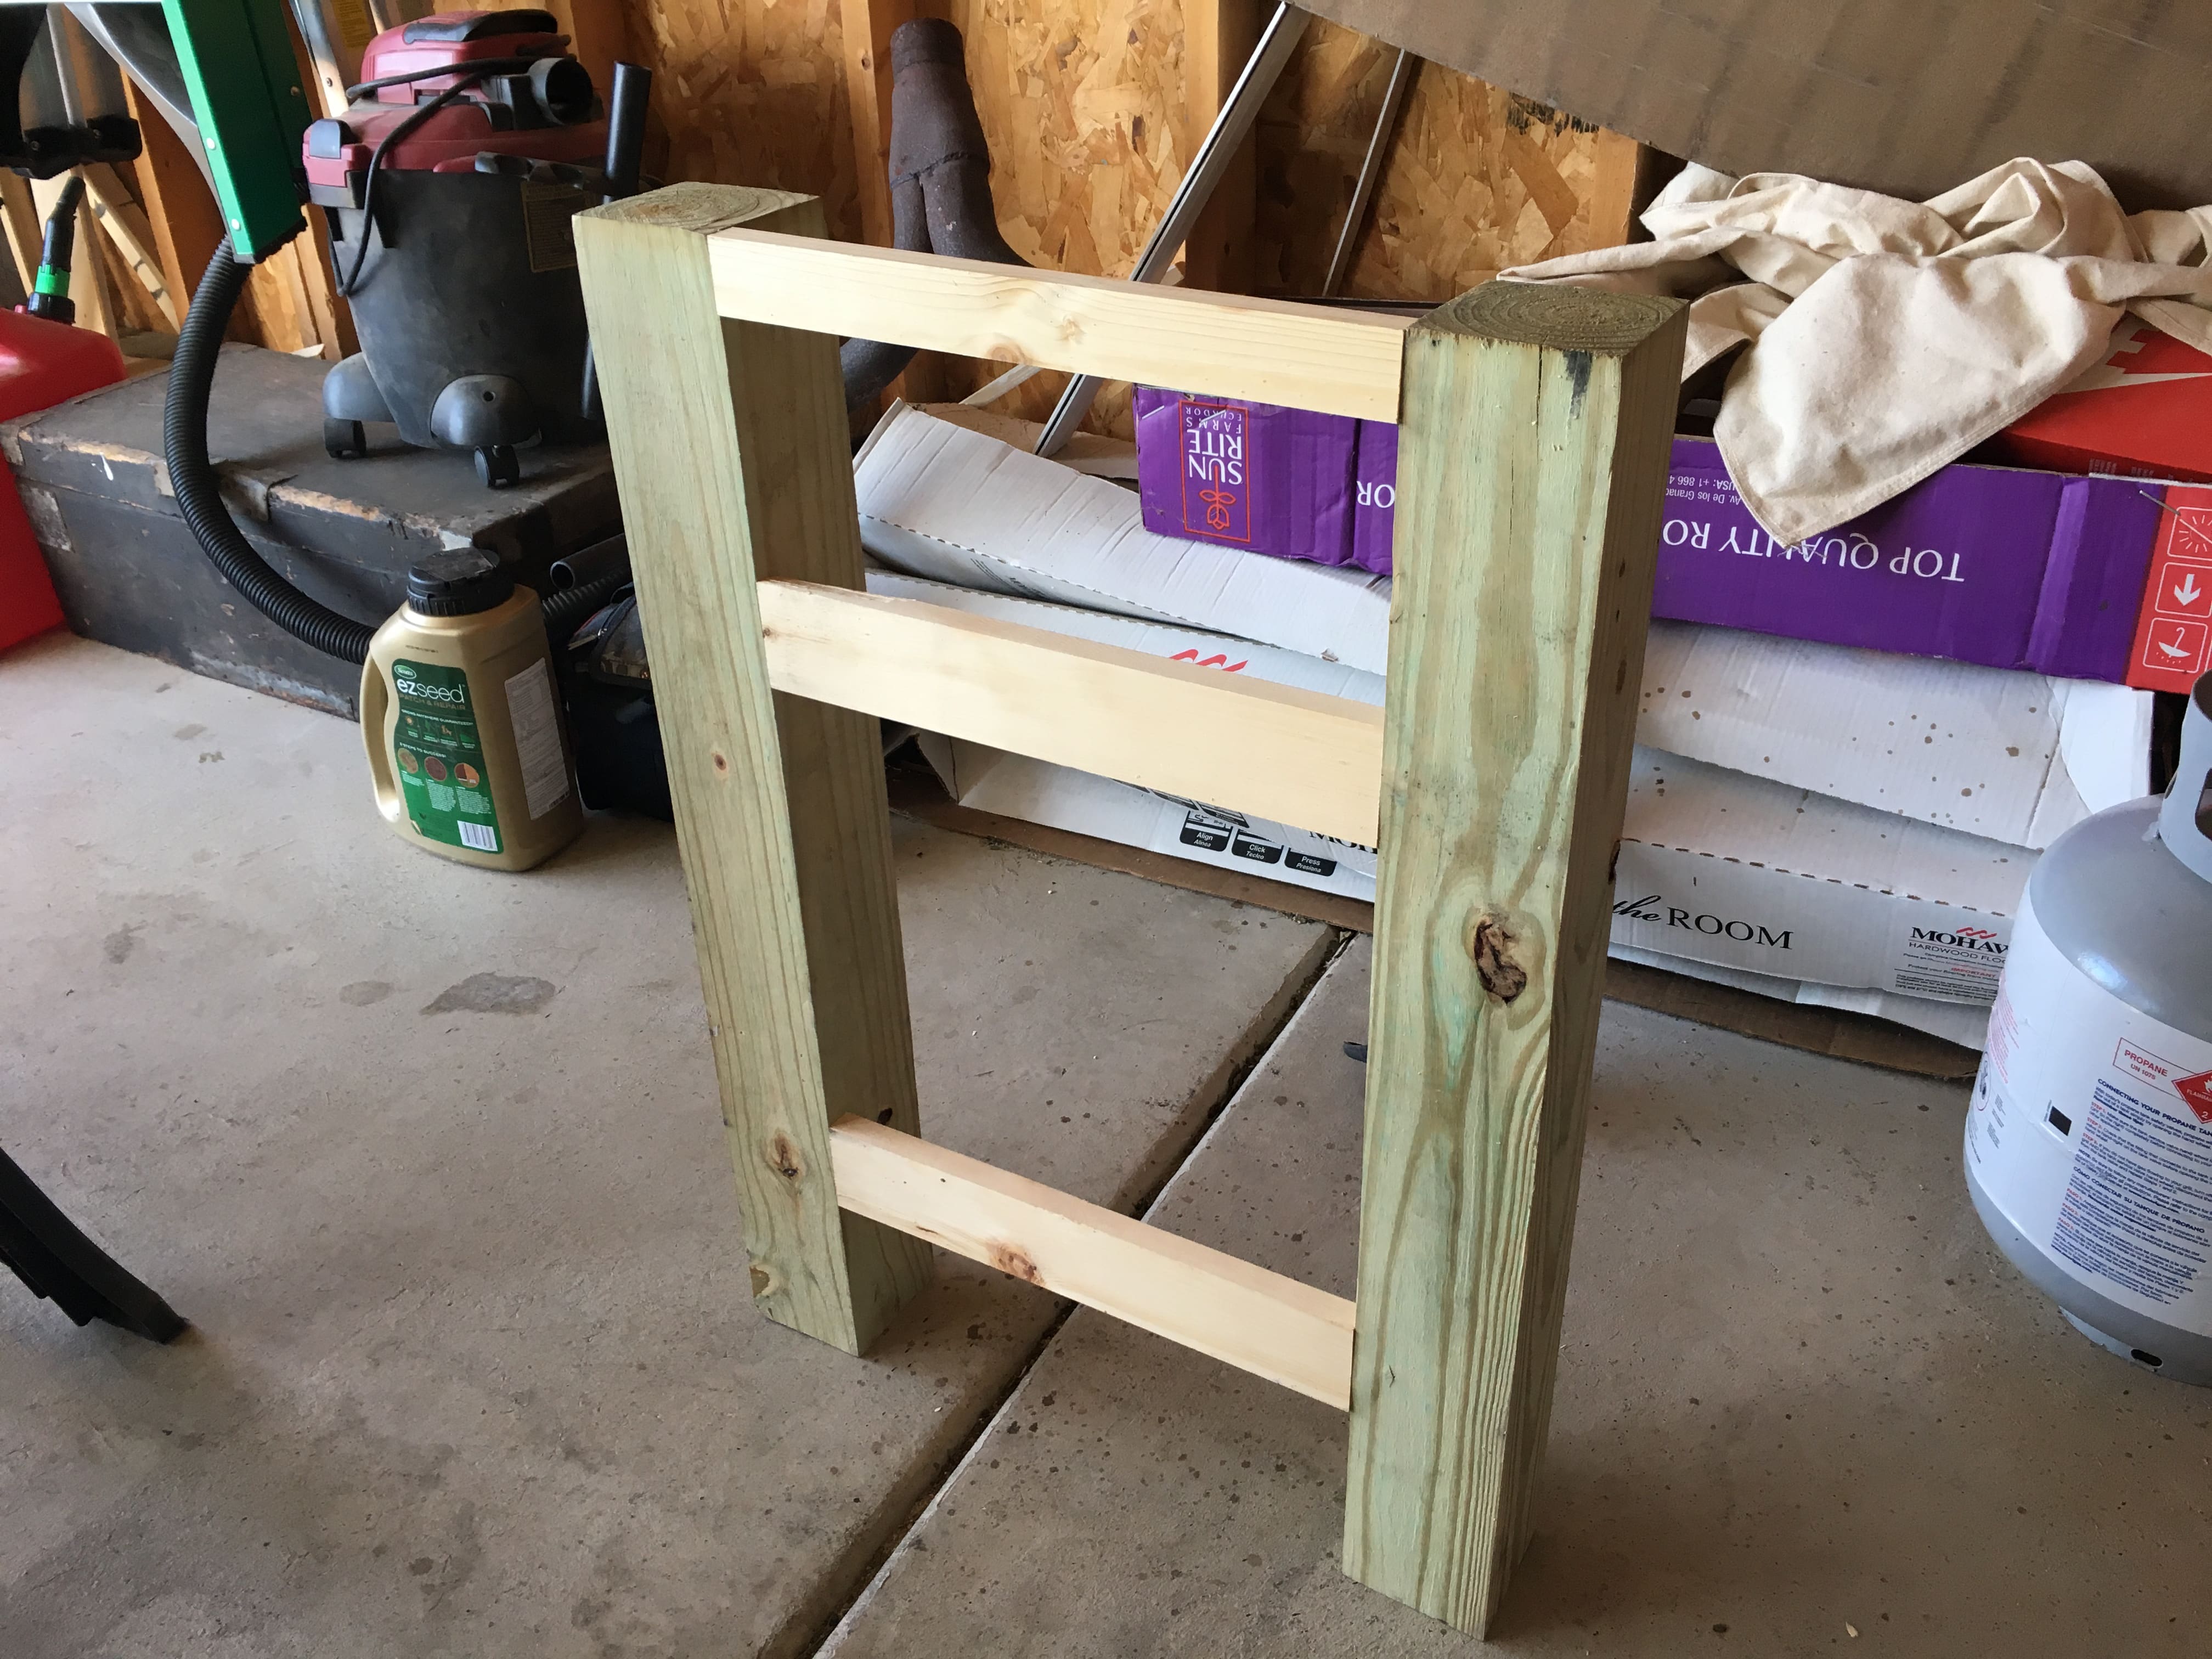
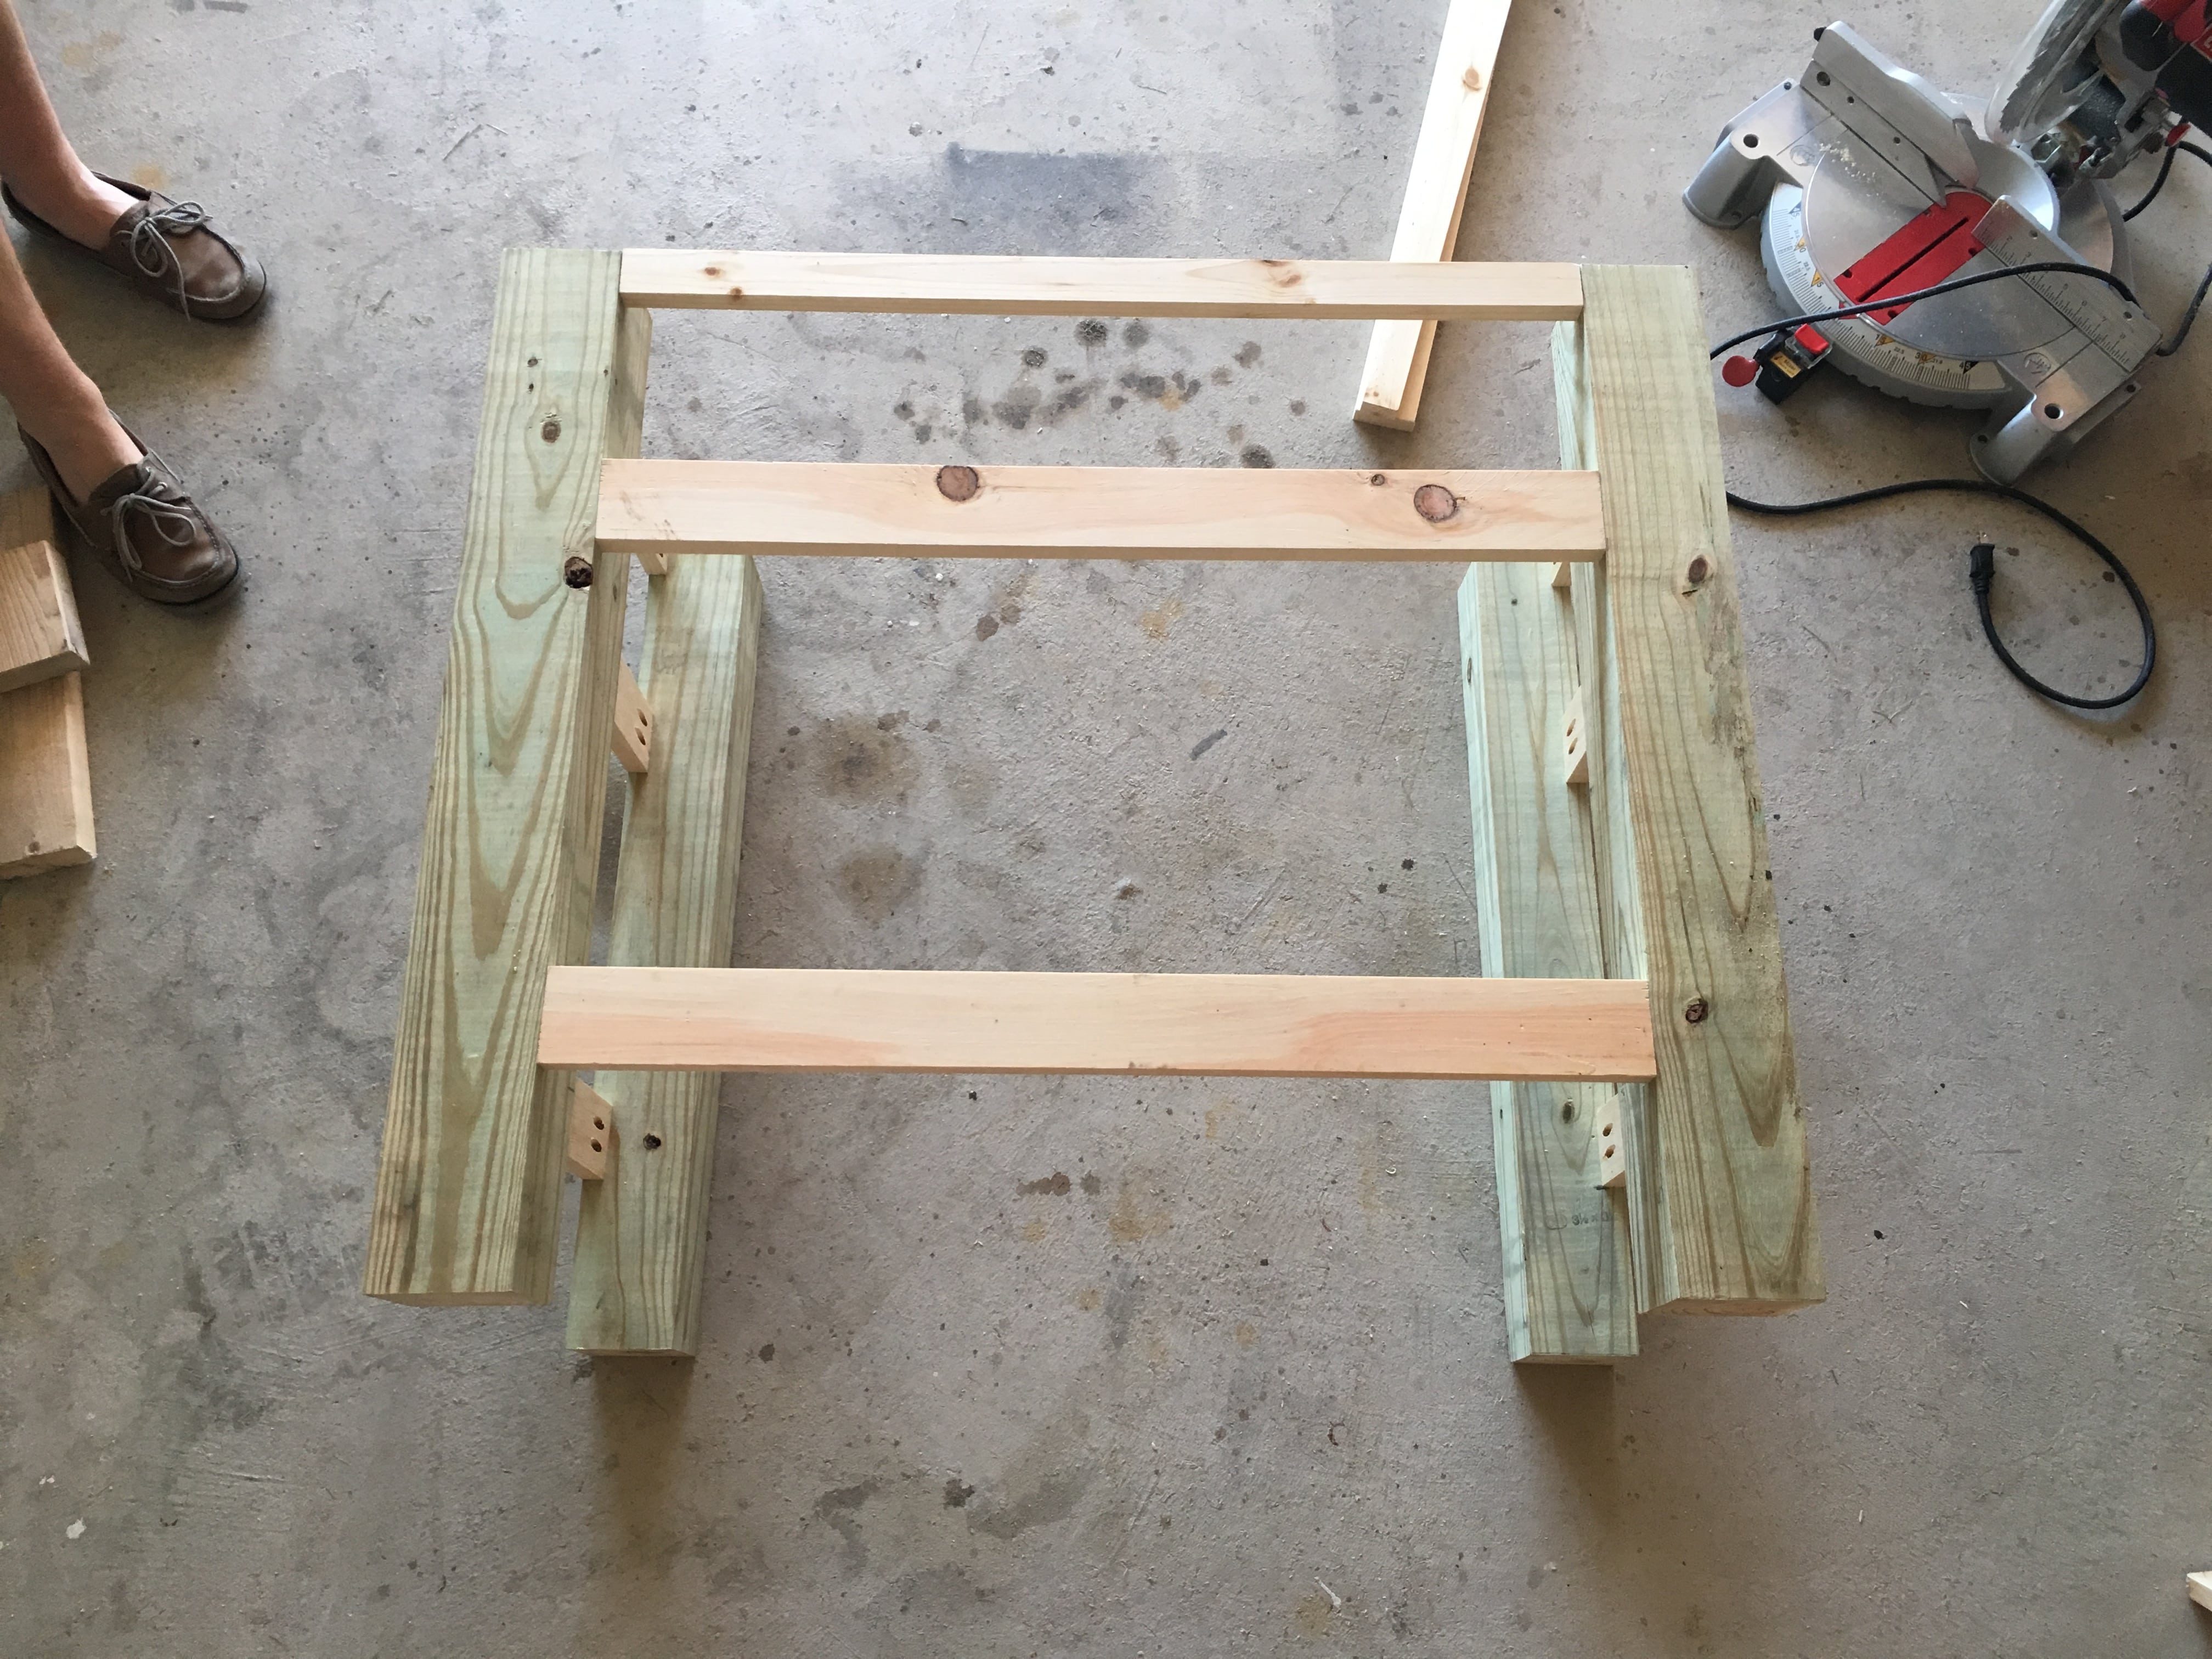
STEP 1 – Build the Two Sides of the Bathroom Vanity
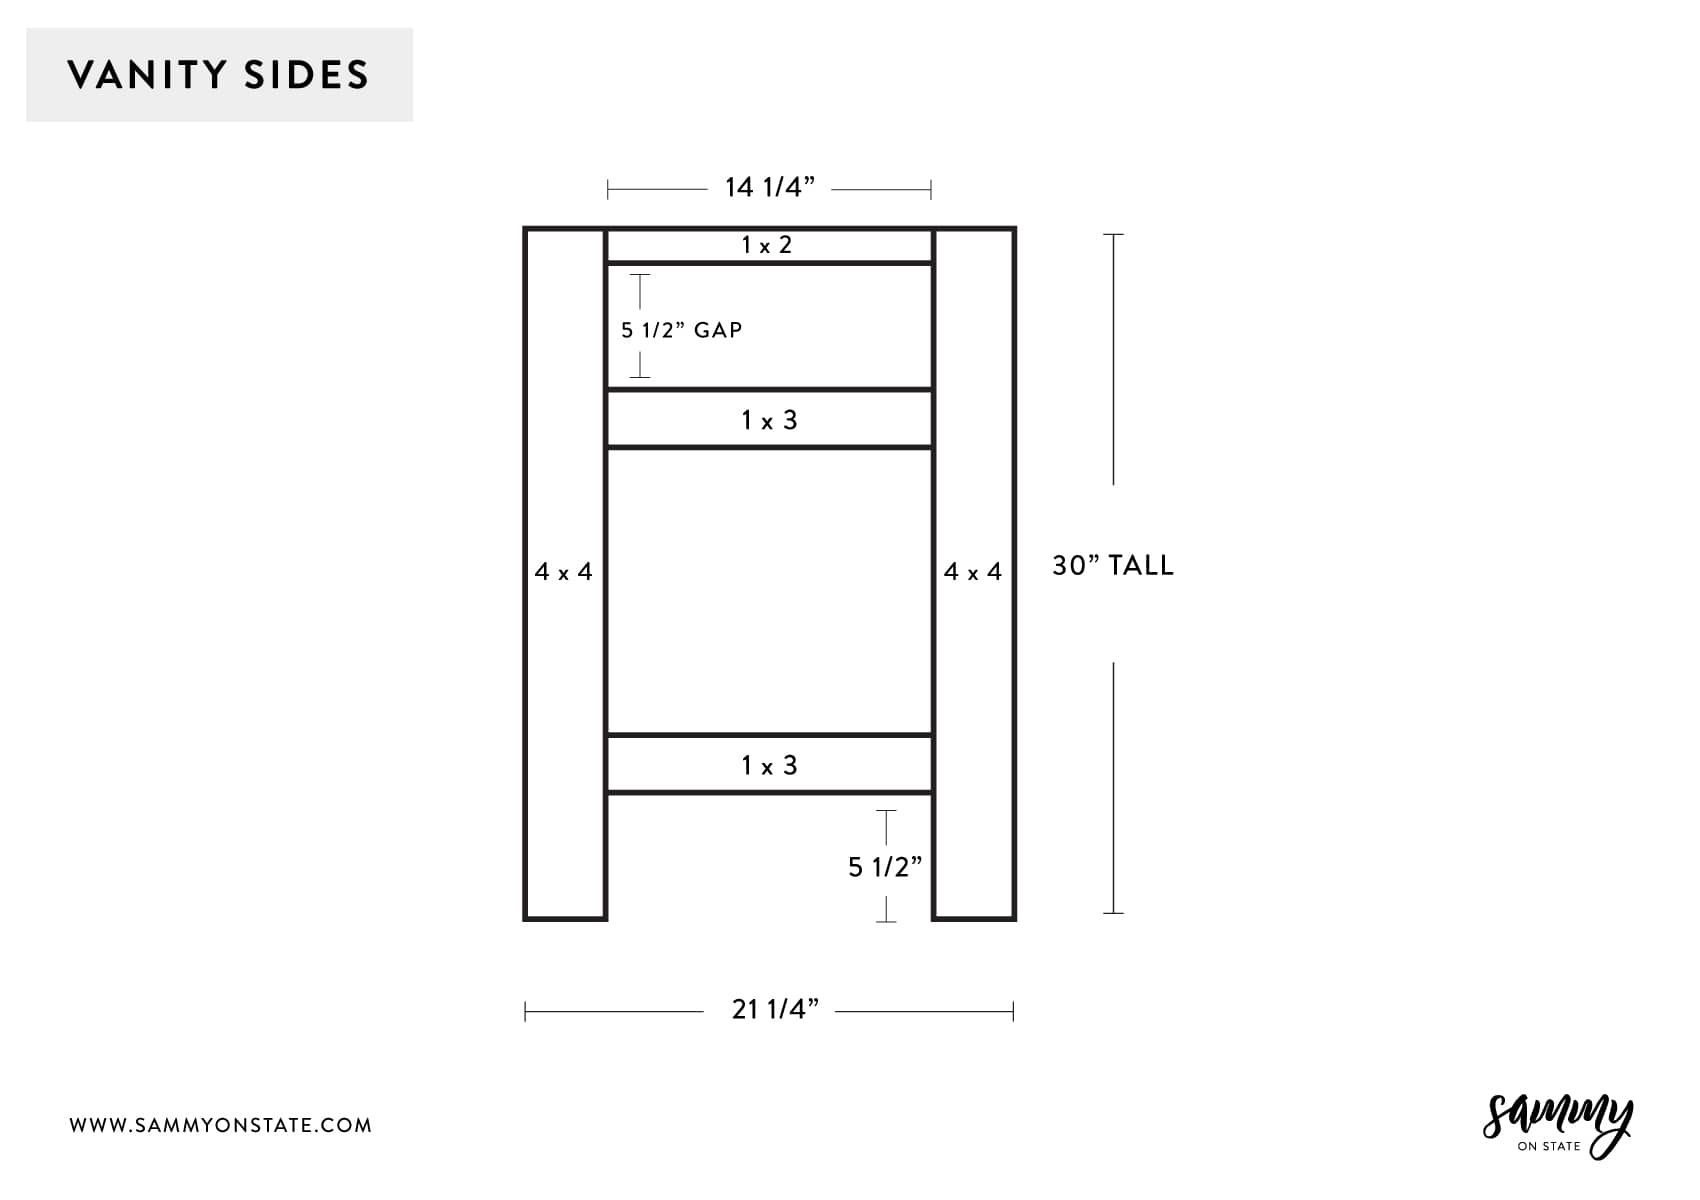
The first step of building the bathroom vanity is to build out the two sides of the vanity. For this, you’ll need to cut:
- 4 – 4x4s cut to 30″
- 2 – 1x2s cut to 14 1/4″
- 4 – 1x3s cut to 14 1/4″
- 2 – 1/4″ thick plywood cut to 14 1/4″ x 9 1/4″
We had to use our circular saw to cut the 4x4s since our miter isn’t large enough to cut through them. For all other cuts, we used our miter saw. For cutting the plywood pieces, you’ll need to use your circular saw.
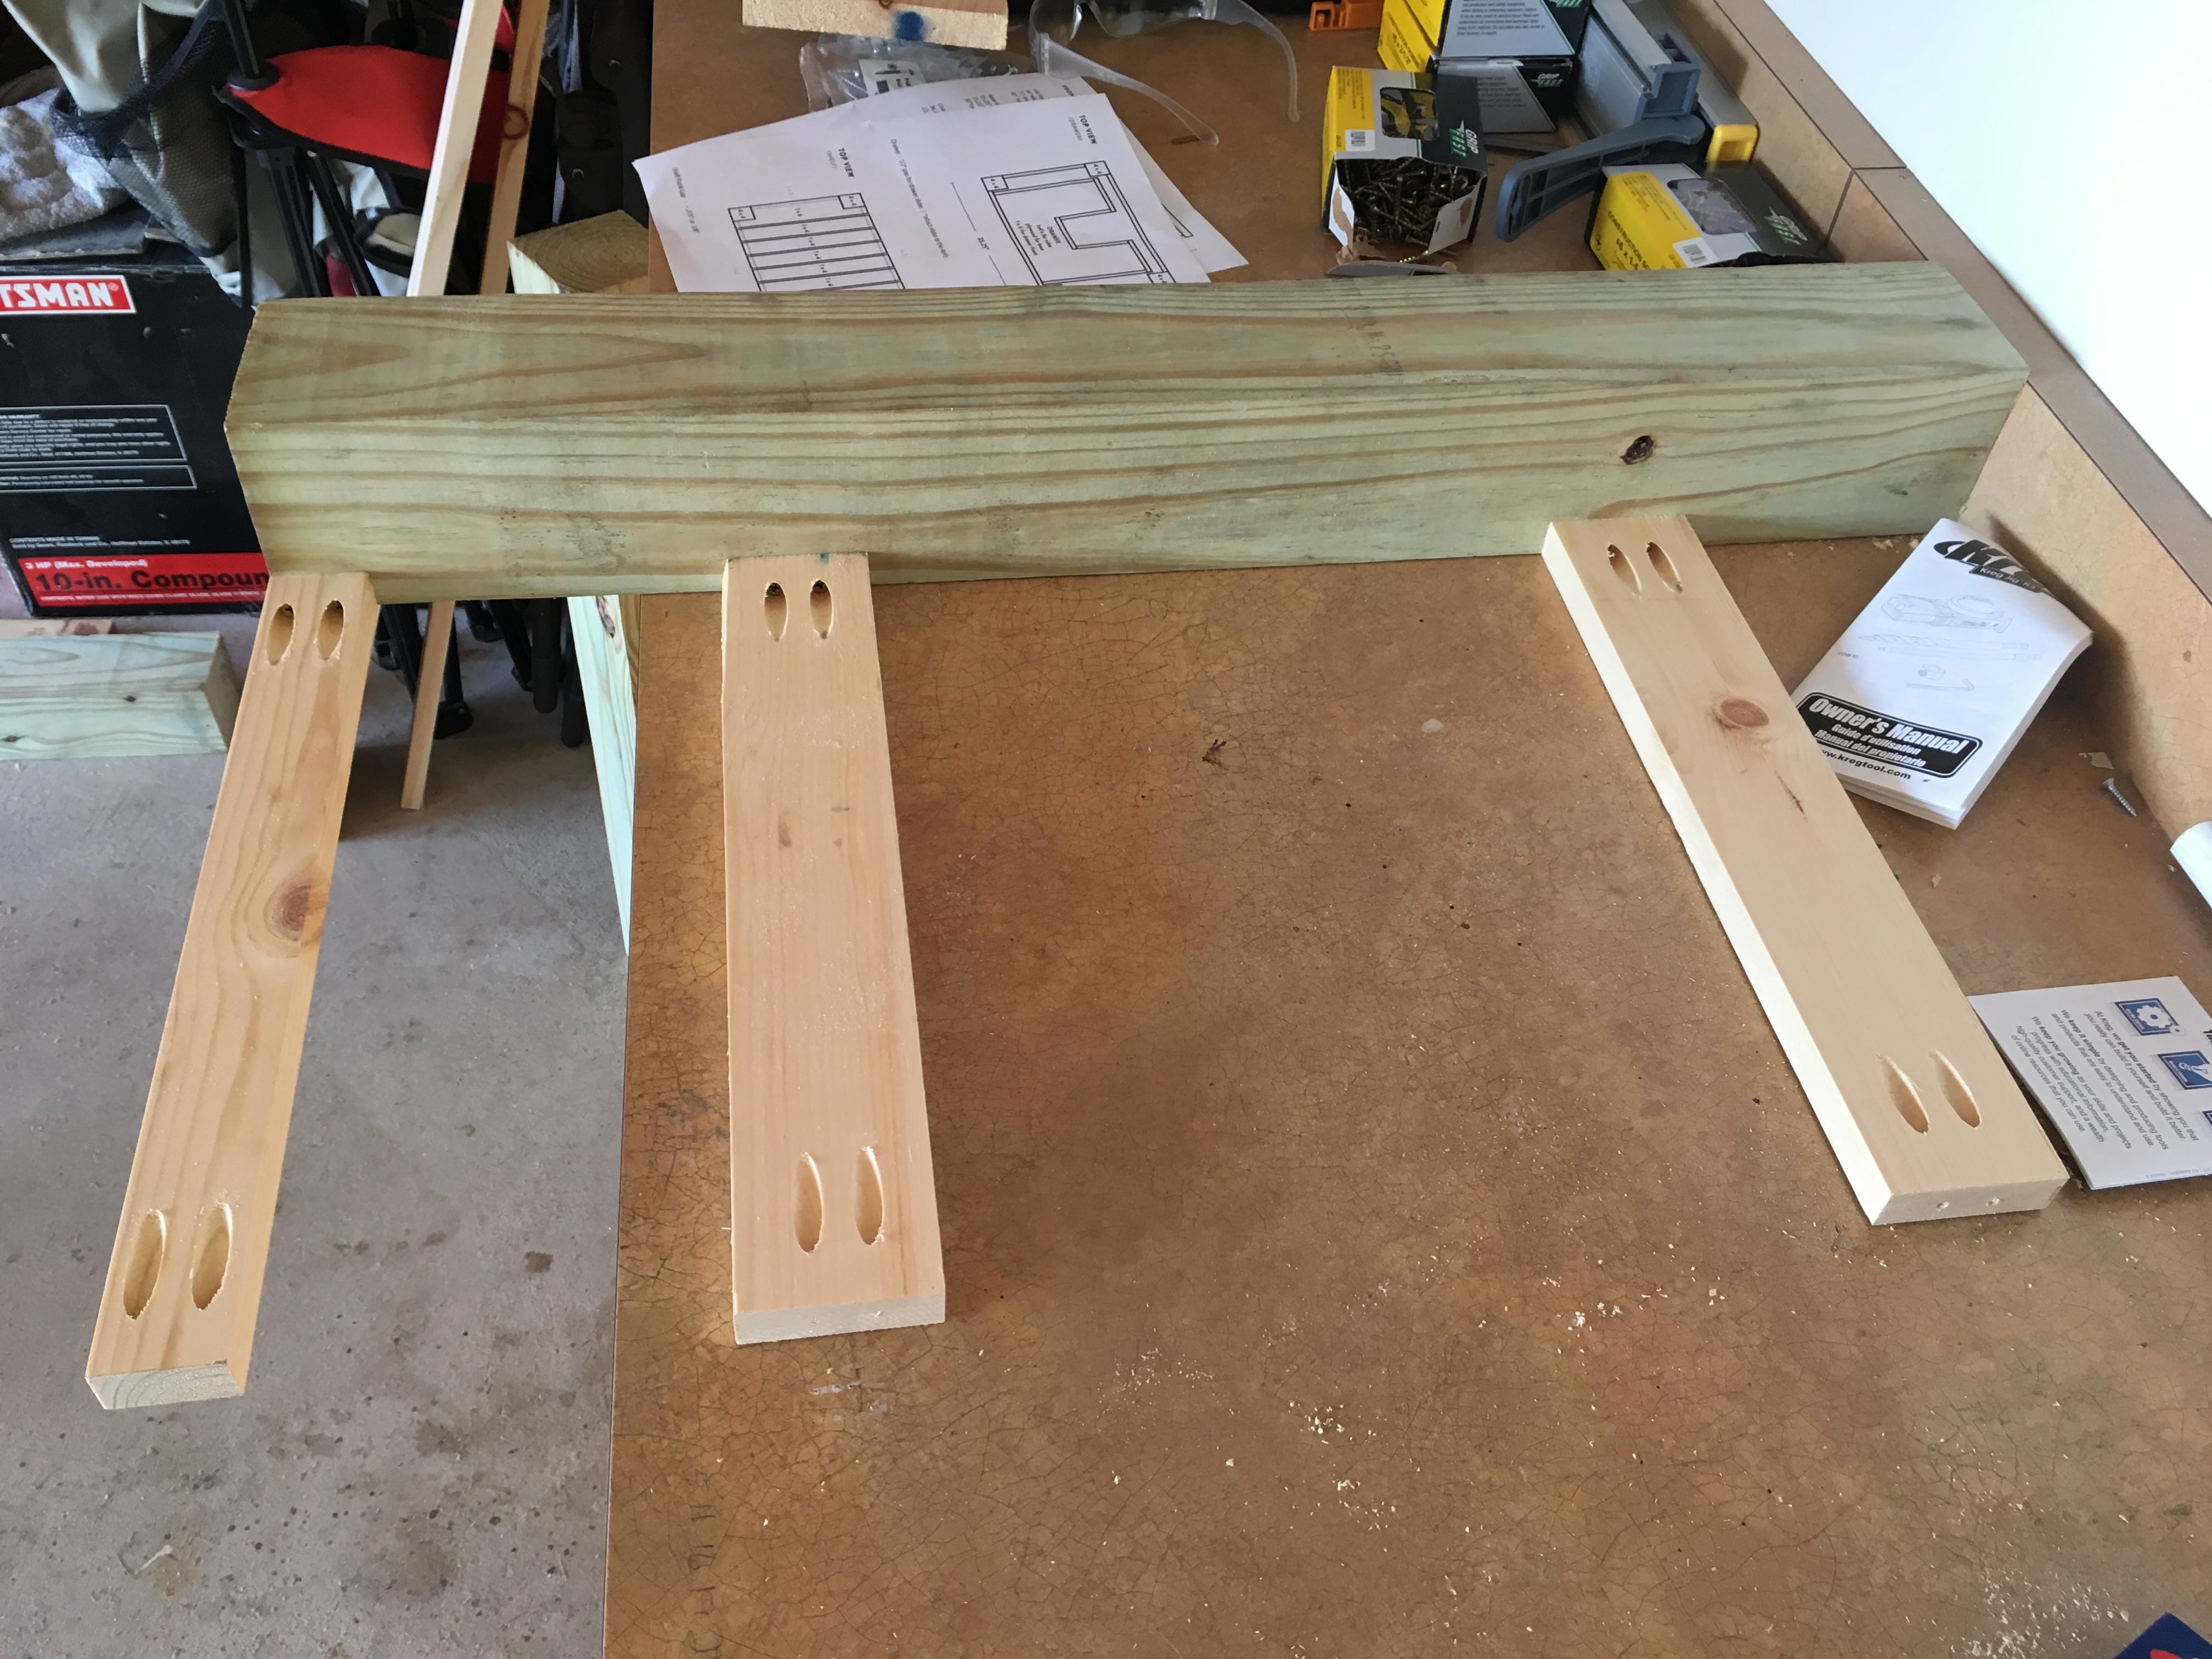
You’ll need to drill pocket holes in all your 1x2s and 1x3s so you can attach them to your 4x4s (the vanity “legs”).

Start by attaching all cross pieces to one of the 4x4s. Use the 2 1/2″ screws for all of these. All cross pieces should be flush to the front of the 4x4s. In addition, the top 1×2 should be flush to the top of the leg. Grab one of the 1x3s and attach it 5 1/2″ from the bottom of the 1×2.
The bottom 1×3, that is for the shelf, should be 5 1/2″ from the floor (see the first diagram in this step).
Once those are all attached, grab another “leg” and line it up, and attach it to the cross supports that were added to the first leg. Double-check all your spacings to make sure they are the same as they were on the first leg you attached to.
Repeat the above, to make the other side of the vanity. Once you have both sides built, add the plywood backings.
Attaching & Adding Plywood Backing
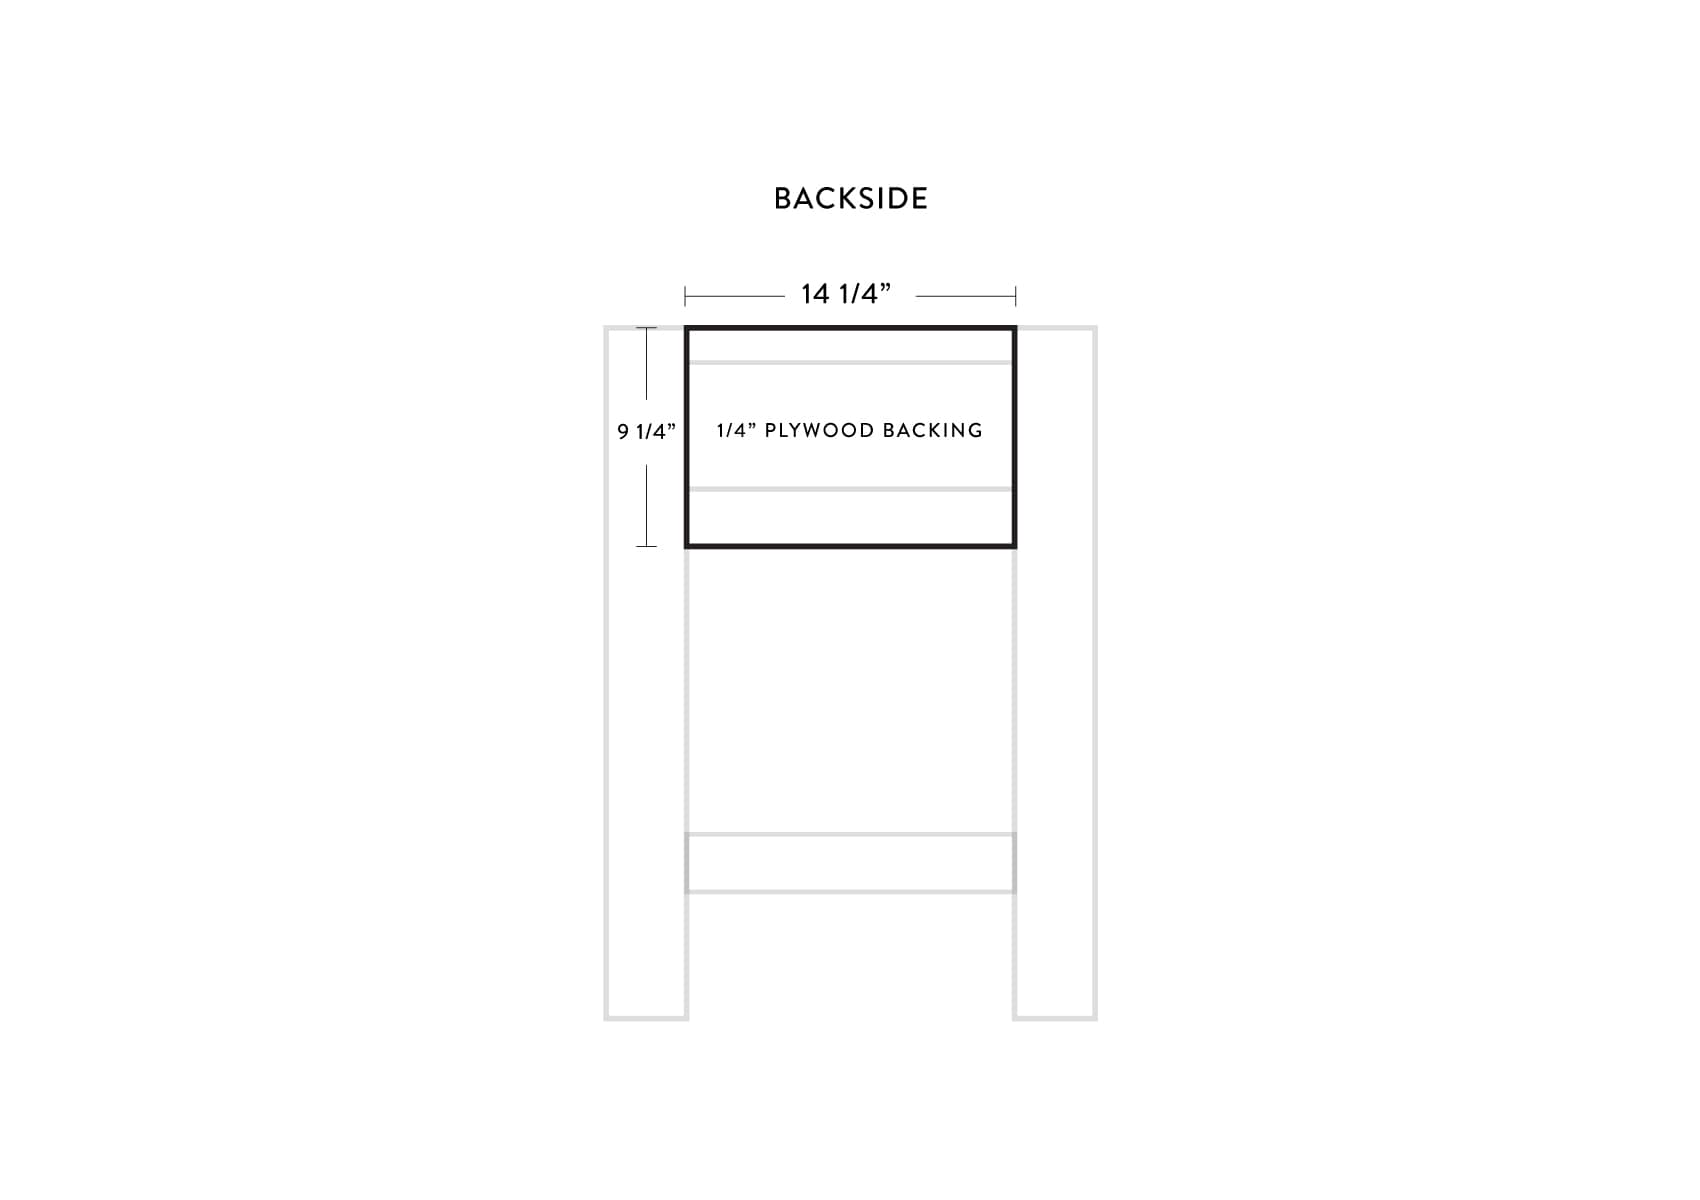
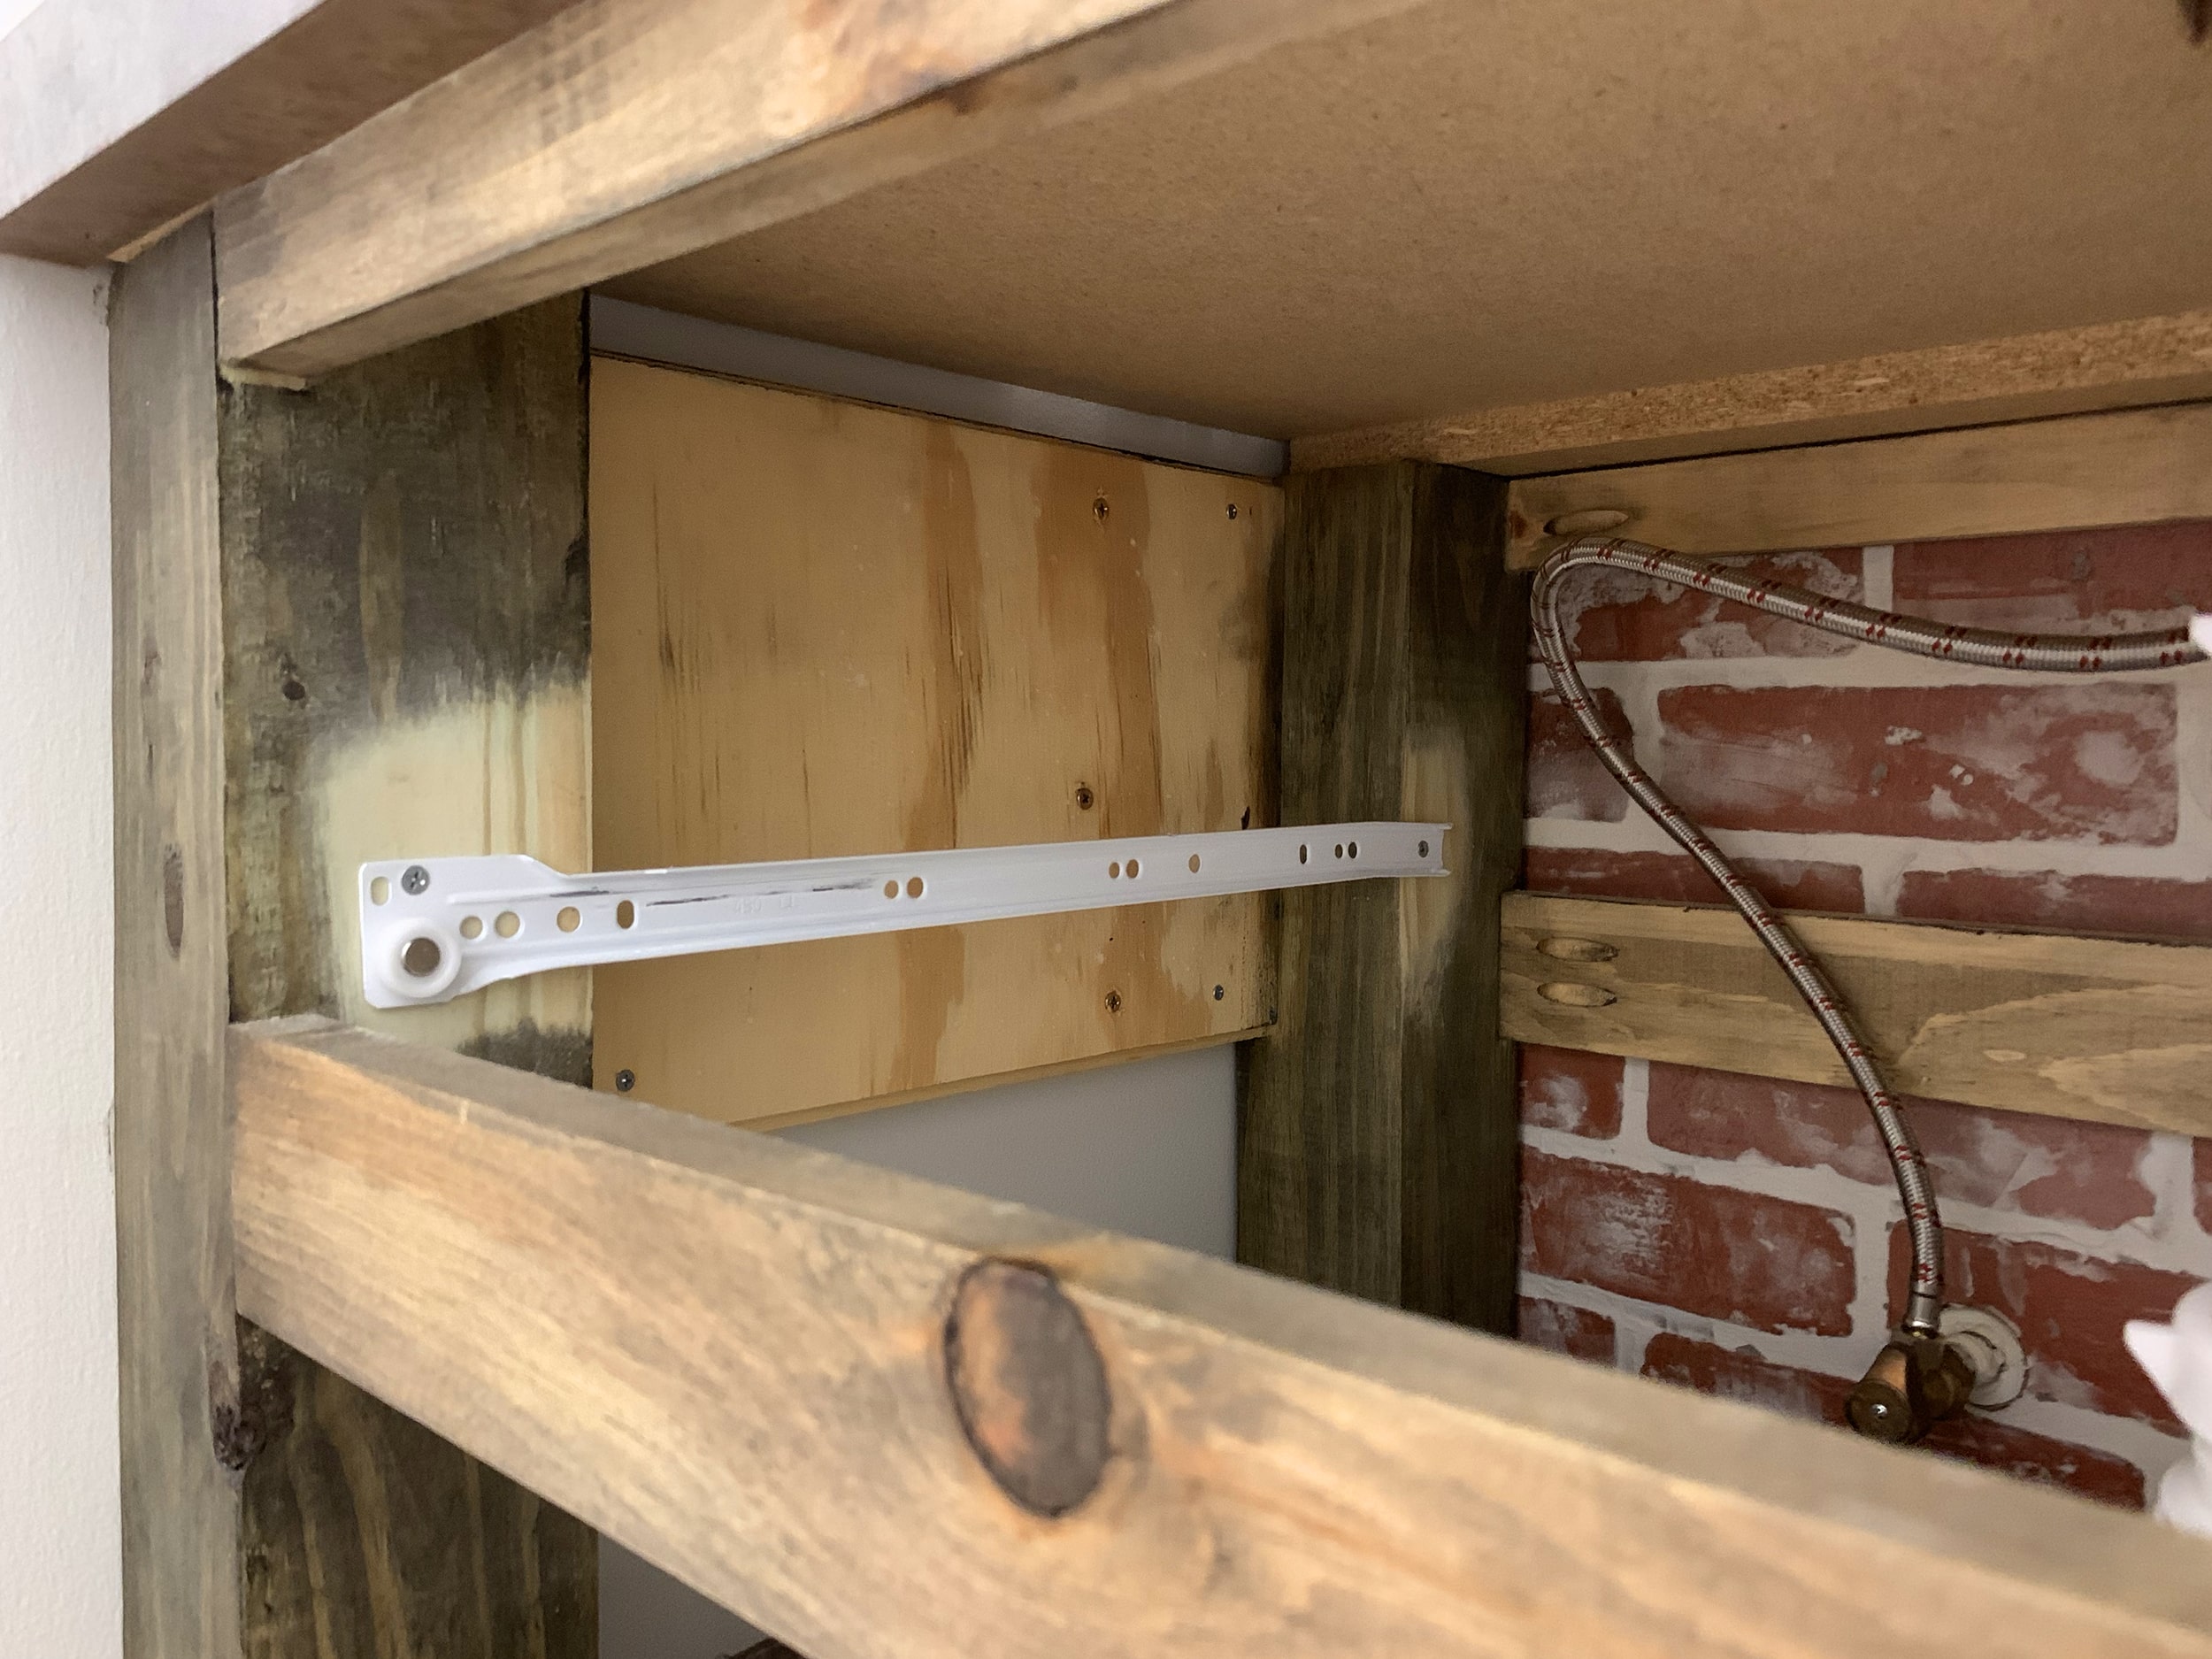
You should have cut 2 plywood pieces to 14 1/4″ x 9 1/4″. To attach the plywood backing to the sides, we opted to use 3/4″ wood screws. You can also use wood glue or a nail gun (if you have short enough nails) to attach the plywood pieces. Attach your cut pieces of plywood to the backs of the 1×2 and 1×3 pieces on each side of the vanity.
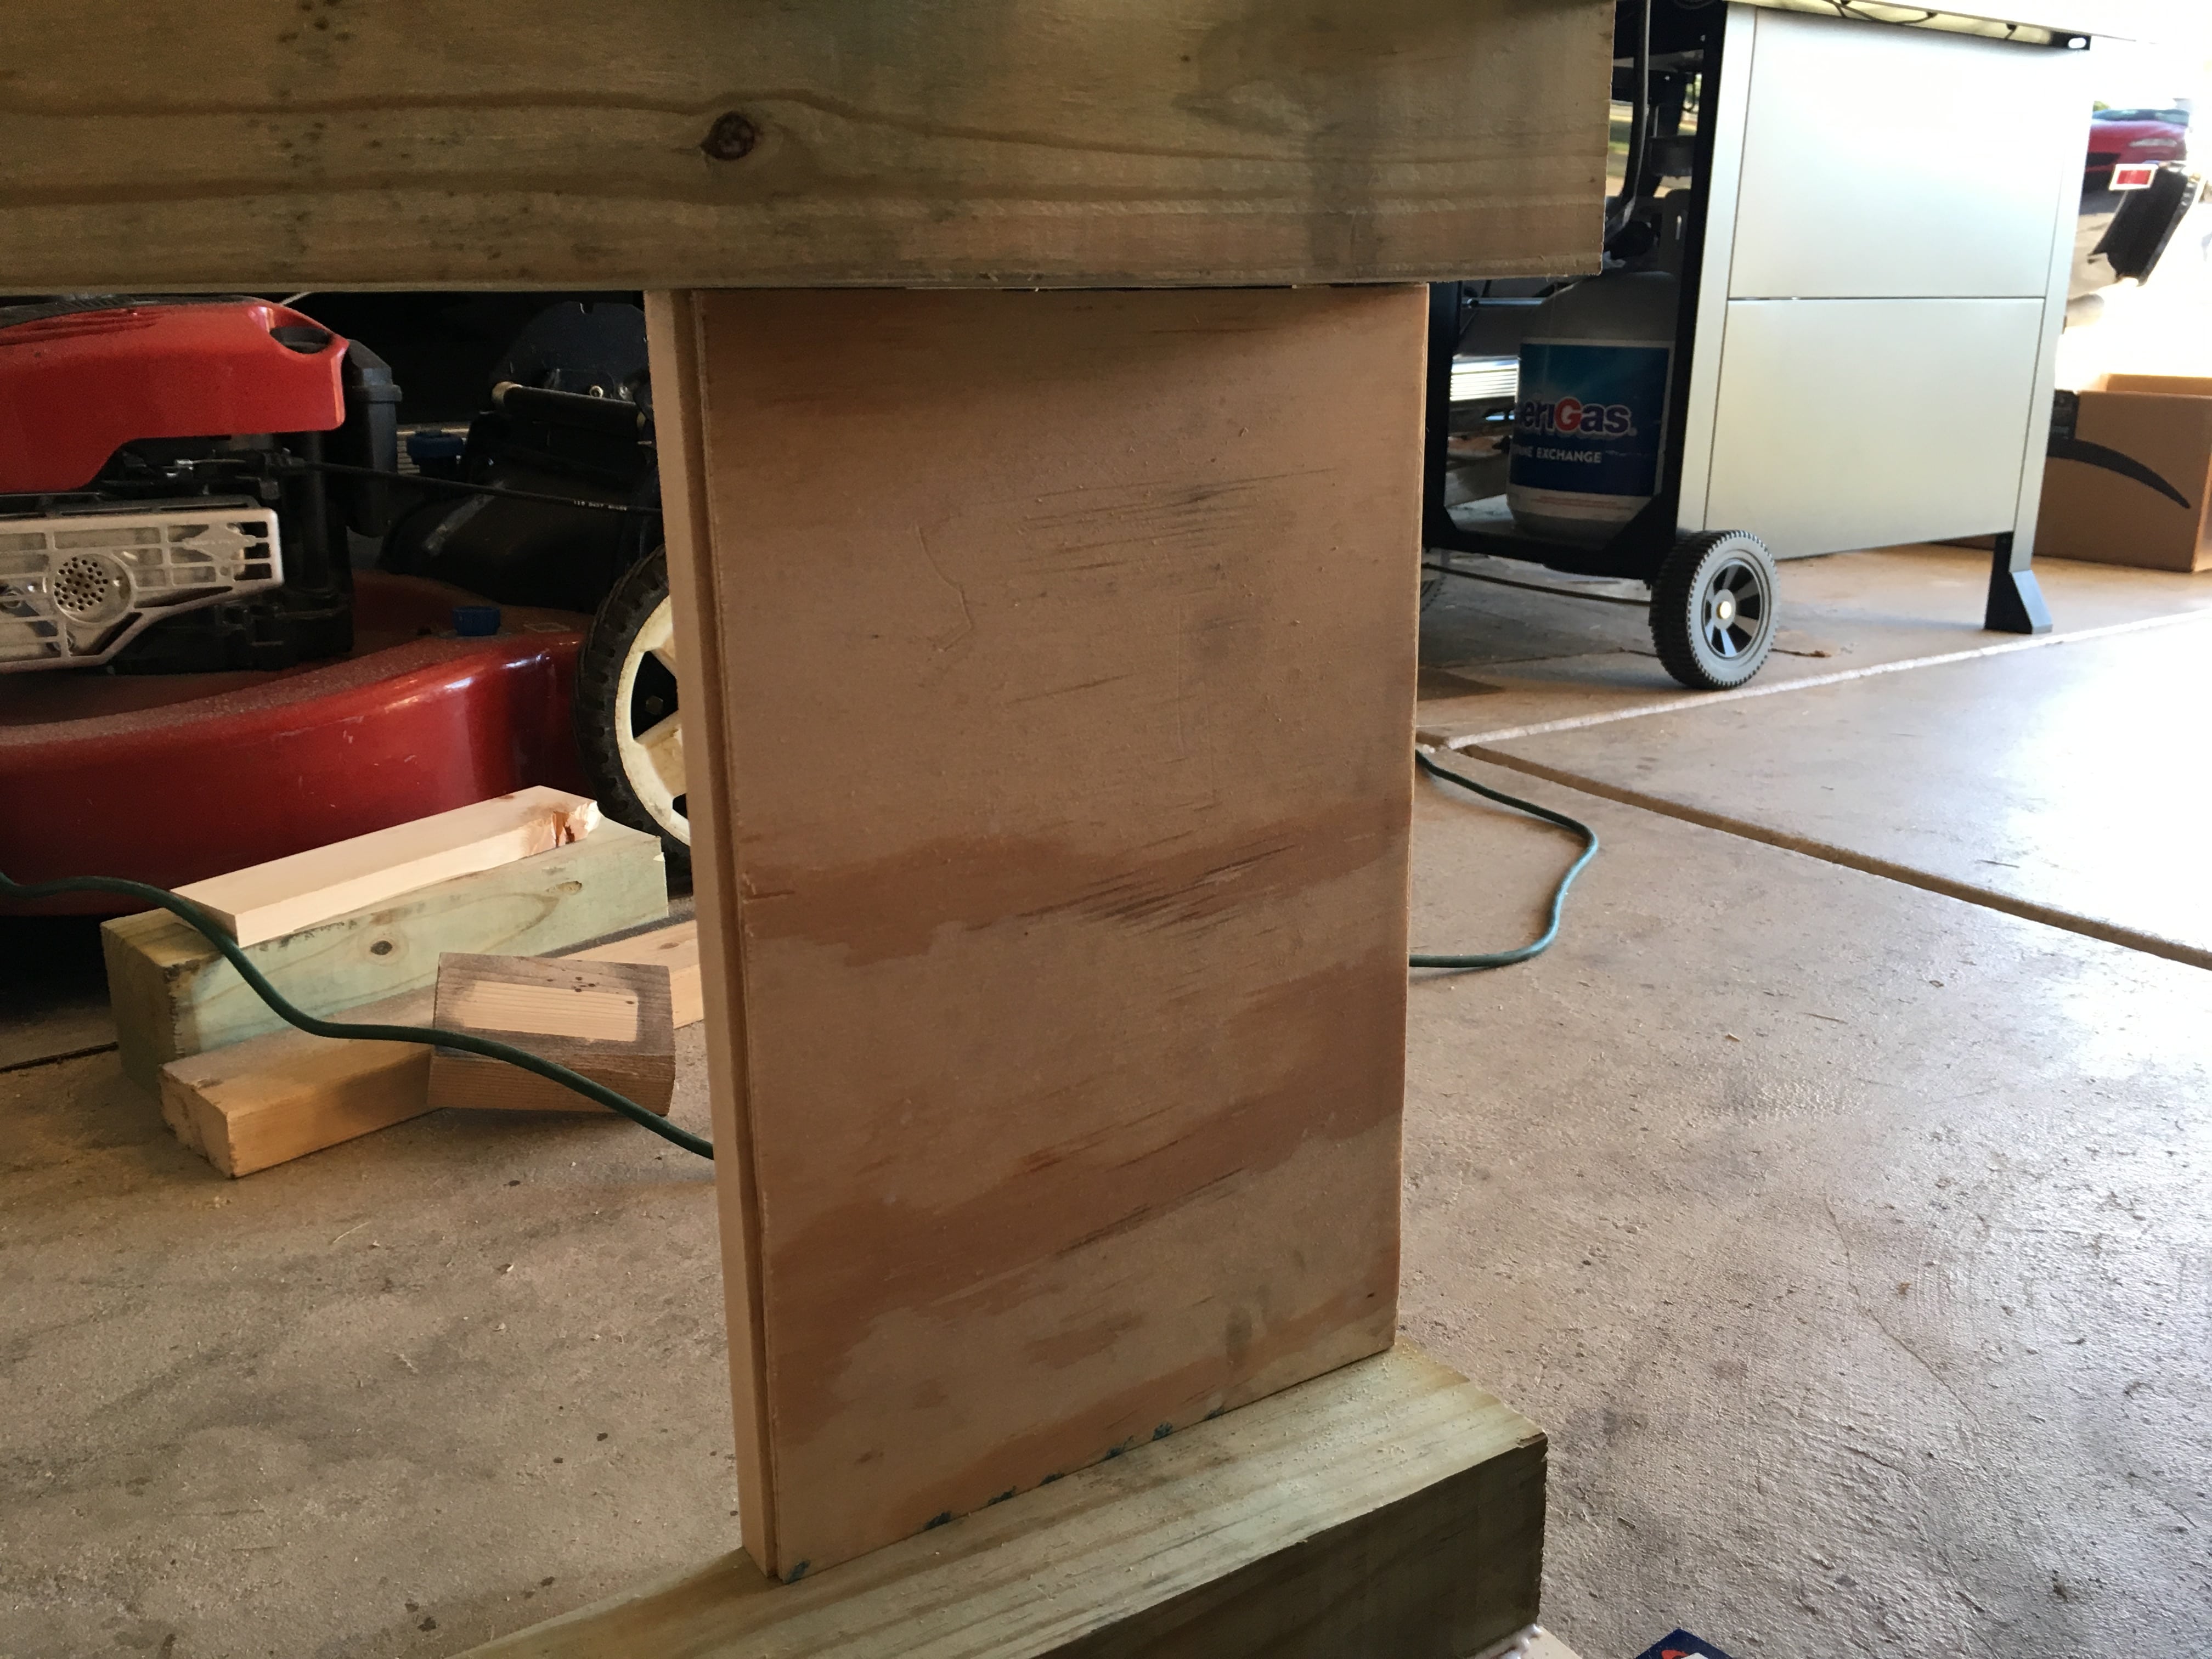
The photo above shows a dry fit of our plywood backing. Unfortunately, I don’t have a photo showing our 3/4″ screws attached. We used 4 at the top and 4 at the bottom, evenly spaced. There are no screws attached to the sides since there is nothing to attach to.
That’s easy enough so far, right?! Now, Let’s start attached the front and back cross supports.
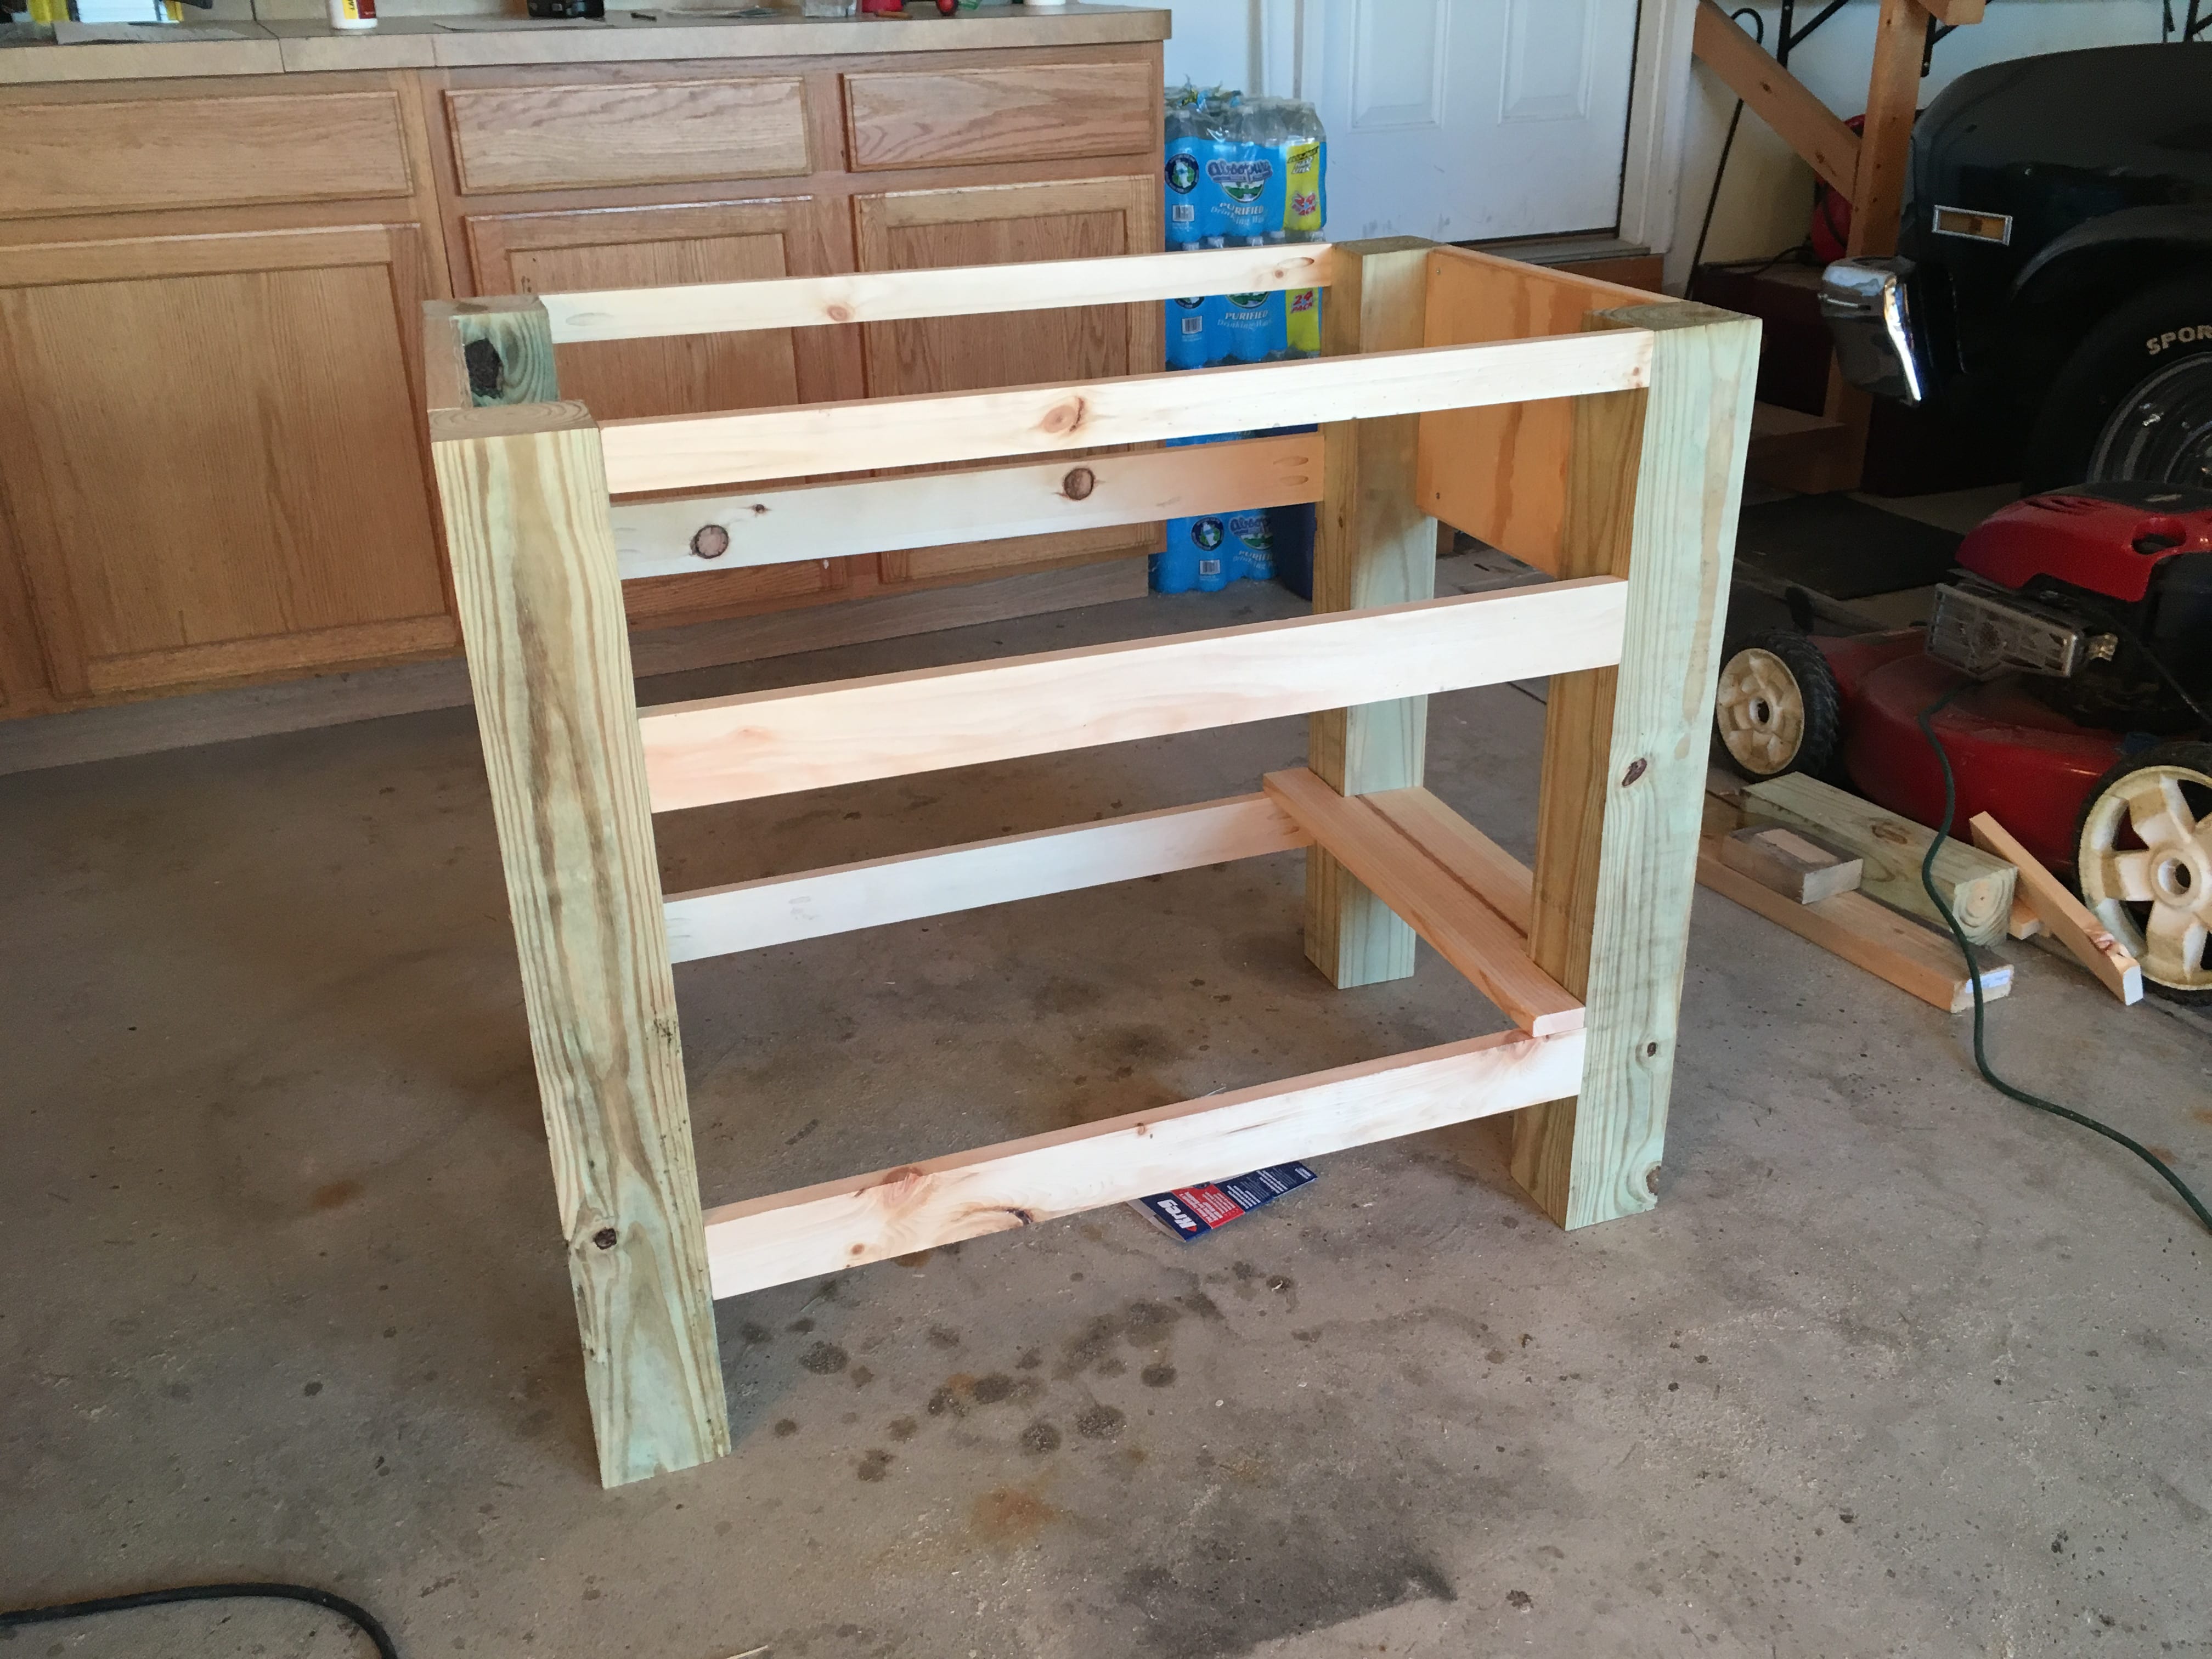
STEP 2 – Attach Front and Back Cross Supports of the Vanity
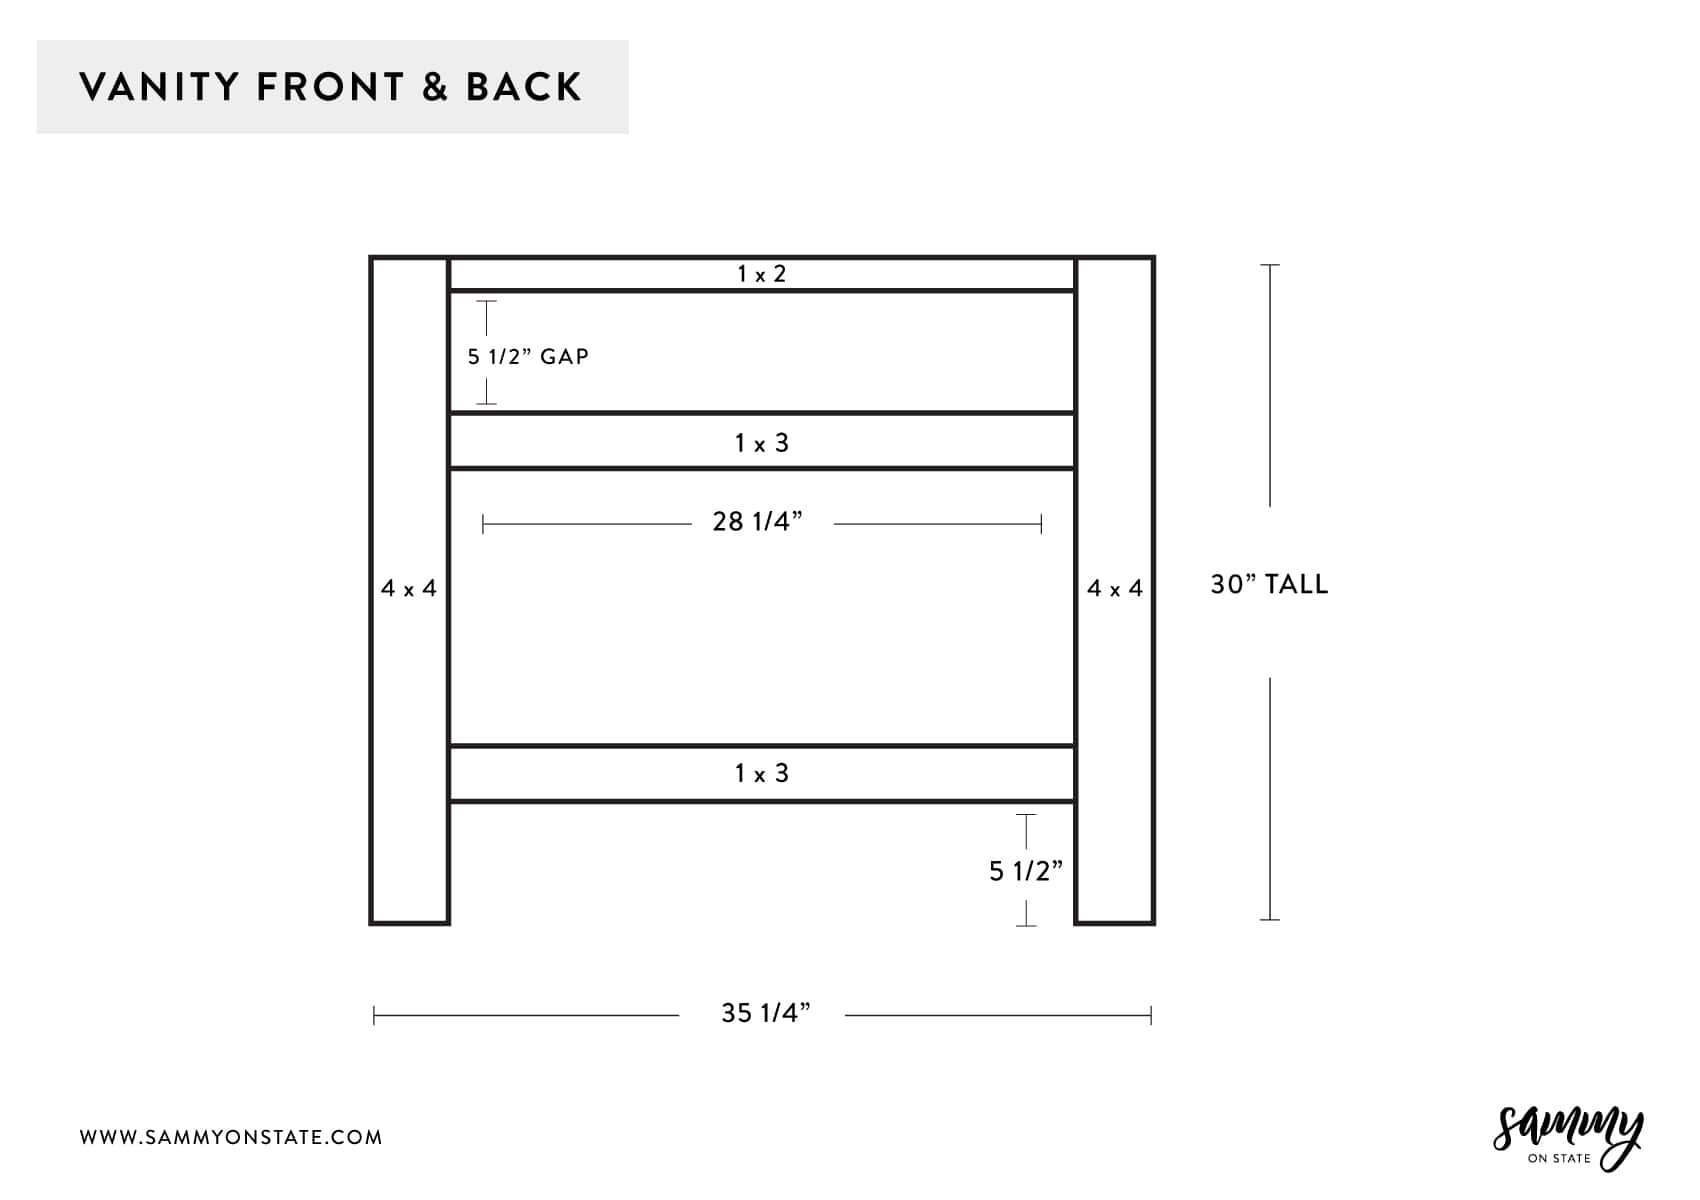
Since you have both sides of the bathroom vanity built, let’s connect them together by building the front and back cross support pieces. The following steps are essentially the exact same as the side piece steps above, but just a longer width.
Pieces that need to be cut for this step:
- 2 – 1x2s cut to 28 1/4″
- 4 – 1x3s cut to 28 1/4″
Again, you’ll need your Kreg Jig to drill pocket holes in all your 1x2s and 1x3s so you can attach them both of the vanity sides you just built.
Once you have all your pocket holes drilled out, grab one of the bathroom vanity sides you built and start to attach either the front or back (doesn’t matter which one you start with at this point since they are the same) 1x2s and 1x3s, just as we did for the sides. You should still be using the 2 1/2″ screws for all of these pieces as well.
All your cross pieces should be flush to the front of the 4x4s. In addition, the top 1×2 should be flush to the top of the 4×4. Grab one of the 1x3s and attach it 5 1/2″ from the bottom of the 1×2. This space created will be where the front of the drawer will be placed (if you are building the front first).
helpful and important tips
Double-check the width of your 1×6 board that will be the drawer front. It should be 5 1/2″ in size, but sometimes it could be 1/32th off, depending on your quality of wood.
You could always cut your front drawer piece and use it as a “spacer” when attaching your 1×3 piece. You don’t want it to be too tight of a space, because you want to be able to easily pullout that 1×6 since it will be your drawer. Adding an extra 1/16th of space, wouldn’t be the worst idea.
Lastly, the bottom 1×3 is again for the shelf and should be 5 1/2″ from the floor (see the diagram at the beginning of this step).
Repeat the above steps to attach either the front or back (whichever one you have left) to the same vanity side you’ve been working with.
Attach the Other Built Vanity Side
Once you have all your front and back cross supports attached to the vanity side you’ve been working on, grab the other vanity side, line it up, and attach it to the cross supports. Again, make sure to double-check all your spacings to ensure they are all the same as on the other side.
Your bathroom vanity should actually, in fact, start to look like a vanity at this point!
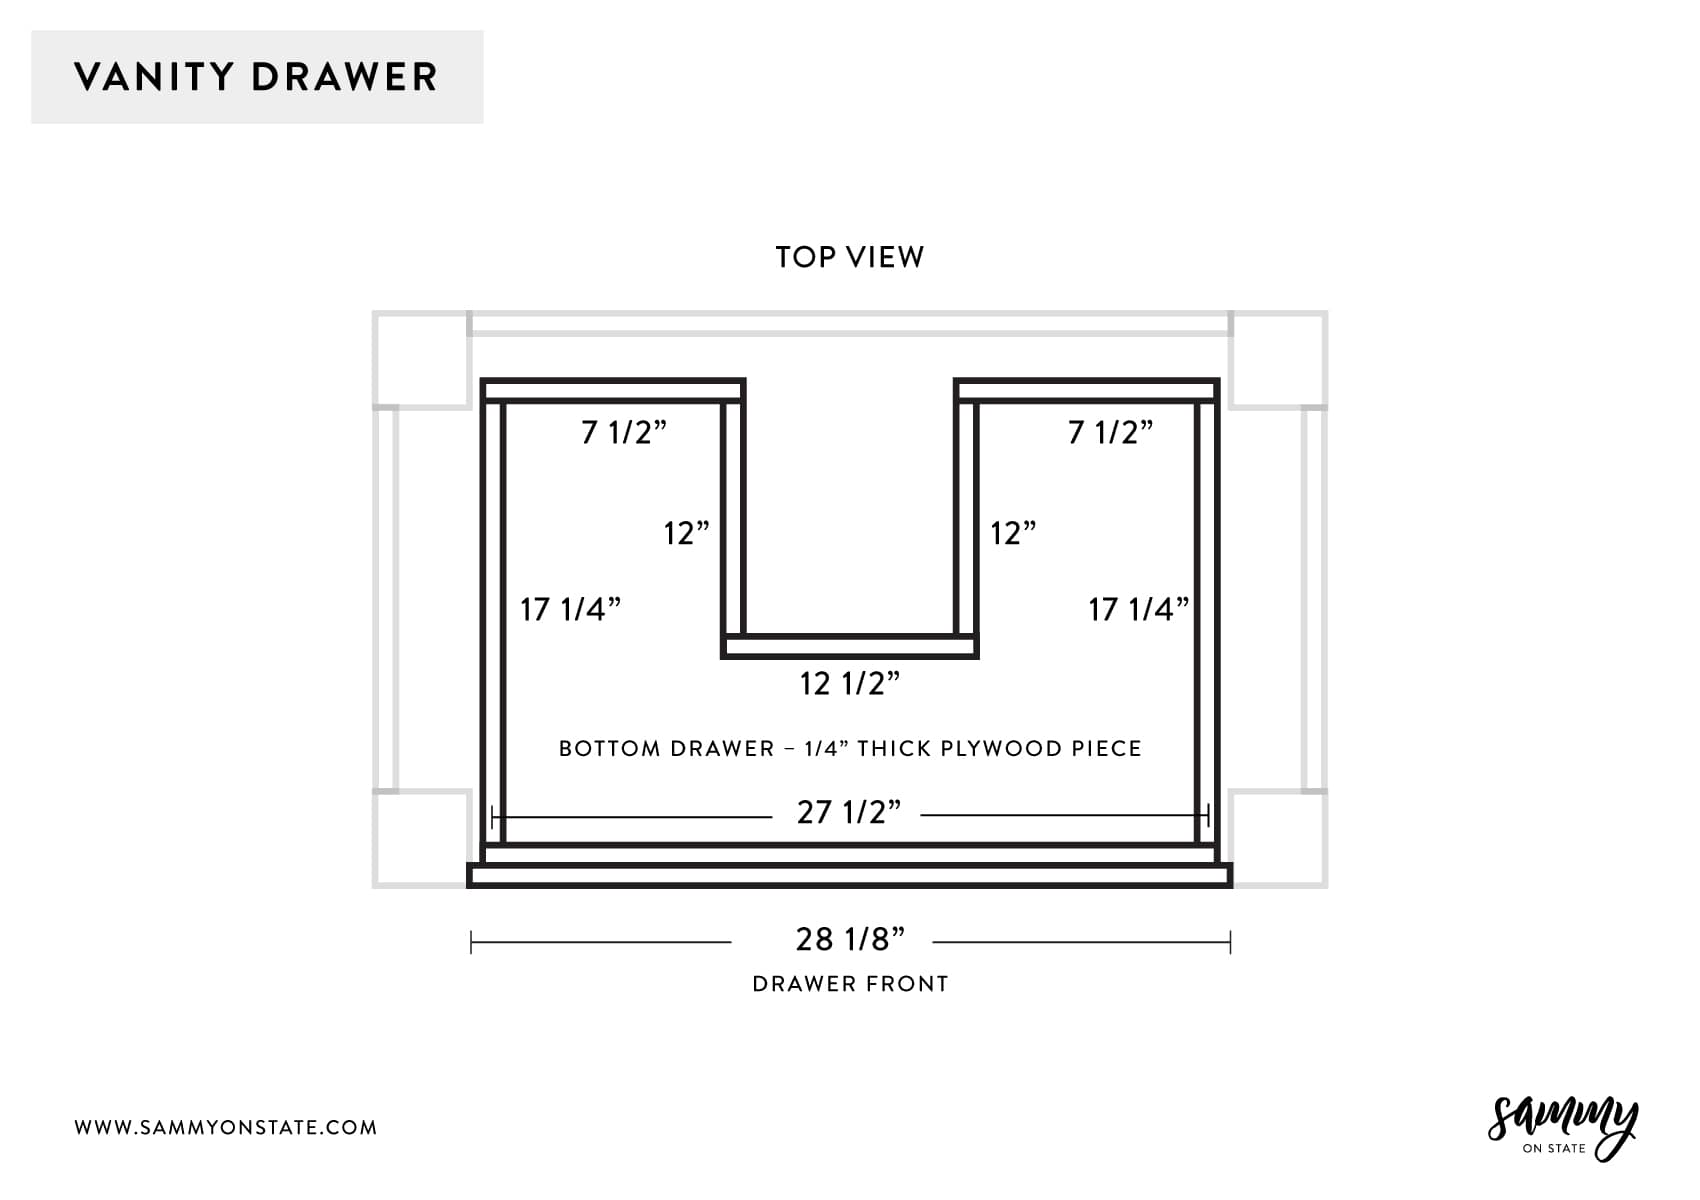
STEP 3 – Build the Drawer
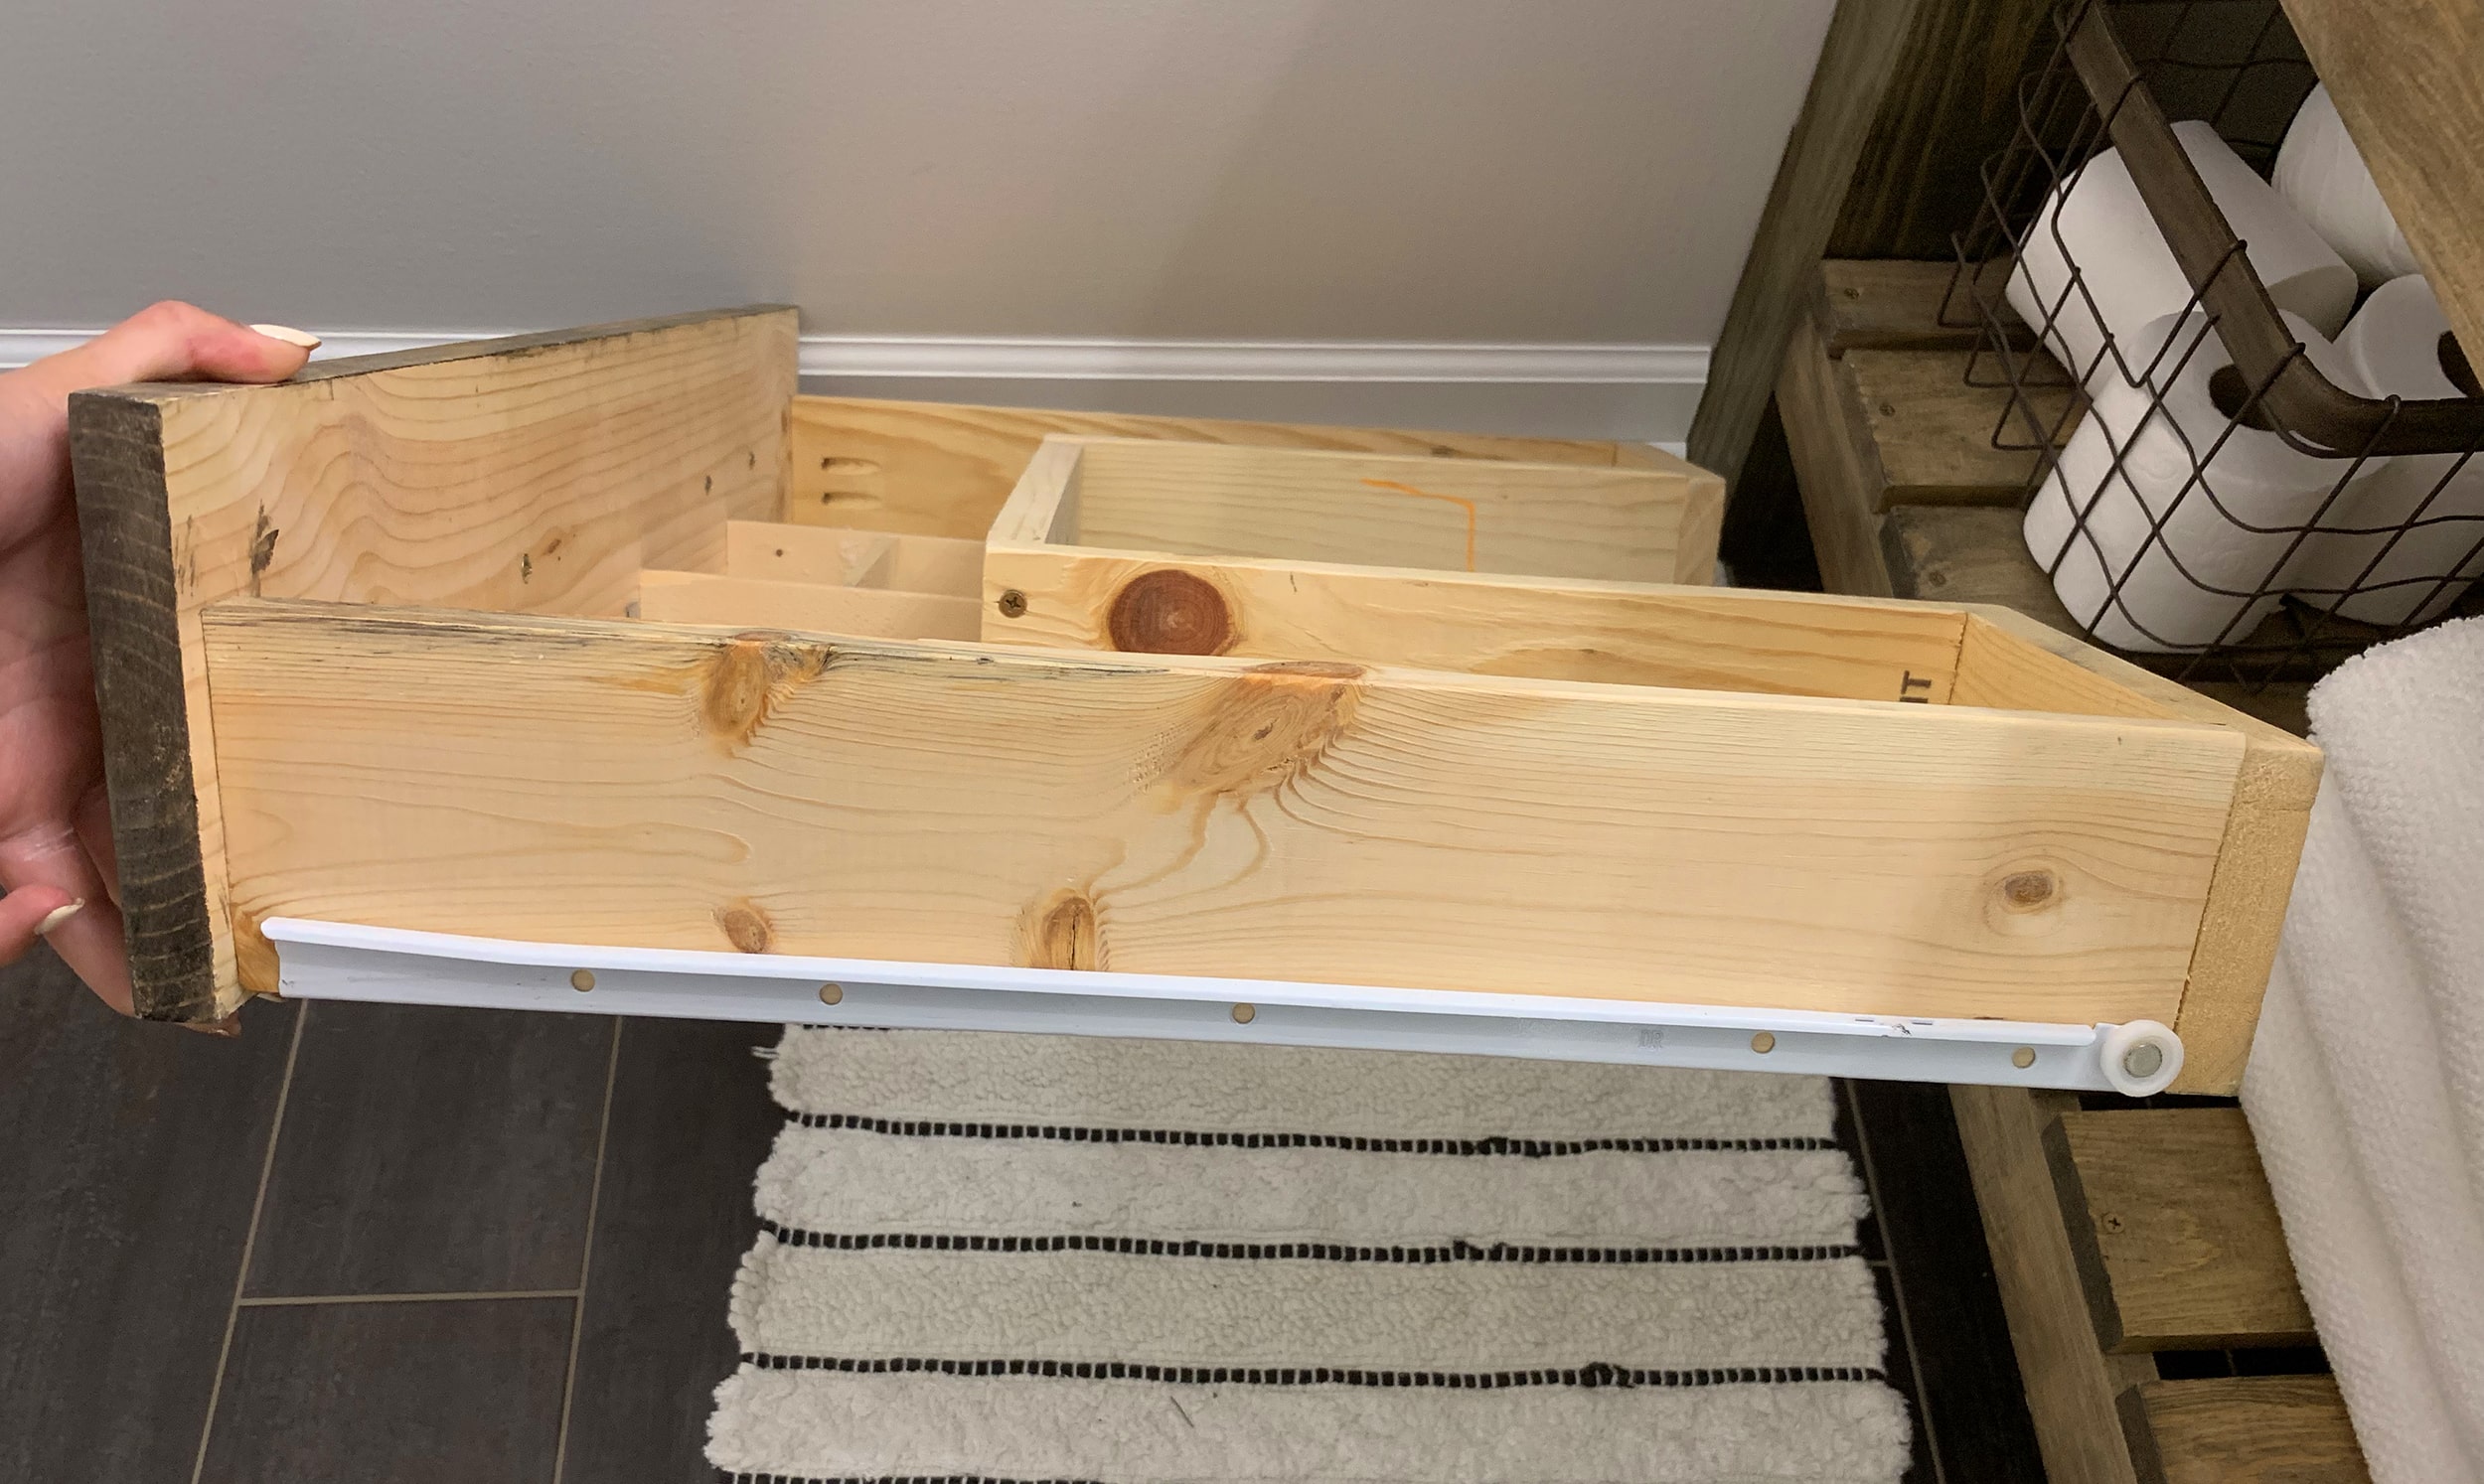
As I mentioned at the beginning of this post, this was the hardest part of the entire build. Mostly, because we really had no idea what we were doing. LOL. And since we didn’t know what we were really doing… I failed to take photos of this part of the vanity build. ? Let me show you what we did, and what NOT to do.

As you can see, we didn’t add a structural “front” to the drawer itself. And we didn’t know how to attach the bottom to the actual front piece of the drawer. Why didn’t we just attach an extra 1×4 (as shown in the diagram) to the front piece? Not sure. I must have had reasoning at the time… right? Since we couldn’t figure it out, we thought L brackets were the answer. I wasn’t kidding when I said it was janky!
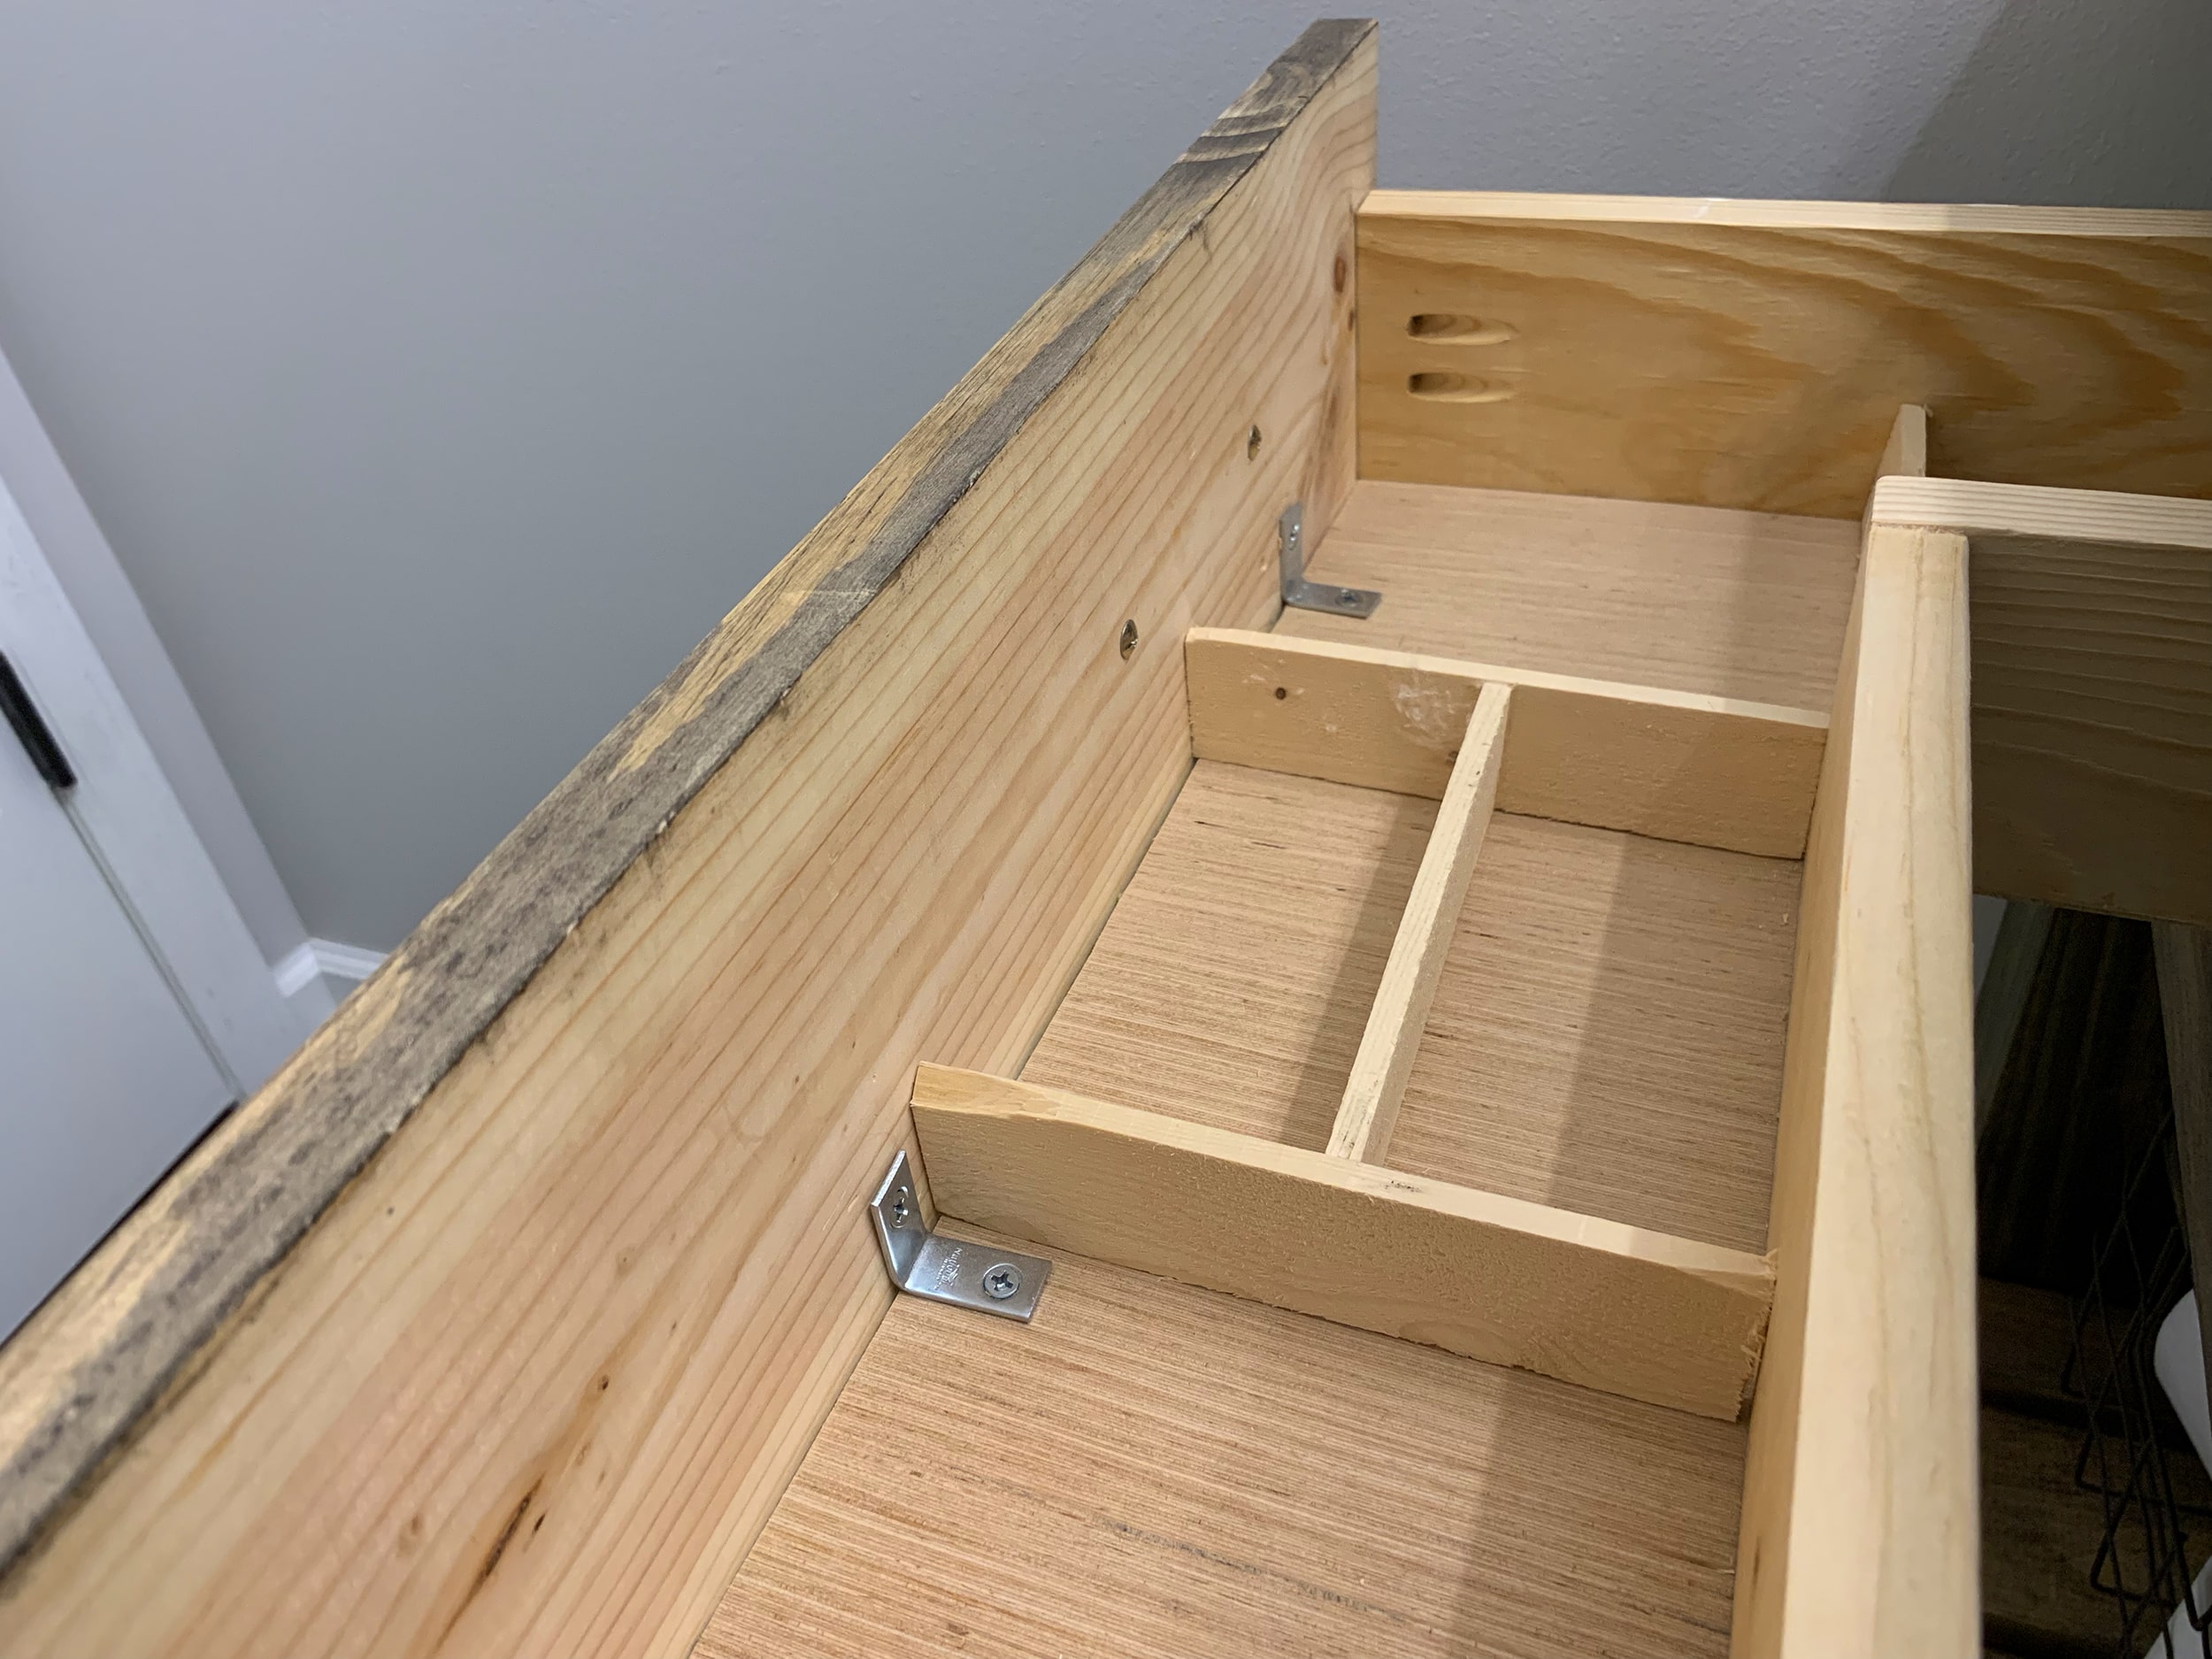
Even though the drawer works and hasn’t failed us a year later, it just looks horrible and isn’t the correct way to build it. Part of me wants to re-do it, but that requires more work. We’ll see 🙂
The drawer honestly wasn’t thatttt difficult to make and put together. It was just the front part that stumped us. And now, looking back at it, I don’t know why we didn’t just add the 1×4. We obviously weren’t thinking! So, the steps below are the CORRECT way of building the drawer.
How to Build the Drawer
Pieces that need to be cut for the drawer:
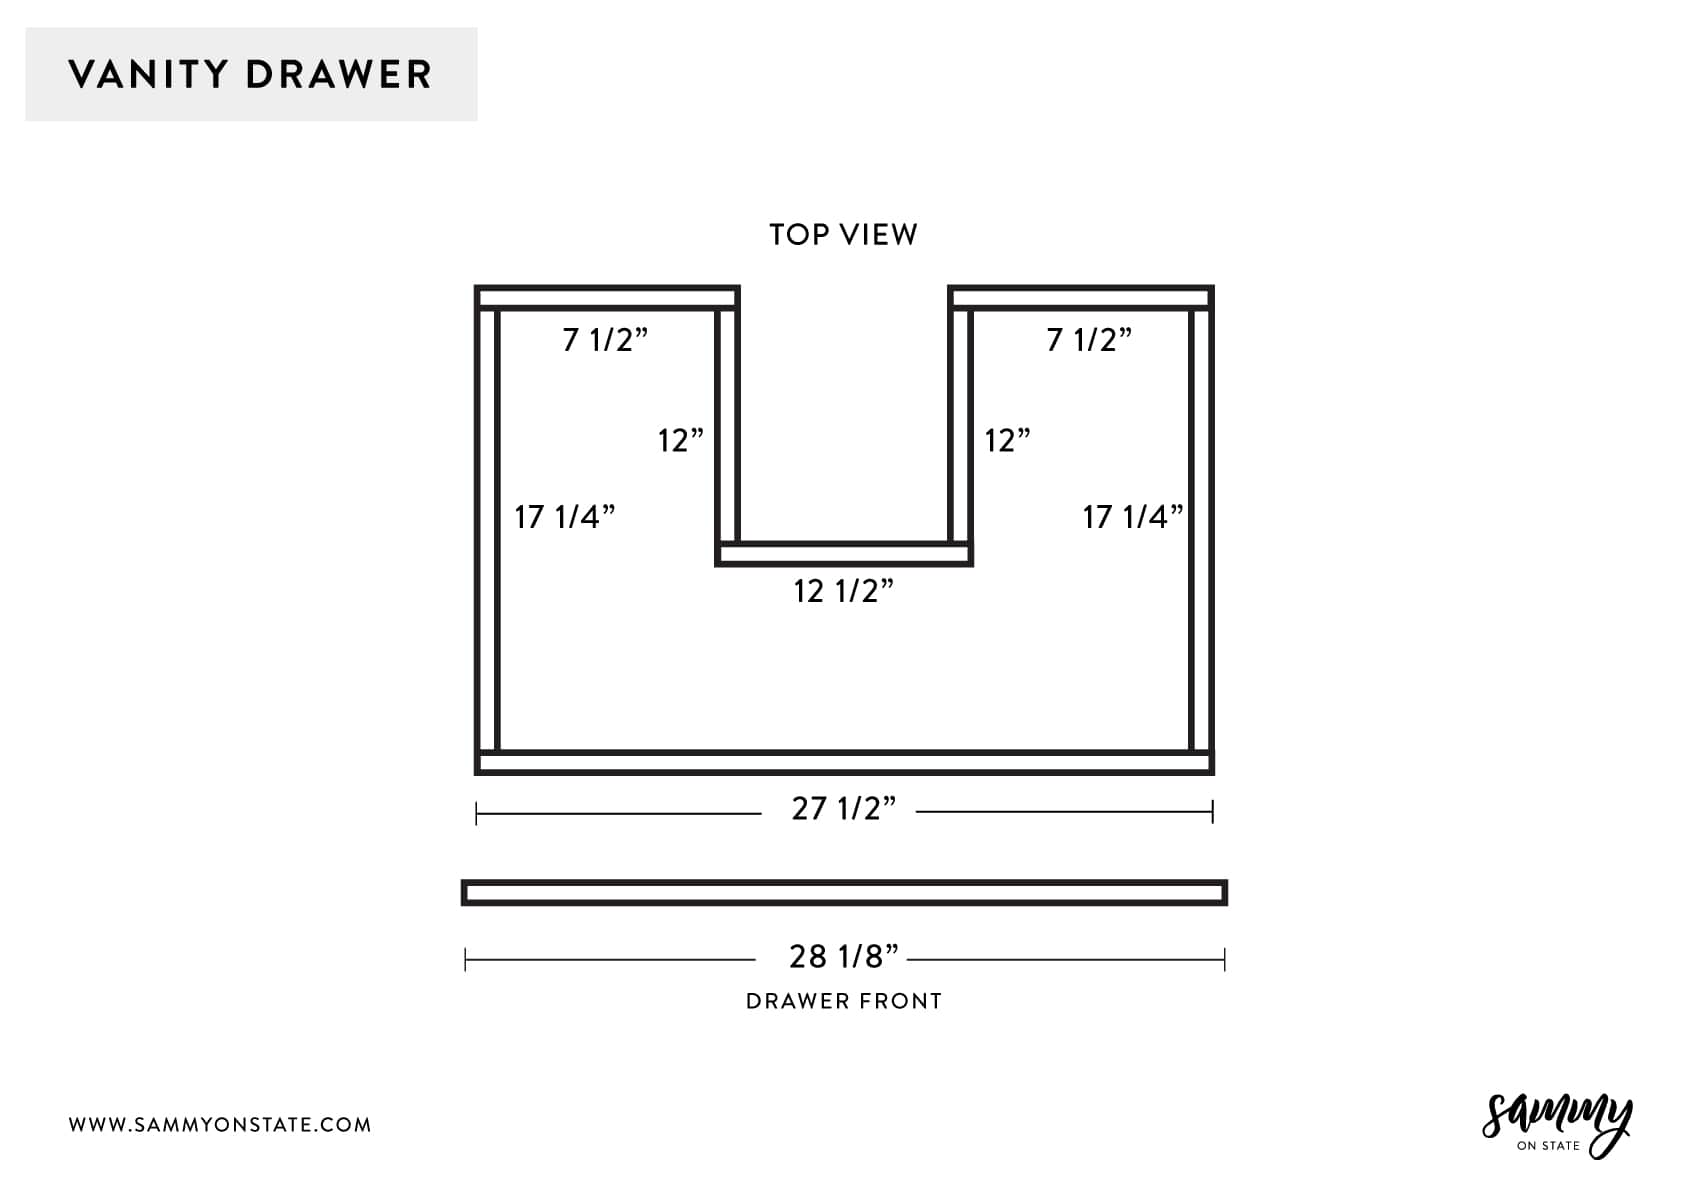
- 1 – 1×6 cut to 28 1/8″ (the drawer face – if you haven’t cut it yet)
- 2 – 1x4s cut to 7 1/2″
- 2 – 1x4s cut to 17 1/4″
- 1 – 1×4 cut to 27 1/2″
- 2 – 1x4s cut to 12″
- 1 – 1×4 cut to 12 1/2″
- Drawer bottom cut from 1/4″ plywood
important tip
The reason the drawer is a ‘U’ shape is because of the sink plumbing. We did a dry fit of the countertop and sink before we built the drawer. We needed to make sure the front part of the drawer cleared the drainpipe when the drawer was fully pushed in. All plumbing is different, so make sure you check the measurements and placement of your drain plumbing before making this drawer. You may just have to adjust some of the measurements we have to make it work for your sink and plumbing.
Use the 1 1/4″ screws to attach all the pieces together. You can use your Kreg Jig to attach all the pieces for a cleaner look, or you can just screw into the ends of the pieces (which is what we did).
However, since you’ll be attaching the front 1×4 of the drawer, to the drawer facepiece (the 1×6), you should use pocket holes to attach the 2 sides (17 1/4″ pieces), to the front piece (27 1/2″ 1×4) so the screw heads do not get in the way of attaching the entire drawer to the drawer face.

Building the Bottom of the Drawer
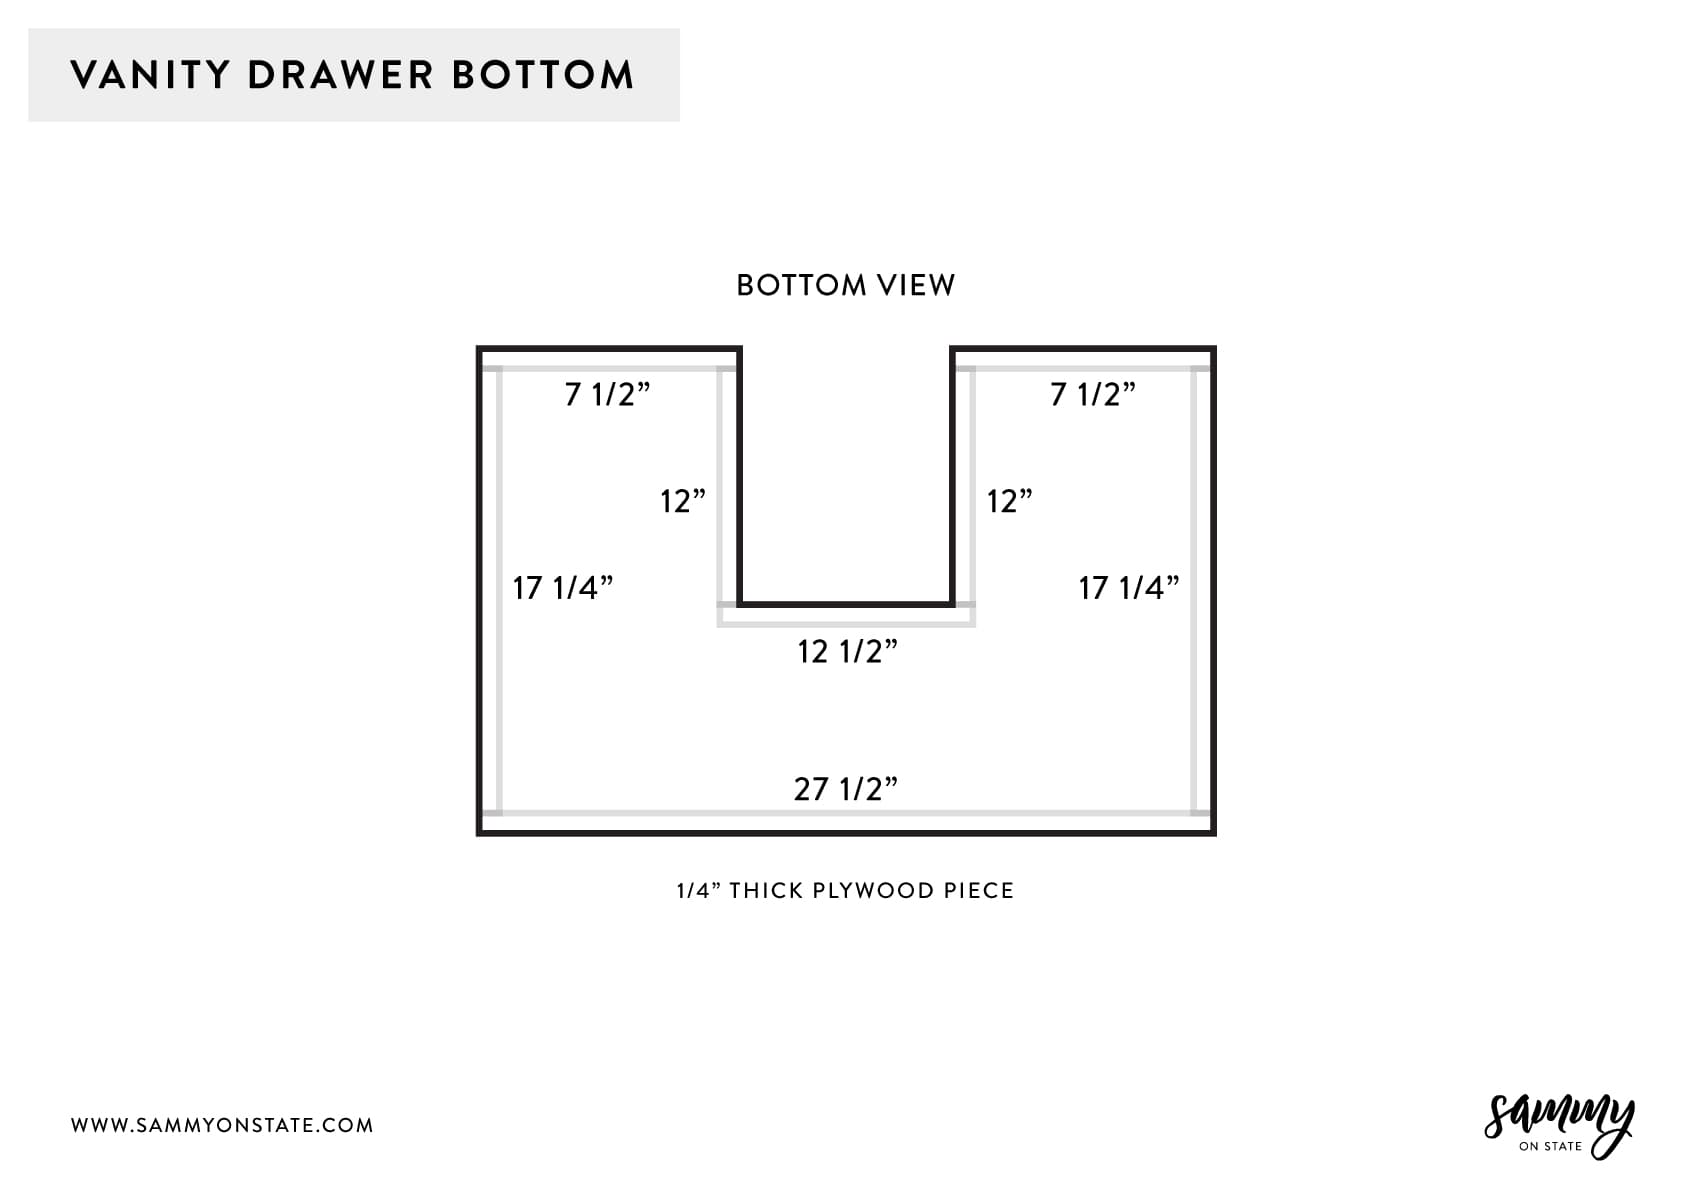
Once you’ve built the frame of the drawer, it’s time to cut the bottom piece for the drawer! You’ll need a jigsaw to cut the drawer bottom, and your nail gun to attach it onto the sides of the drawer.
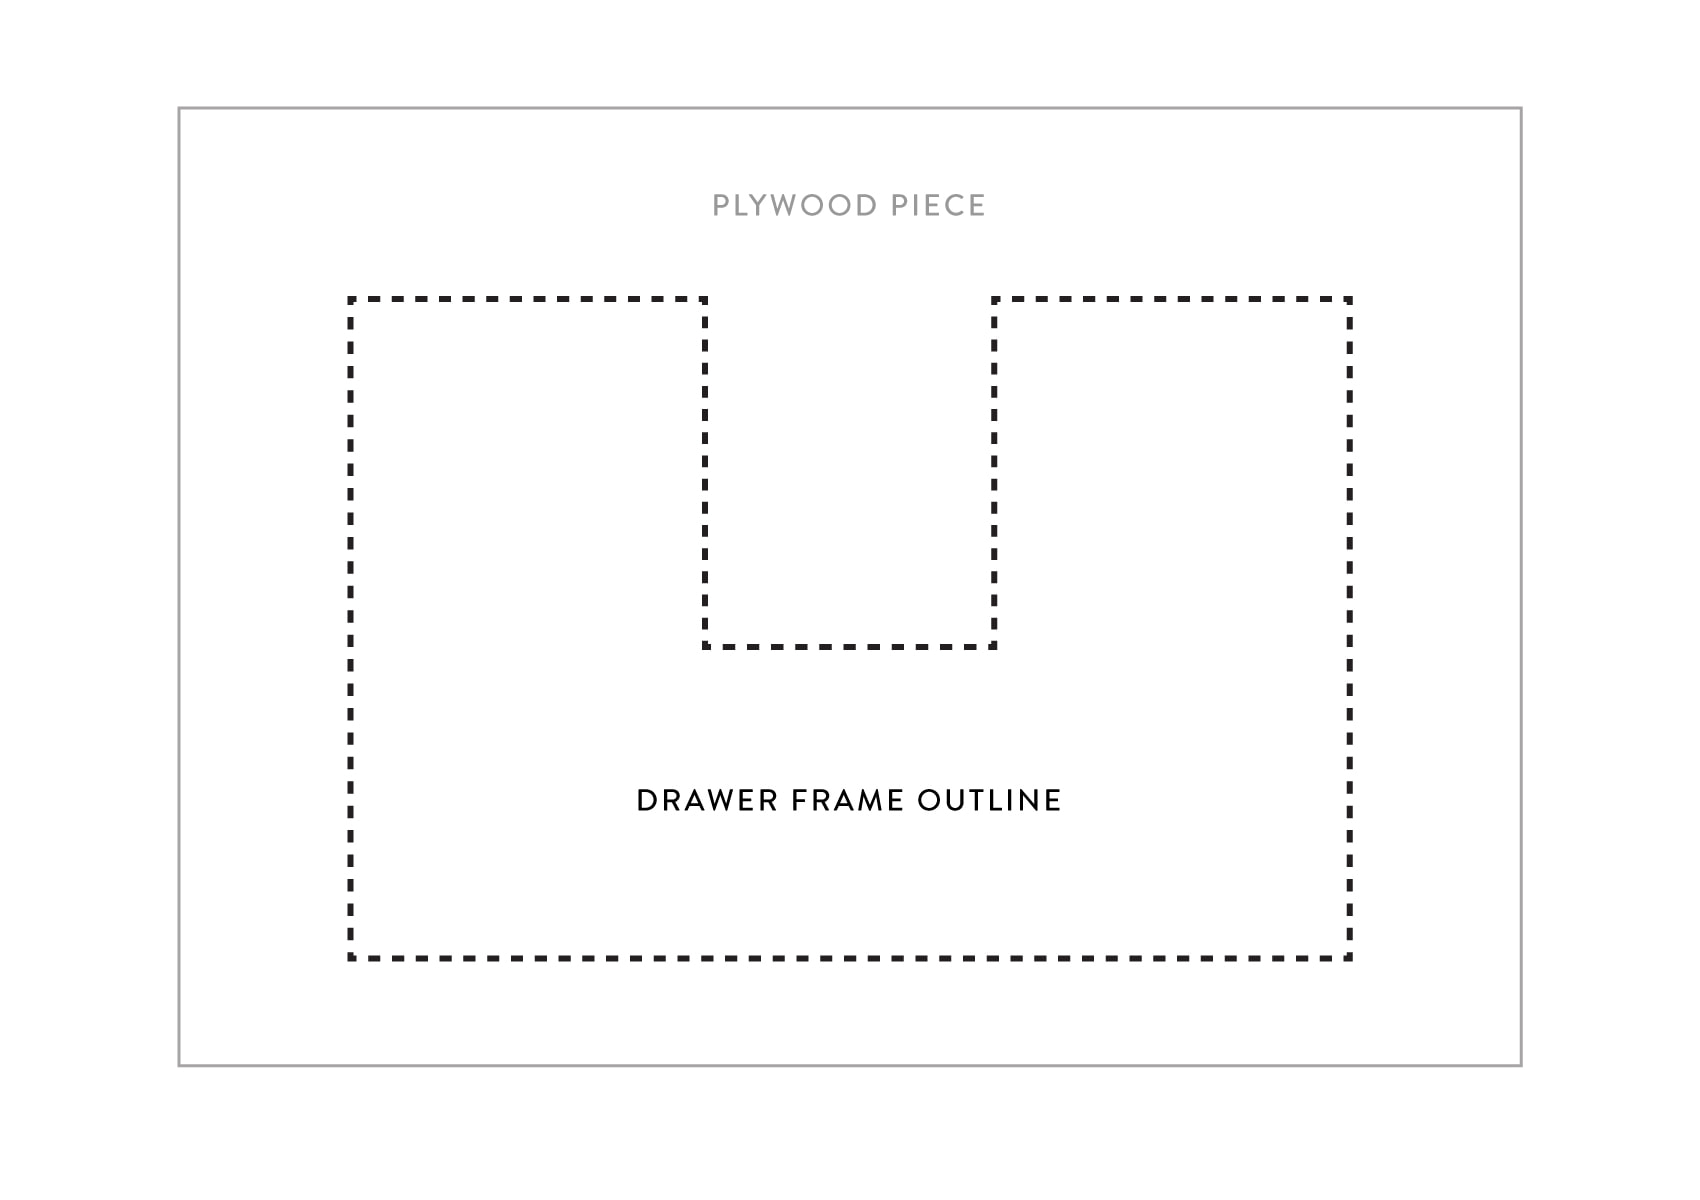
Take the drawer frame that you built and set it on top of your plywood. Use your pencil and trace around the outside of the drawer onto the plywood piece. Take the drawer off the plywood and cut the plywood piece based on the outline of the drawer you just created. Make sure to cut in the inside of your line using your jigsaw.
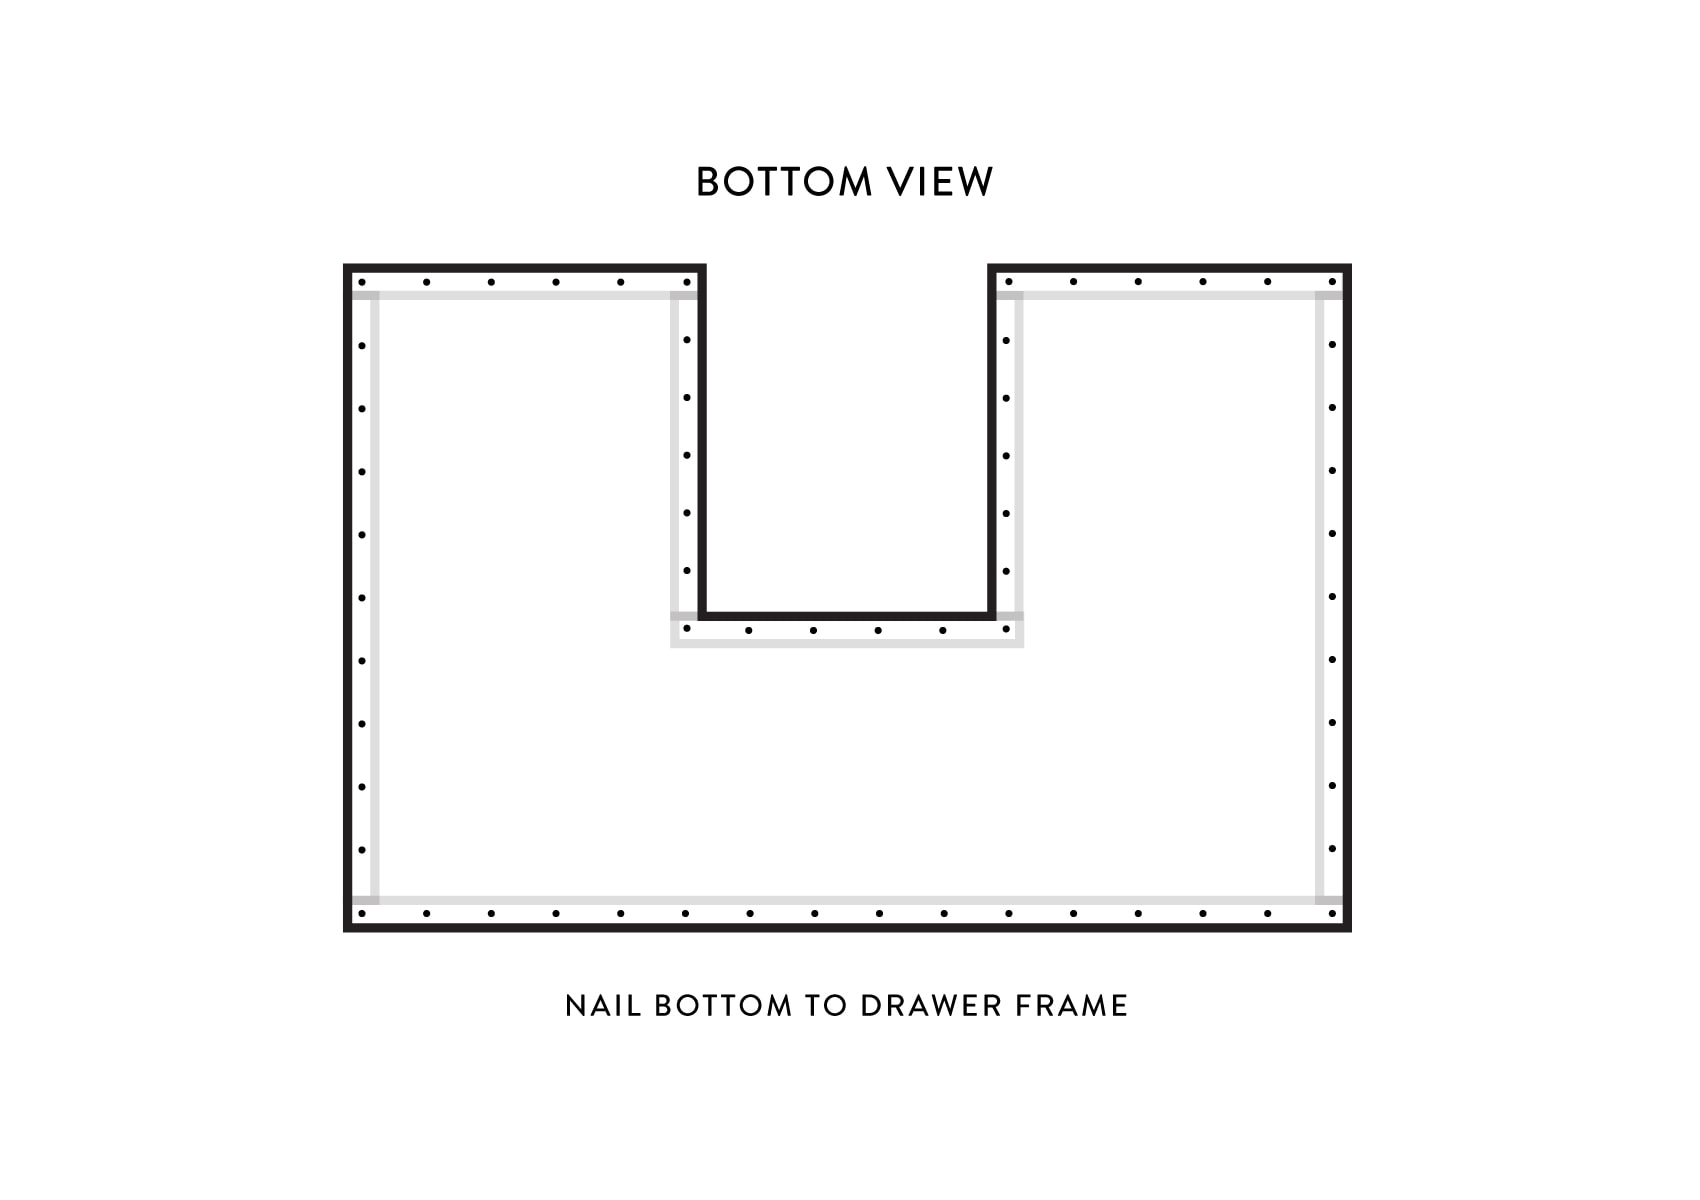
Once you have your bottom piece cut, grab the drawer frame and nail the bottom onto the drawer using your nail gun.
Attach the Drawer to Drawer Front Face
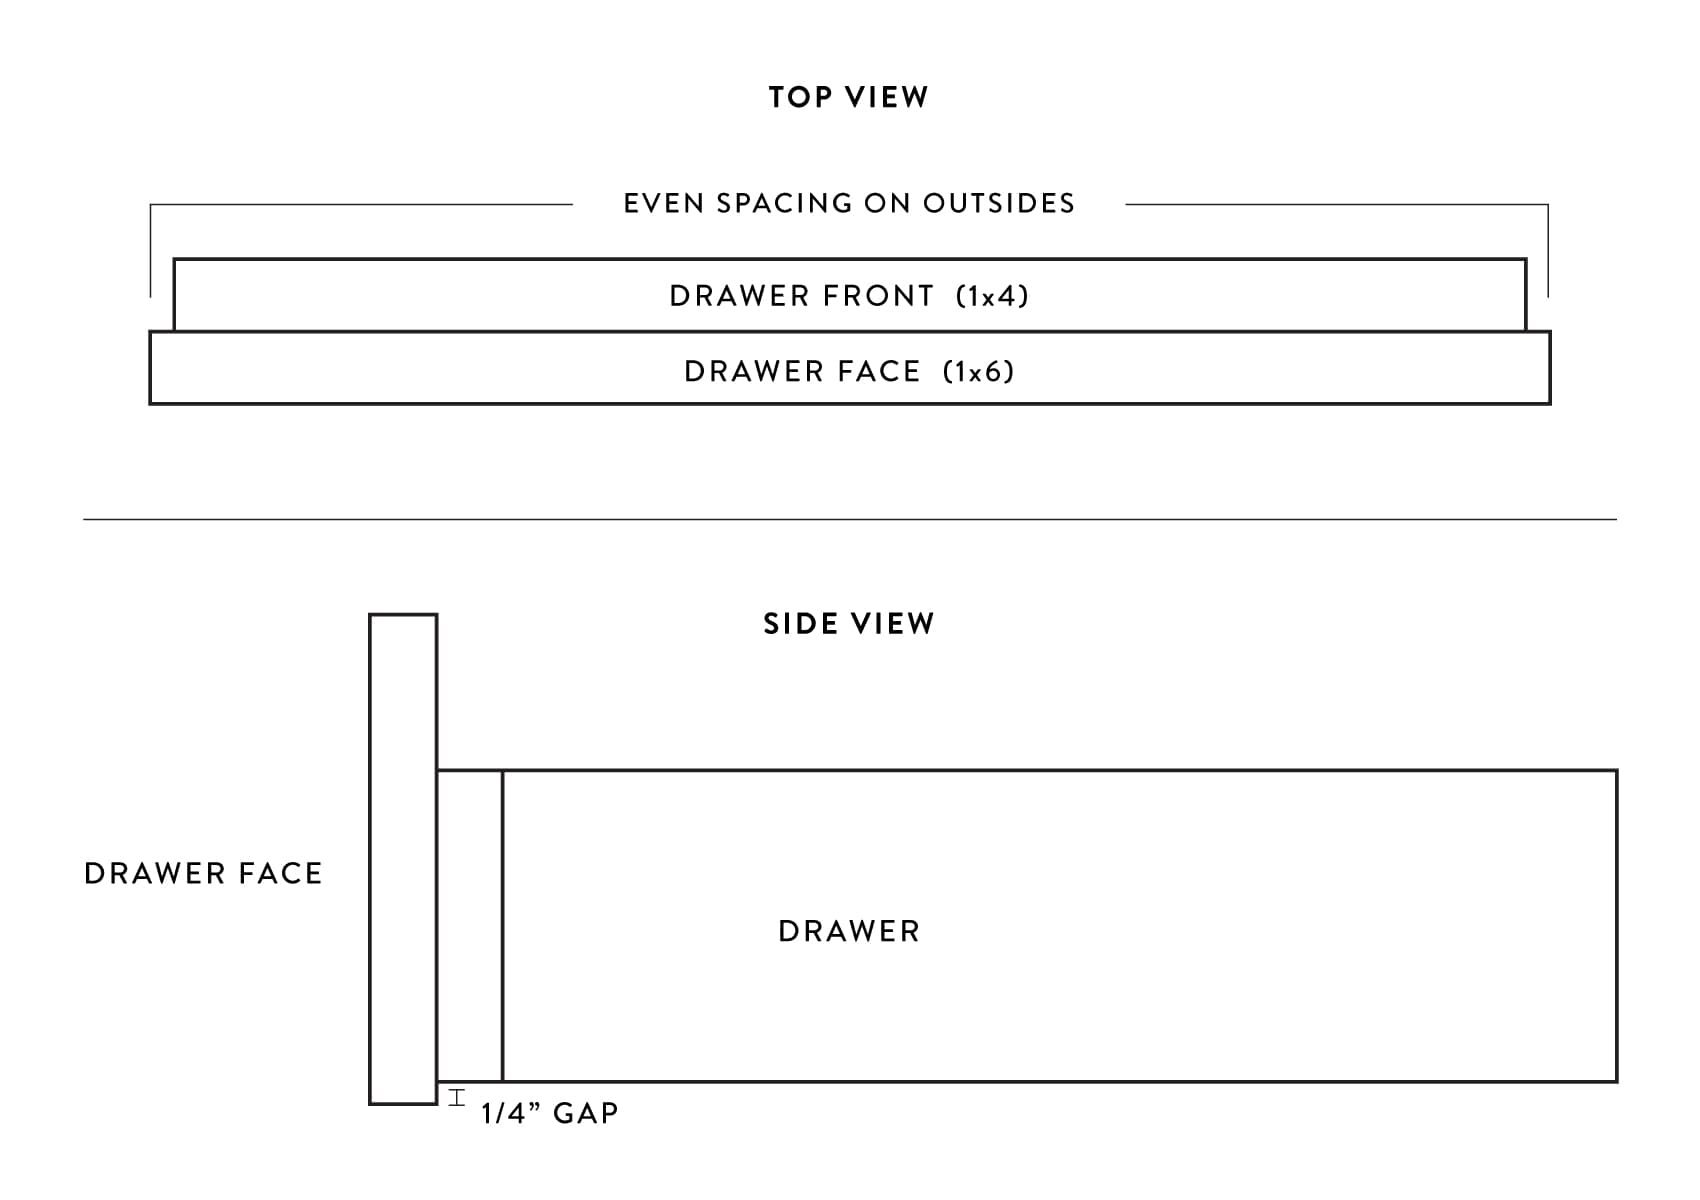
Once you’ve completed the drawer build, attach it to the front 1×6 piece using 1 1/4″ screws. Position your drawer towards the bottom of the facepiece, leaving 1/4″ space from the bottom of the drawer face. Also, make sure your drawer facepiece is centered and evenly spaced on the drawer itself.
STEP 5 – Install the Drawer to the Bathroom Vanity
We used this 18″ Side Mount Drawer Slide. Start by attaching the roller part of the slides to the bottom of the drawer, using the screws that were provided with the slides.
Once you have the slide rollers added to the bottom of the drawer, grab the other part of the slide mounts (for the sides of the vanity) and slide the drawer into the side mounts.
Take the entire drawer with the mounts (an extra set of hands will be helpful here!), and place it into the vanity to make your marks on the 4x4s for where you should install it.
Grab your level and make sure both sides are level! Once everything looks level and correct with placement, take the other screws that came with the slides and install the side mounts onto the 4x4s.
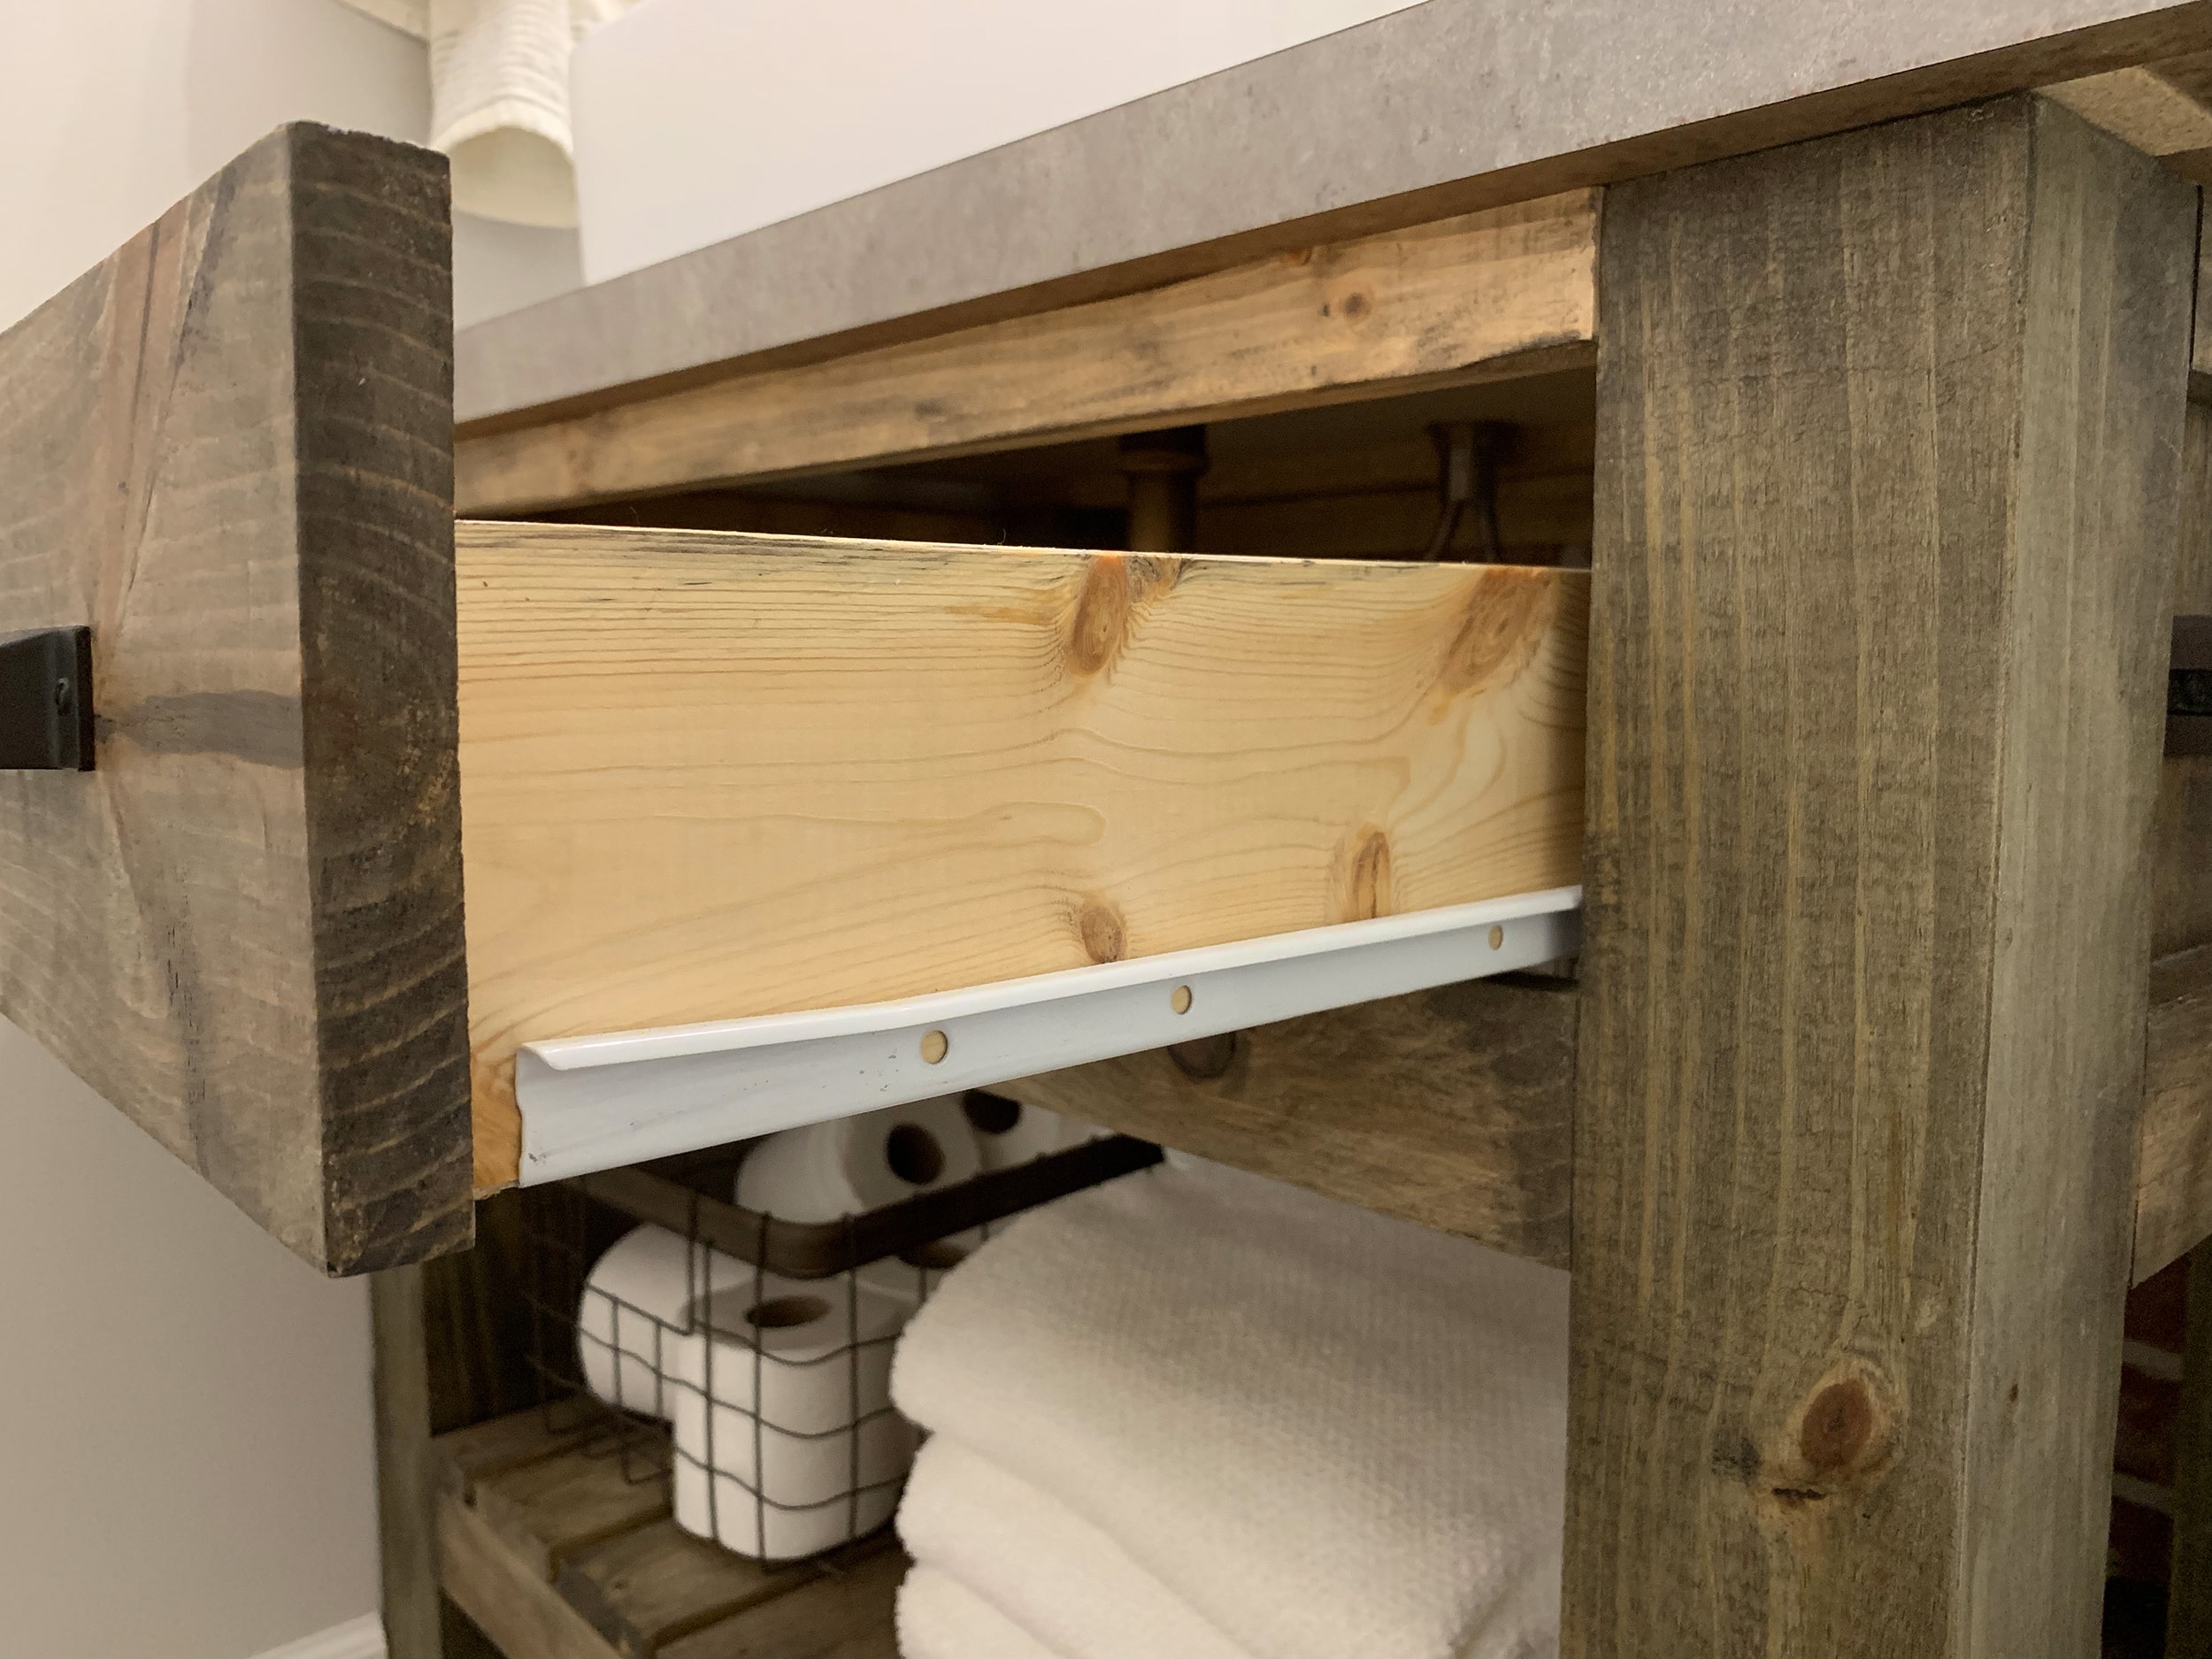
Once you install your side mounts to the 4×4, slide the drawer into place!
STEP 6 – Cut and Attach Bottom Shelf Pieces
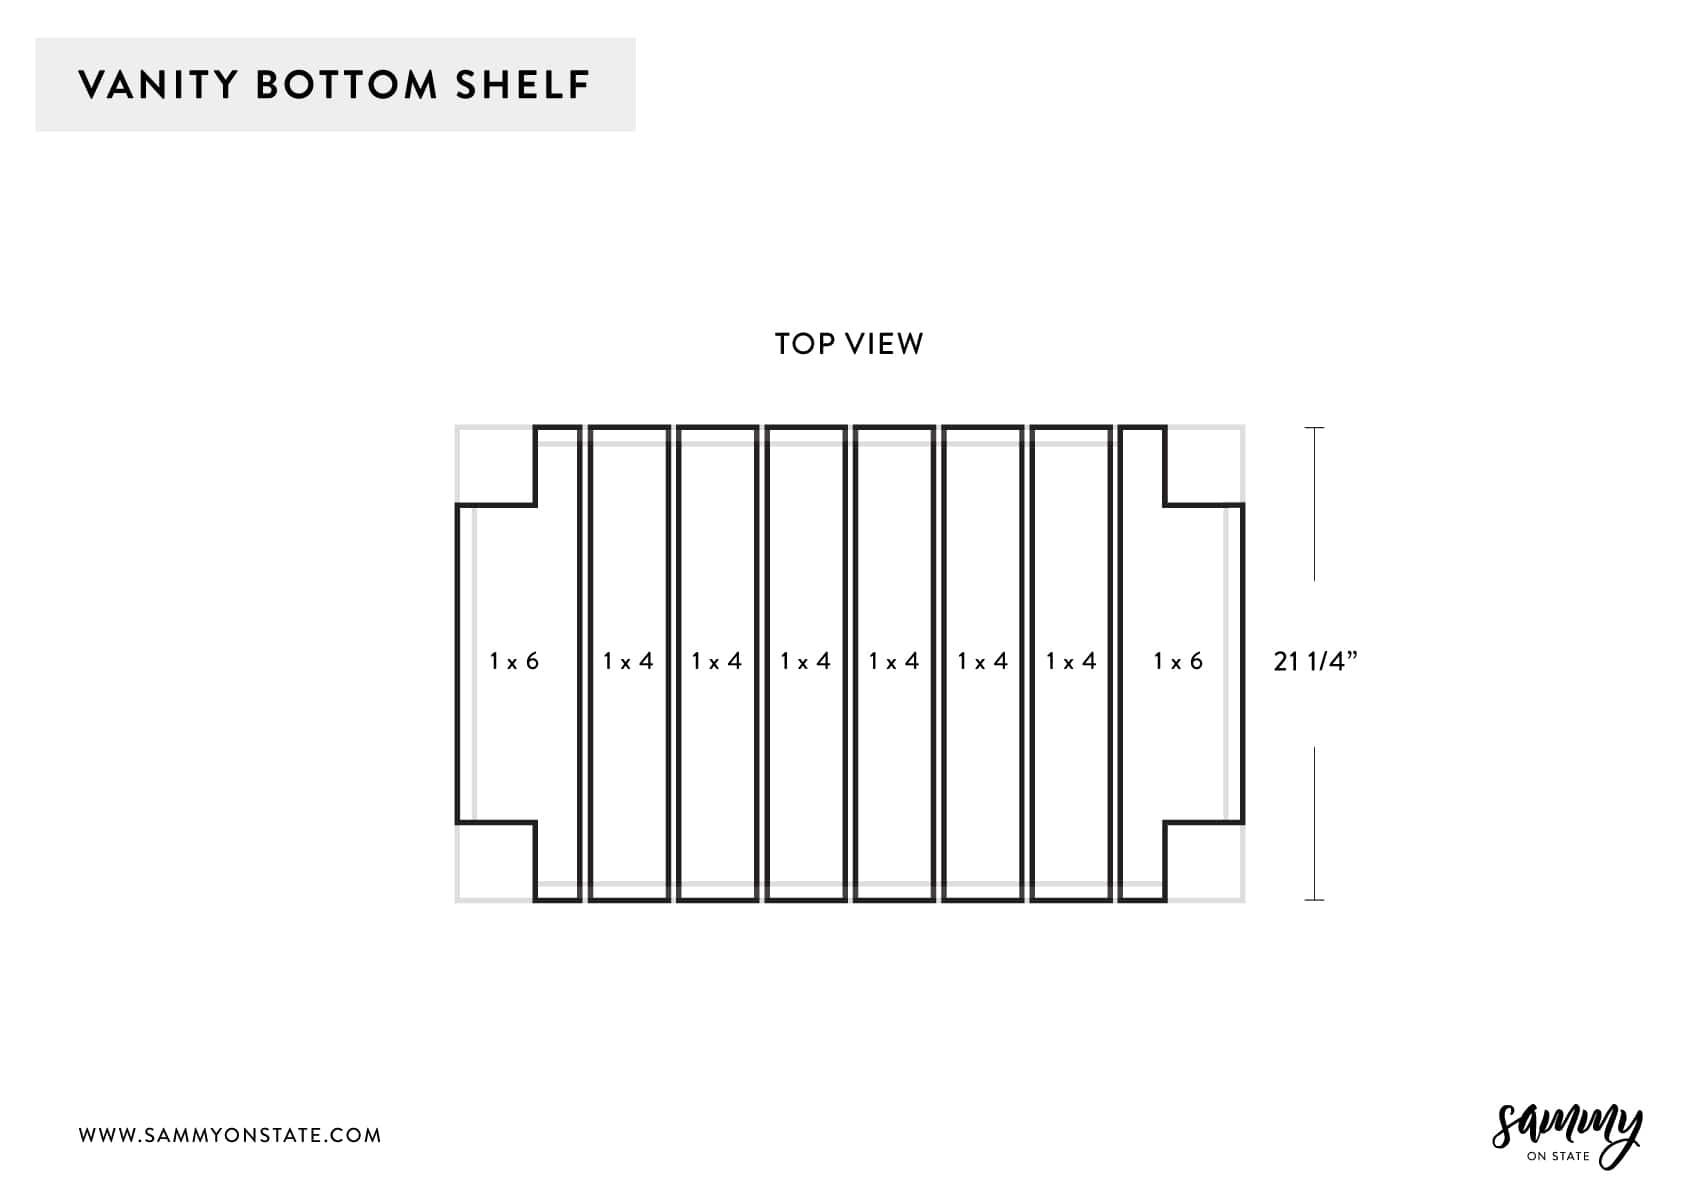
The final step! Cutting and attaching the shelf top pieces.
Pieces that need to be cut for the shelf:
- 6 – 1x4s cut to 21 1/4″
- 2 – 1x6s cut to 21 1/4″
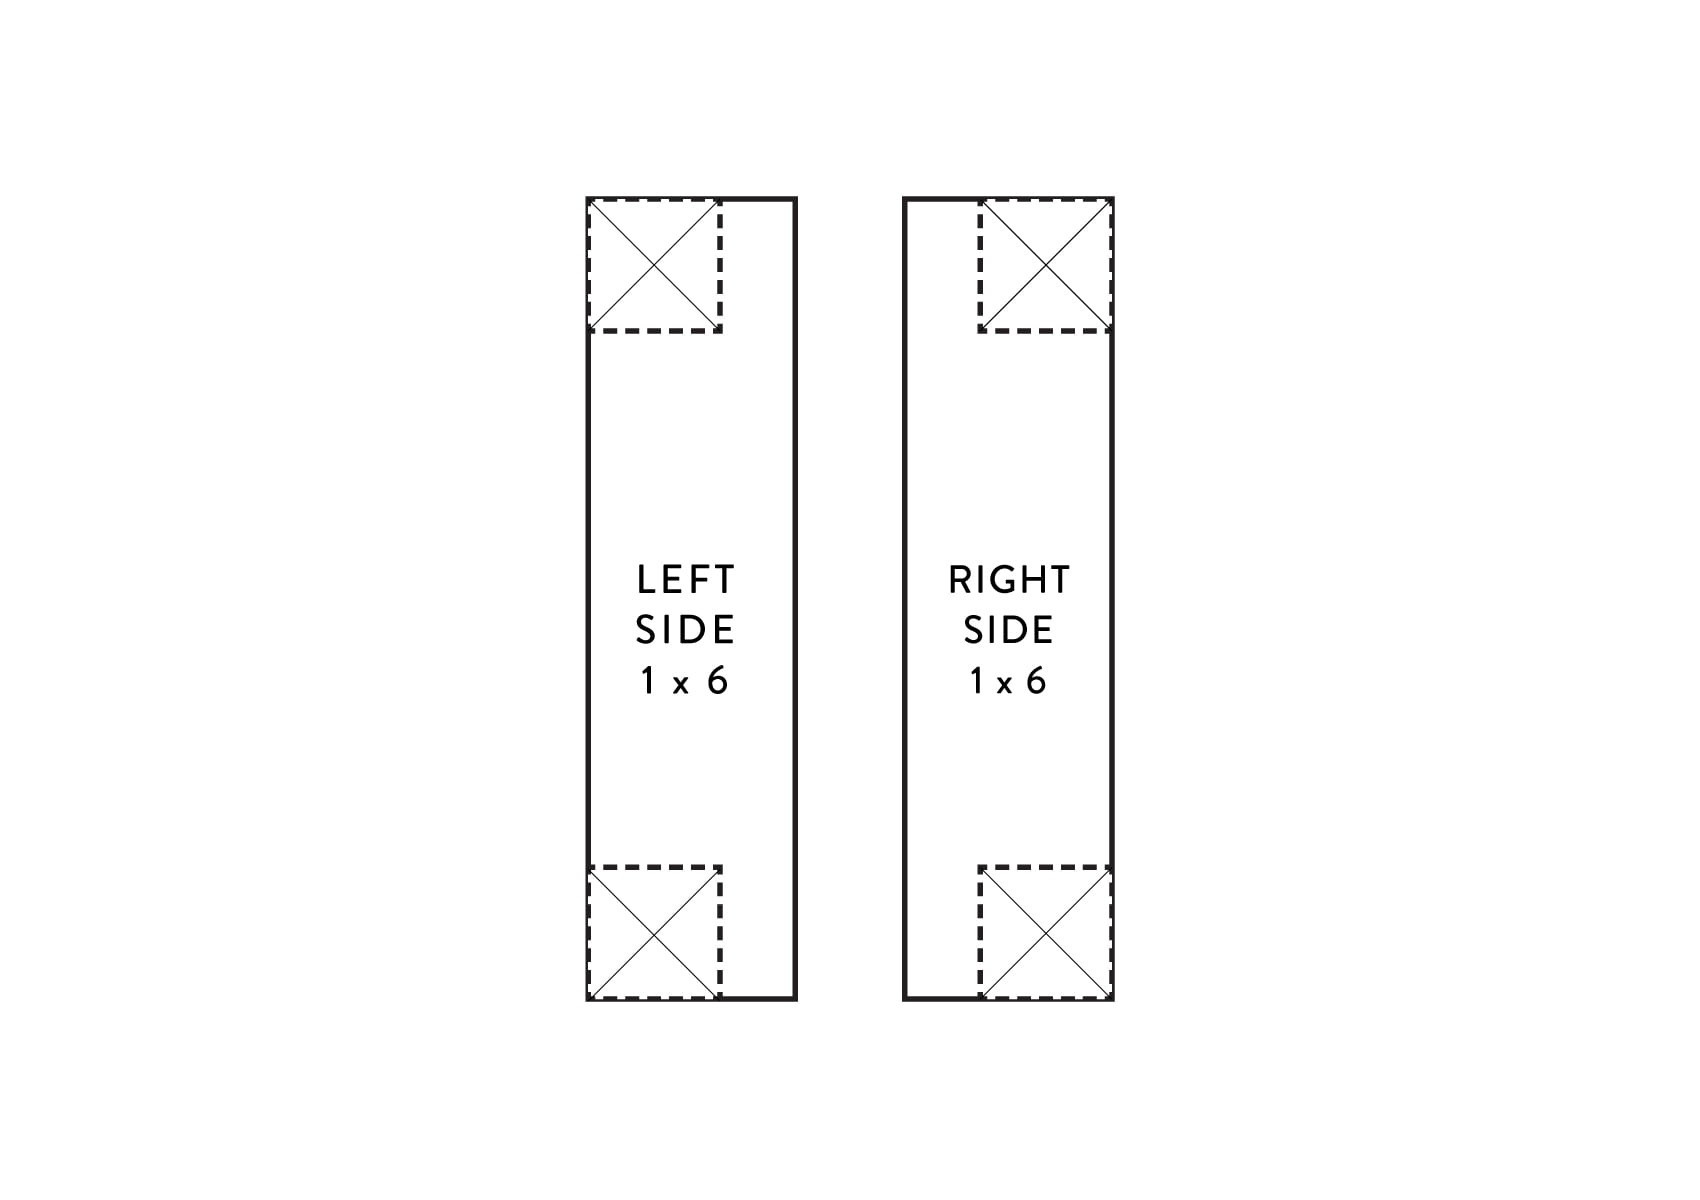
Cutting notches out of 1x6s
You will need to cut out notches on the ends of each 1×6 so the boards can fit around the 4×4 legs. For this, you’ll need your jigsaw again.
Take a leftover scrap piece of your 4×4 and trace the shape of it on the ends of your 1x6s. Or, measure the size of your 4×4 legs and make those marks on the 1x6s. Once you have your marks made, grab your jigsaw and cut those little square pieces out of the 1x6s.
Once you have your 1x6s cut, either nail or screw them down on top of the 1x3s on each end of the vanity. We chose to screw them down, but nailing them down would give a cleaner look (we obviously were still not thinking at this point LOL).
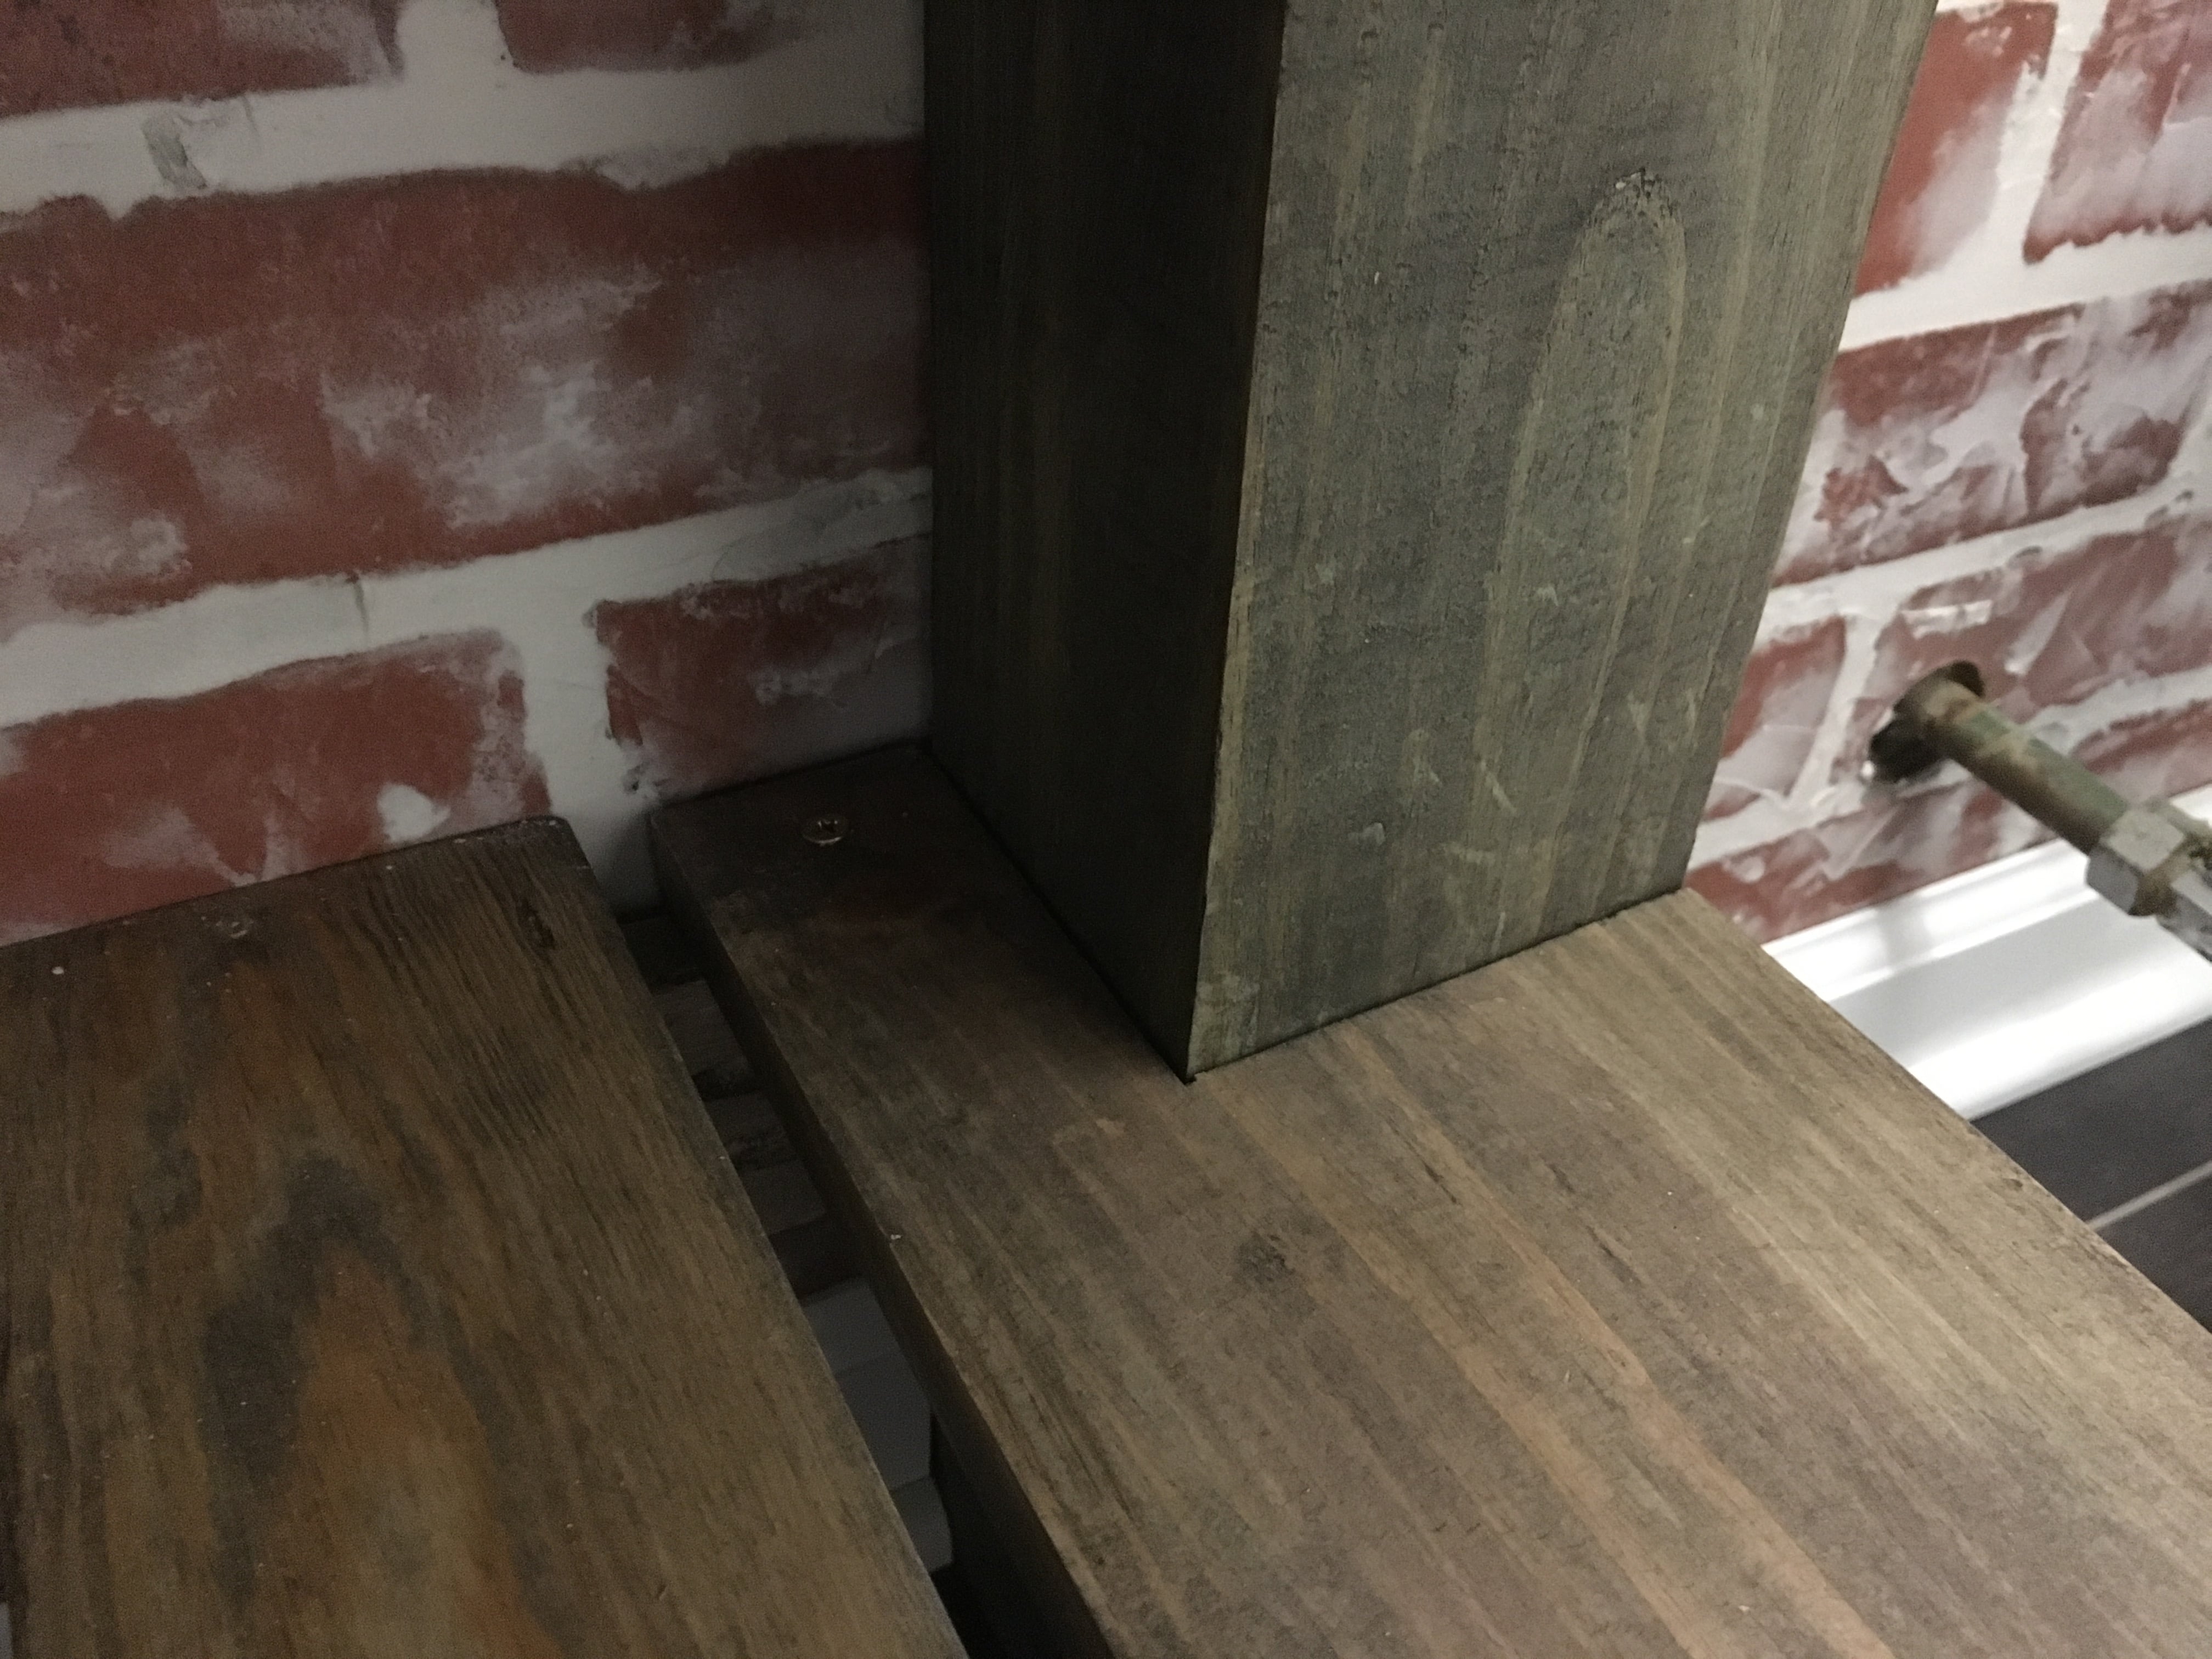
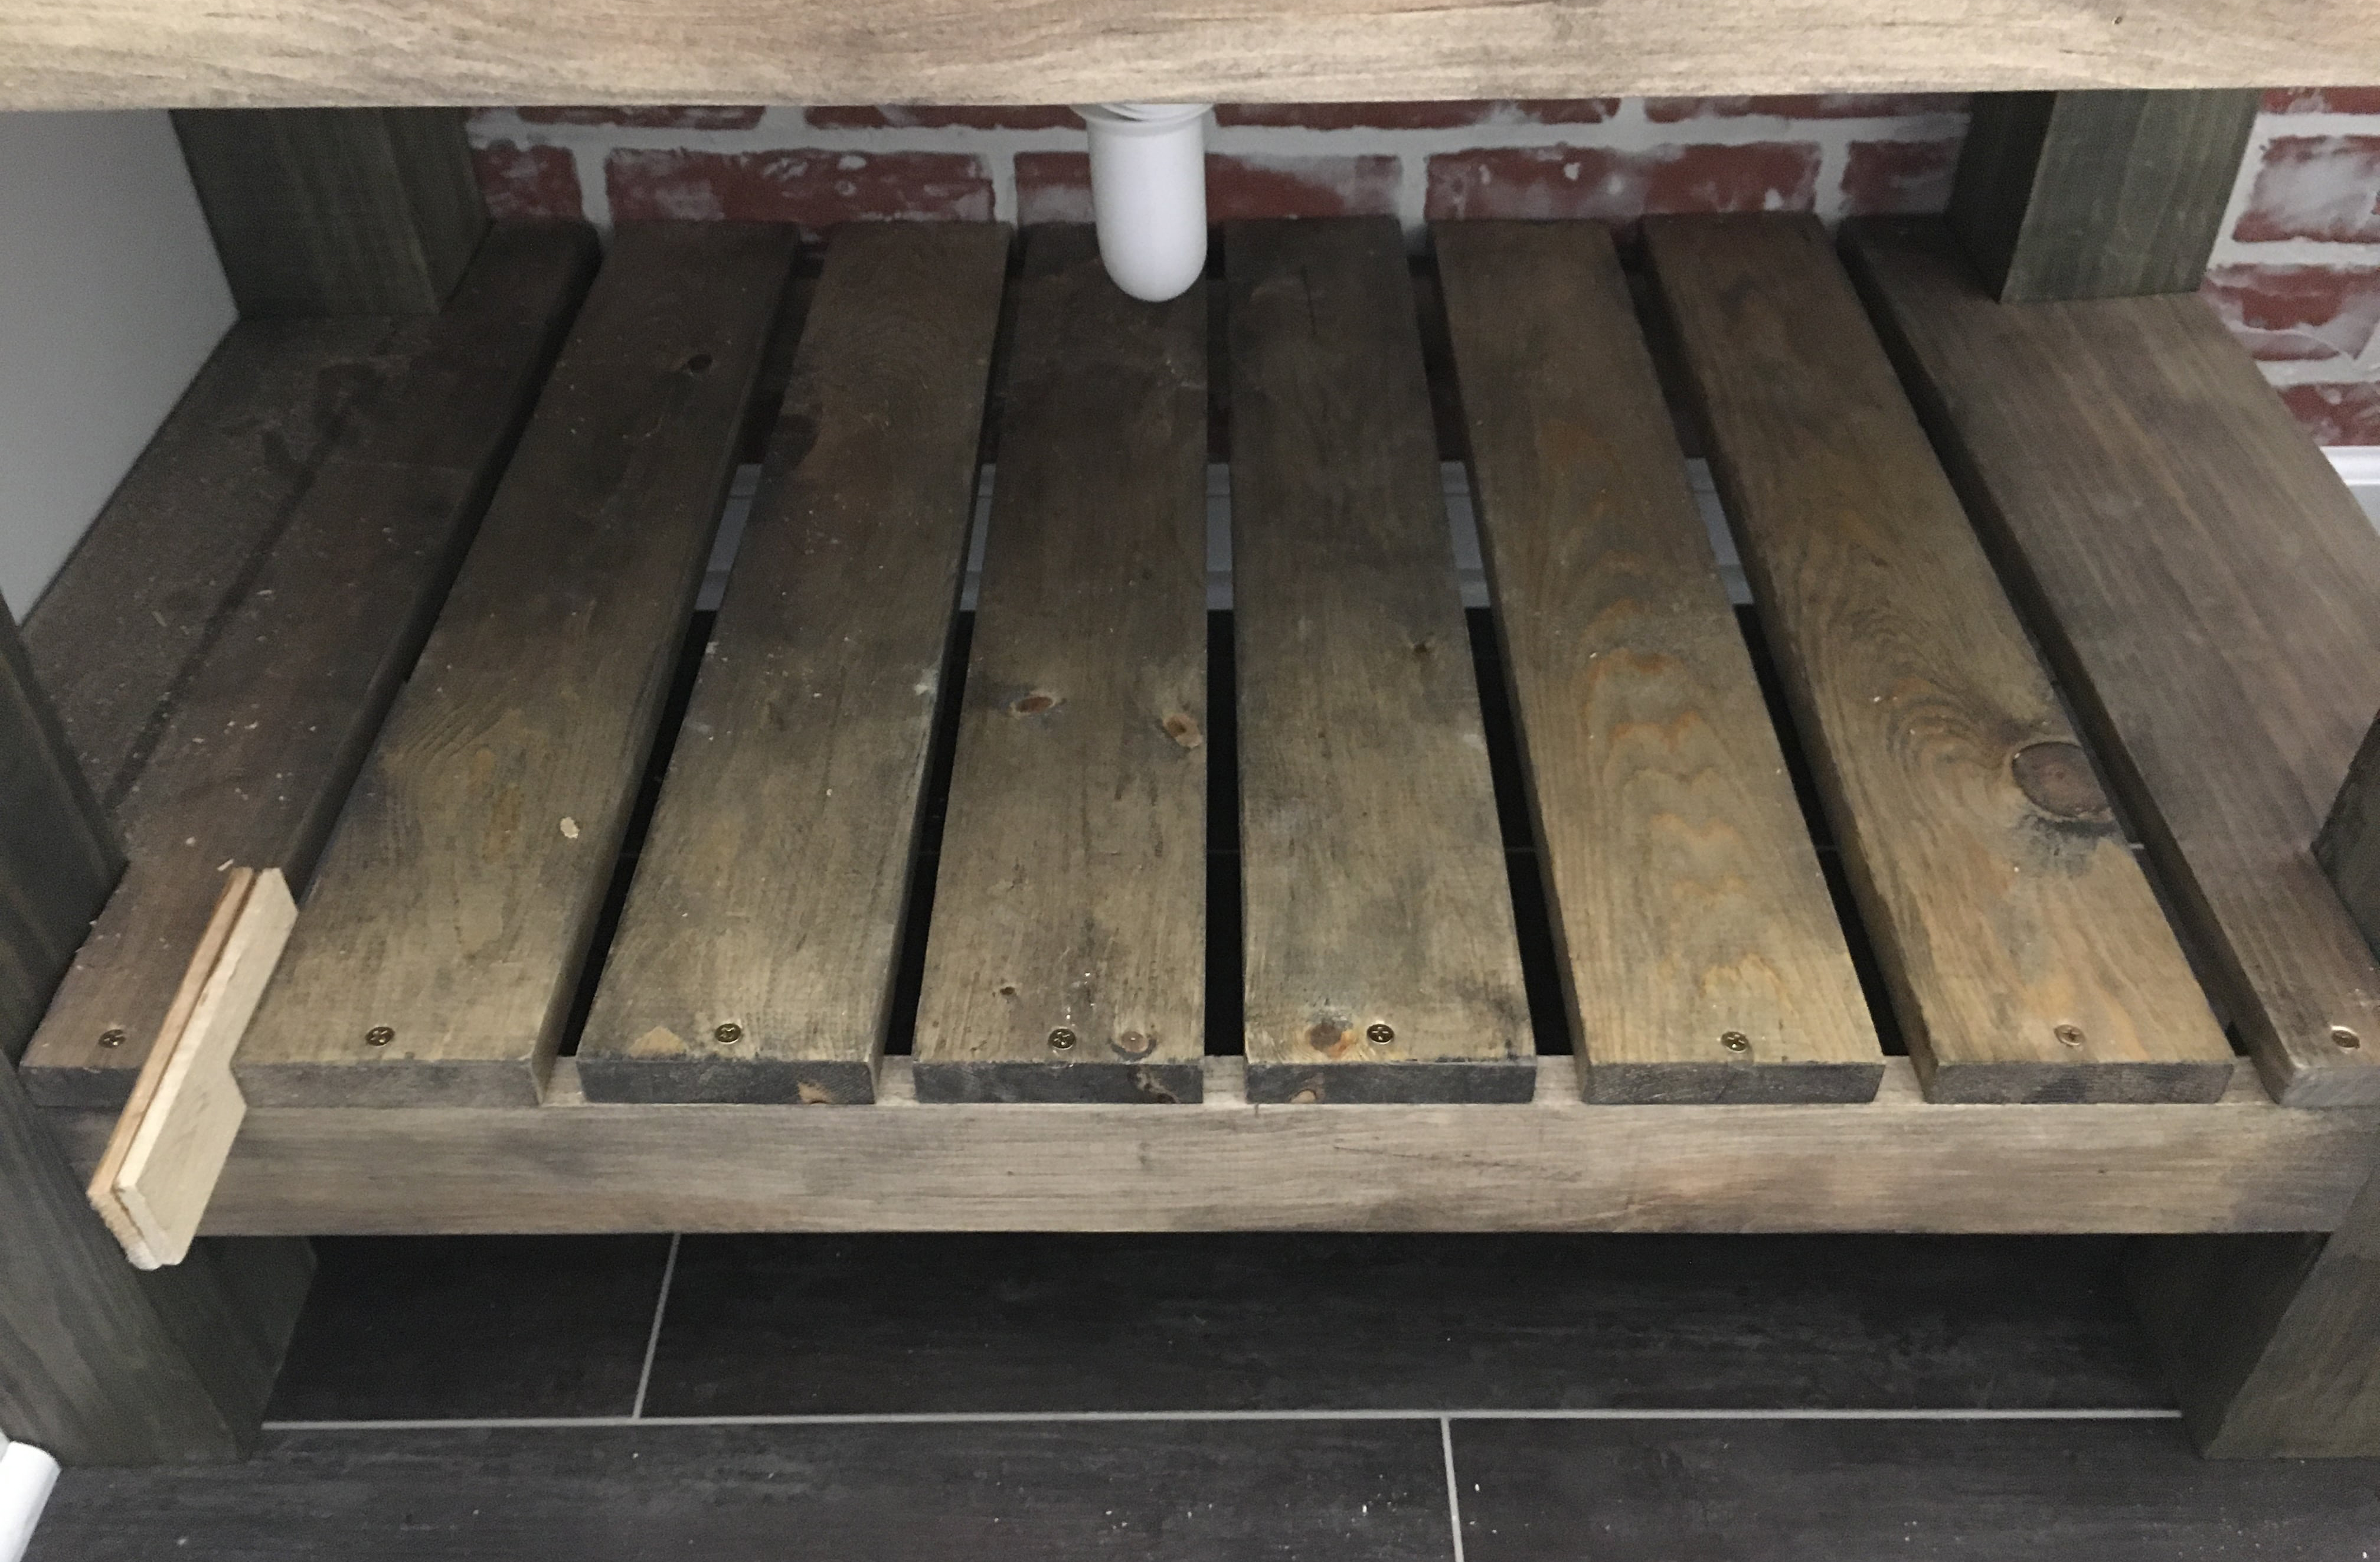
As you can see, at this point in the build, I’ve already stained our vanity. I cut all the shelf pieces prior to staining and installing them.
Creating the Spaces Between the Boards
The gaps in between the boards end up being an odd number, that’s not really divisible on a ruler. The closest ruler mark would be 15/32nd… Who’s counting those marks? Well, I can assure you I did not. I took 2 scrap pieces of wood laths that I had from a previous project and used that as a guide. Basically, I eyeballed the gaps. ?
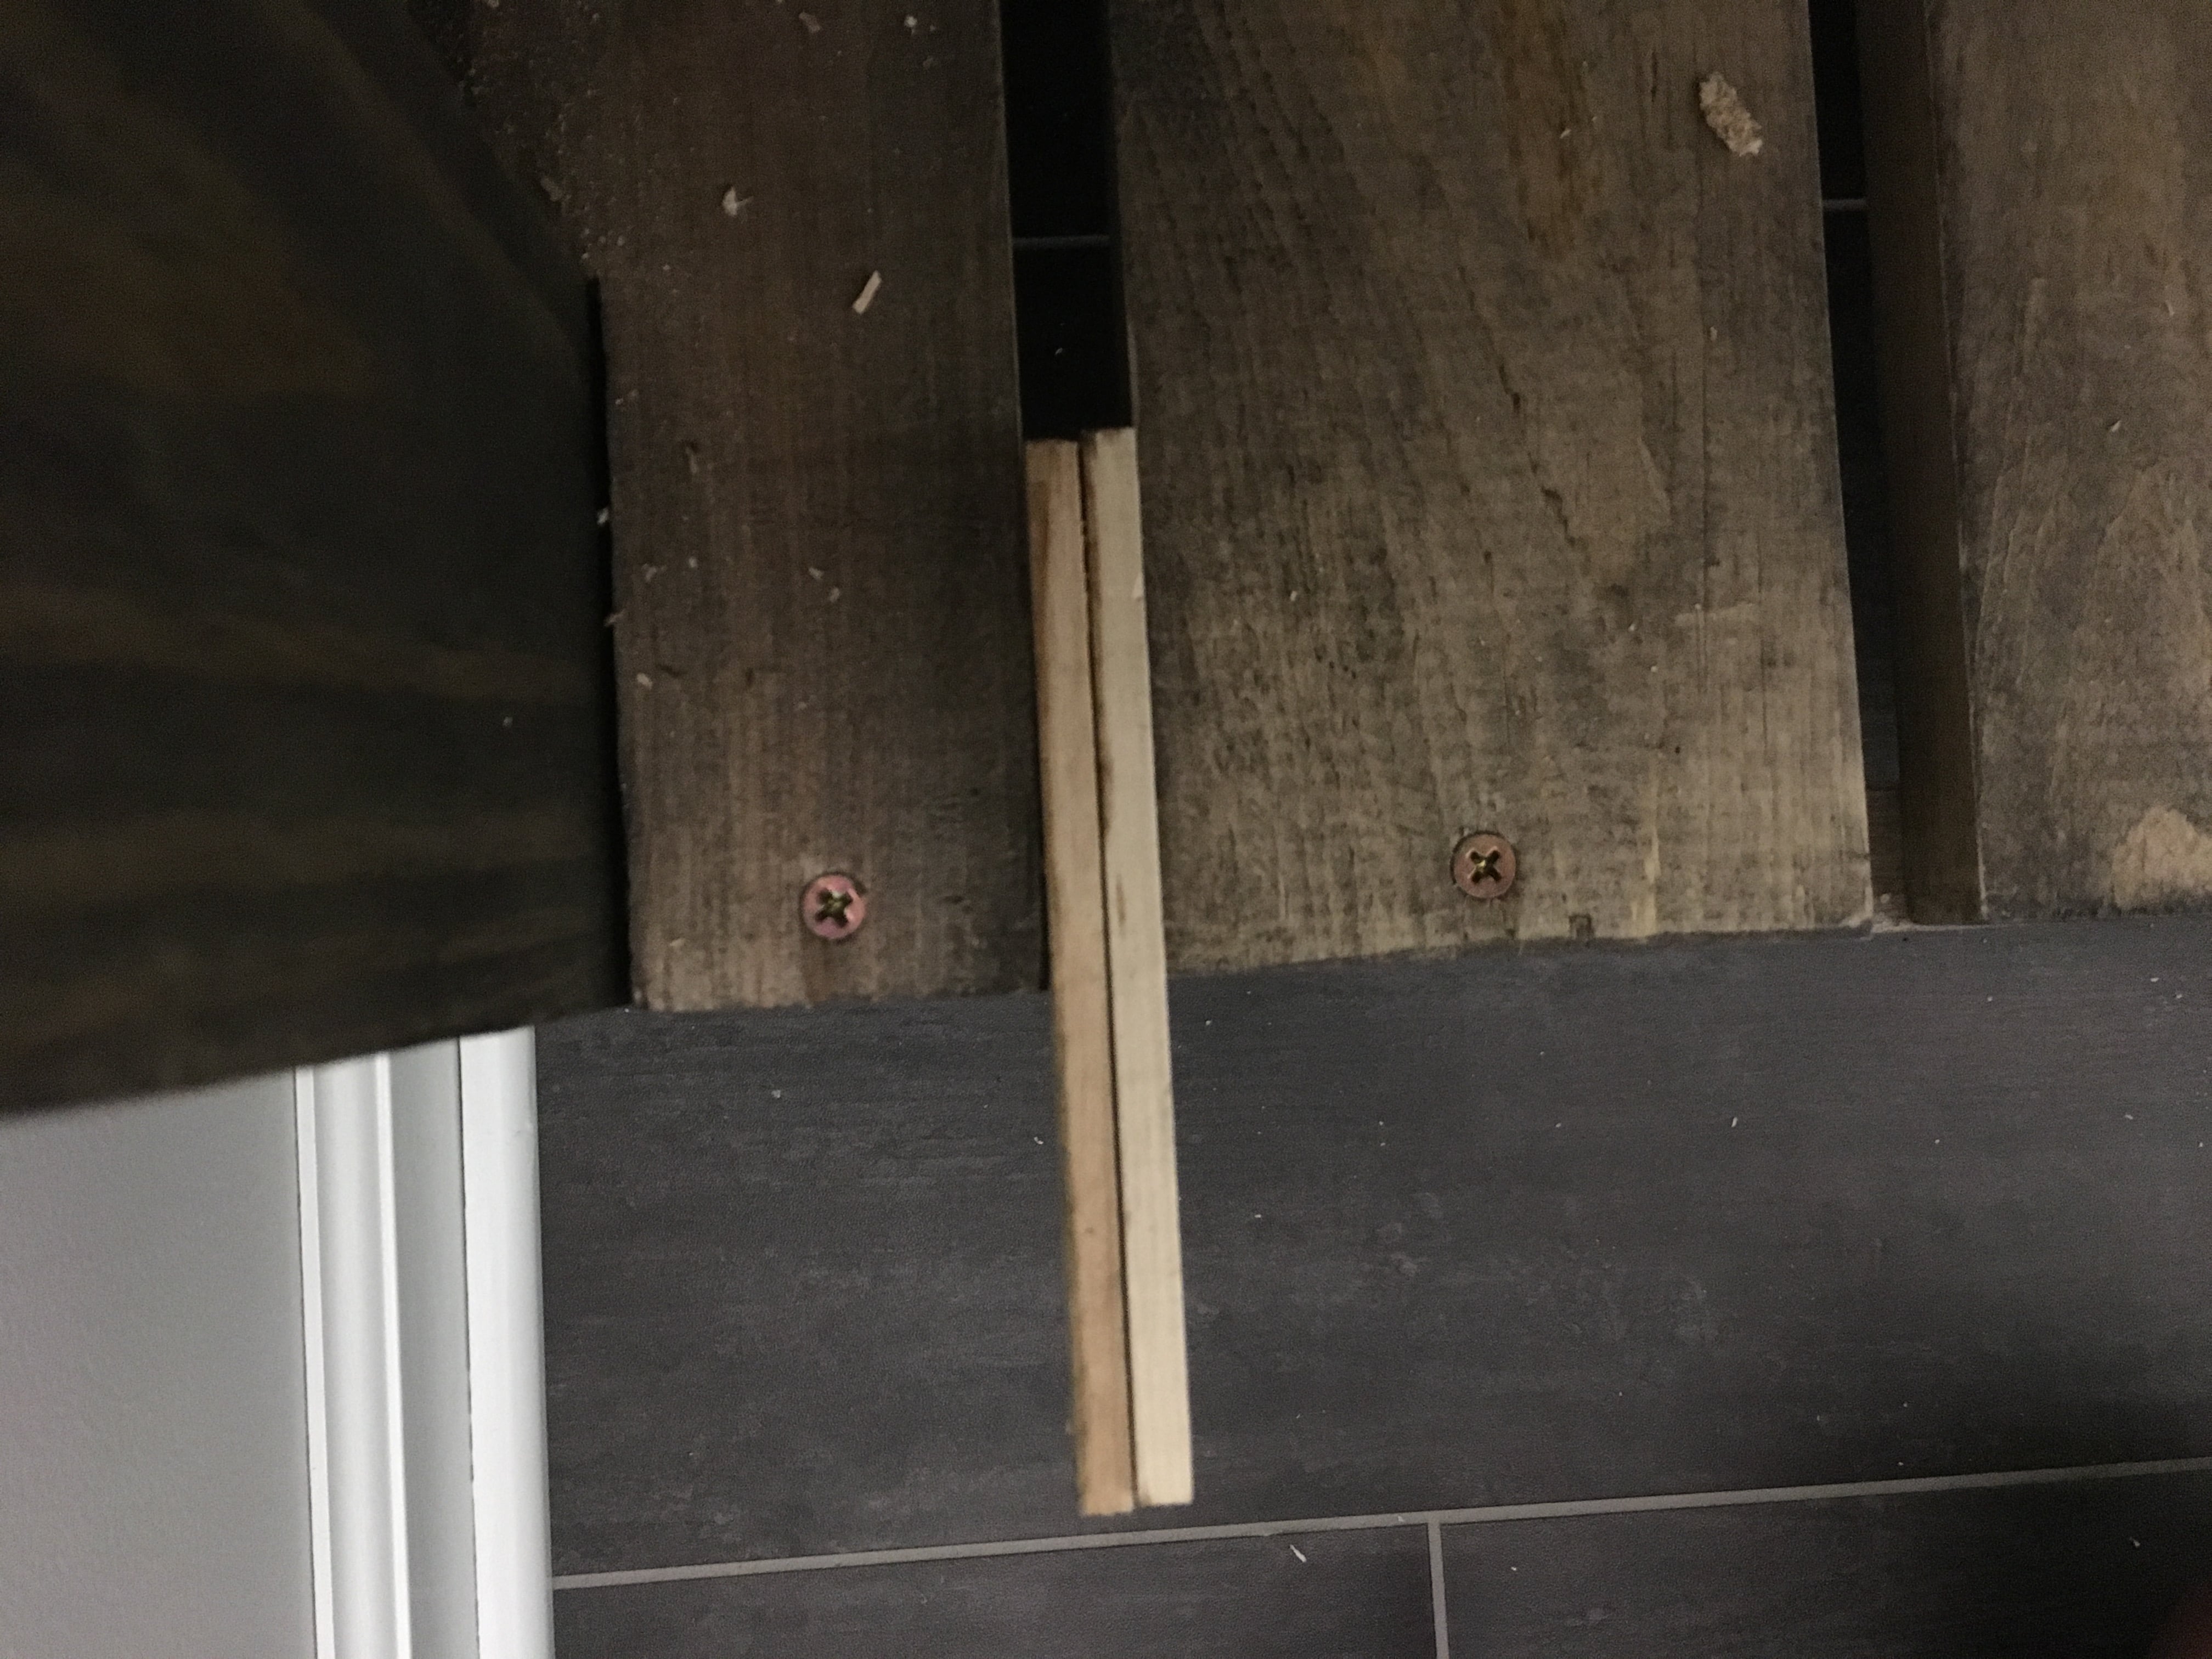
Start at one end of the vanity and work your way to the other end.
helpful tip
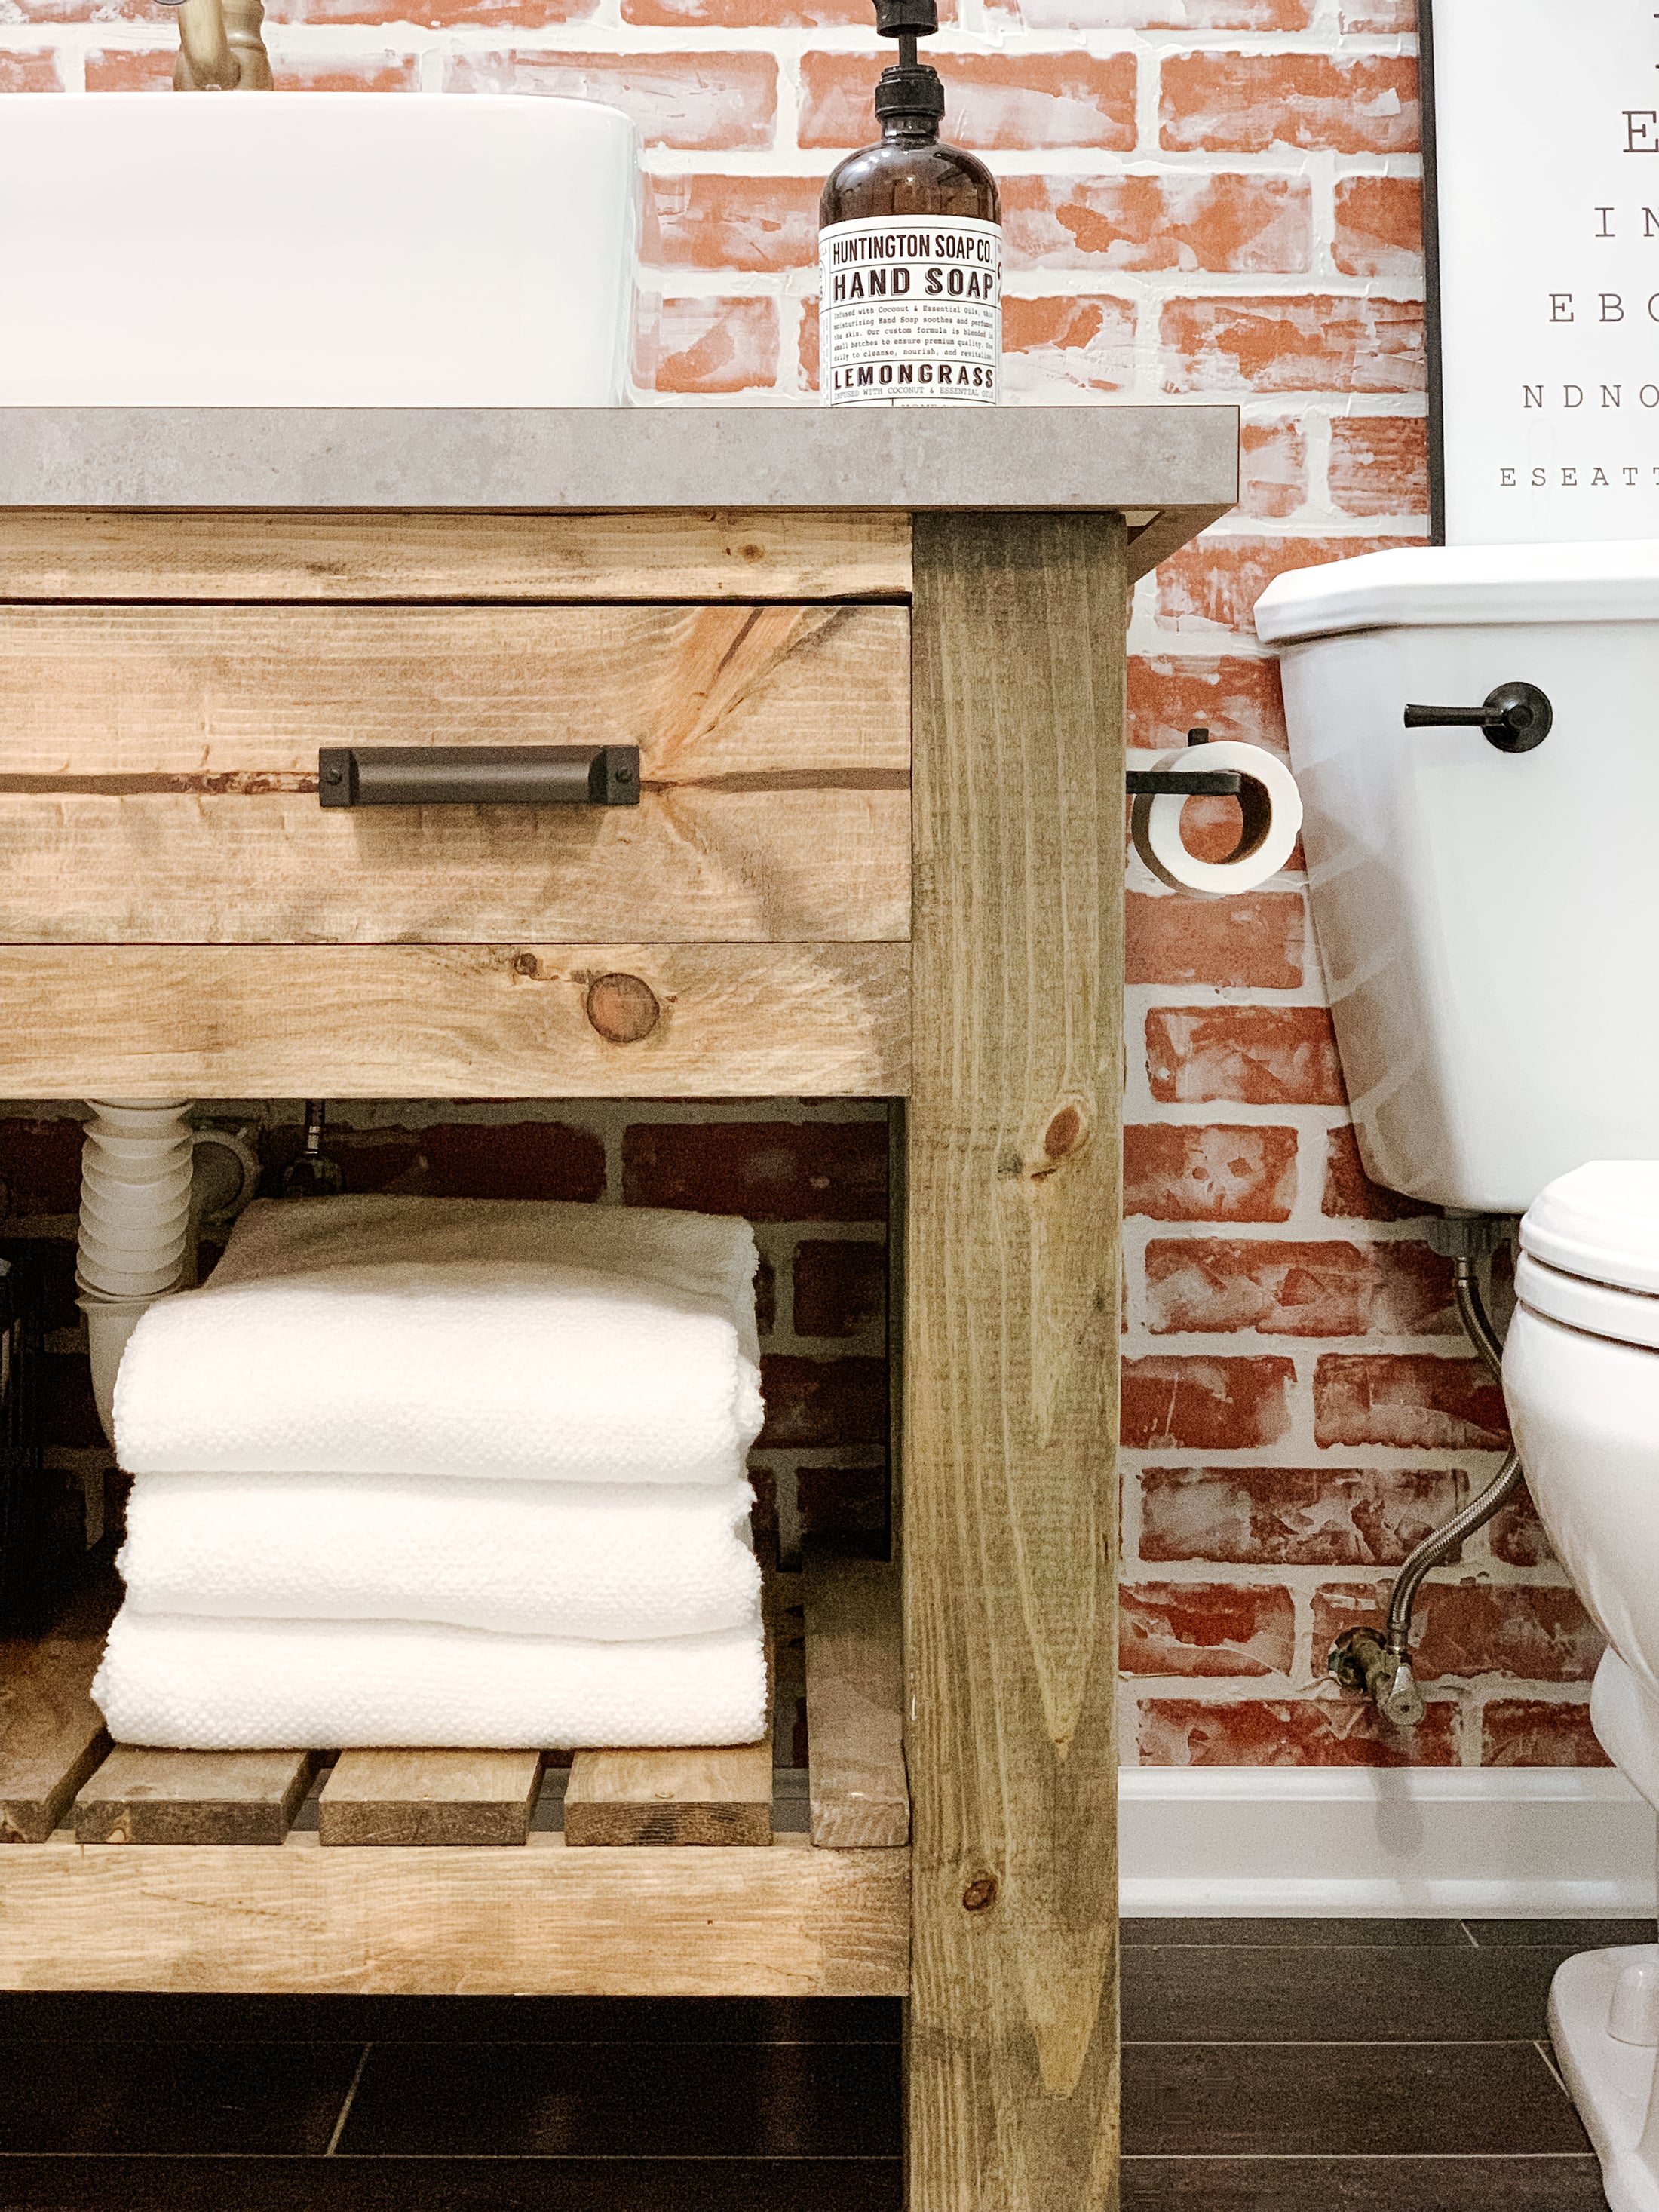
We didn’t install these shelf pieces until after the countertop, sink, and plumbing were installed. In doing so, it gave Brad plenty of space to work under the sink when installing the plumbing.
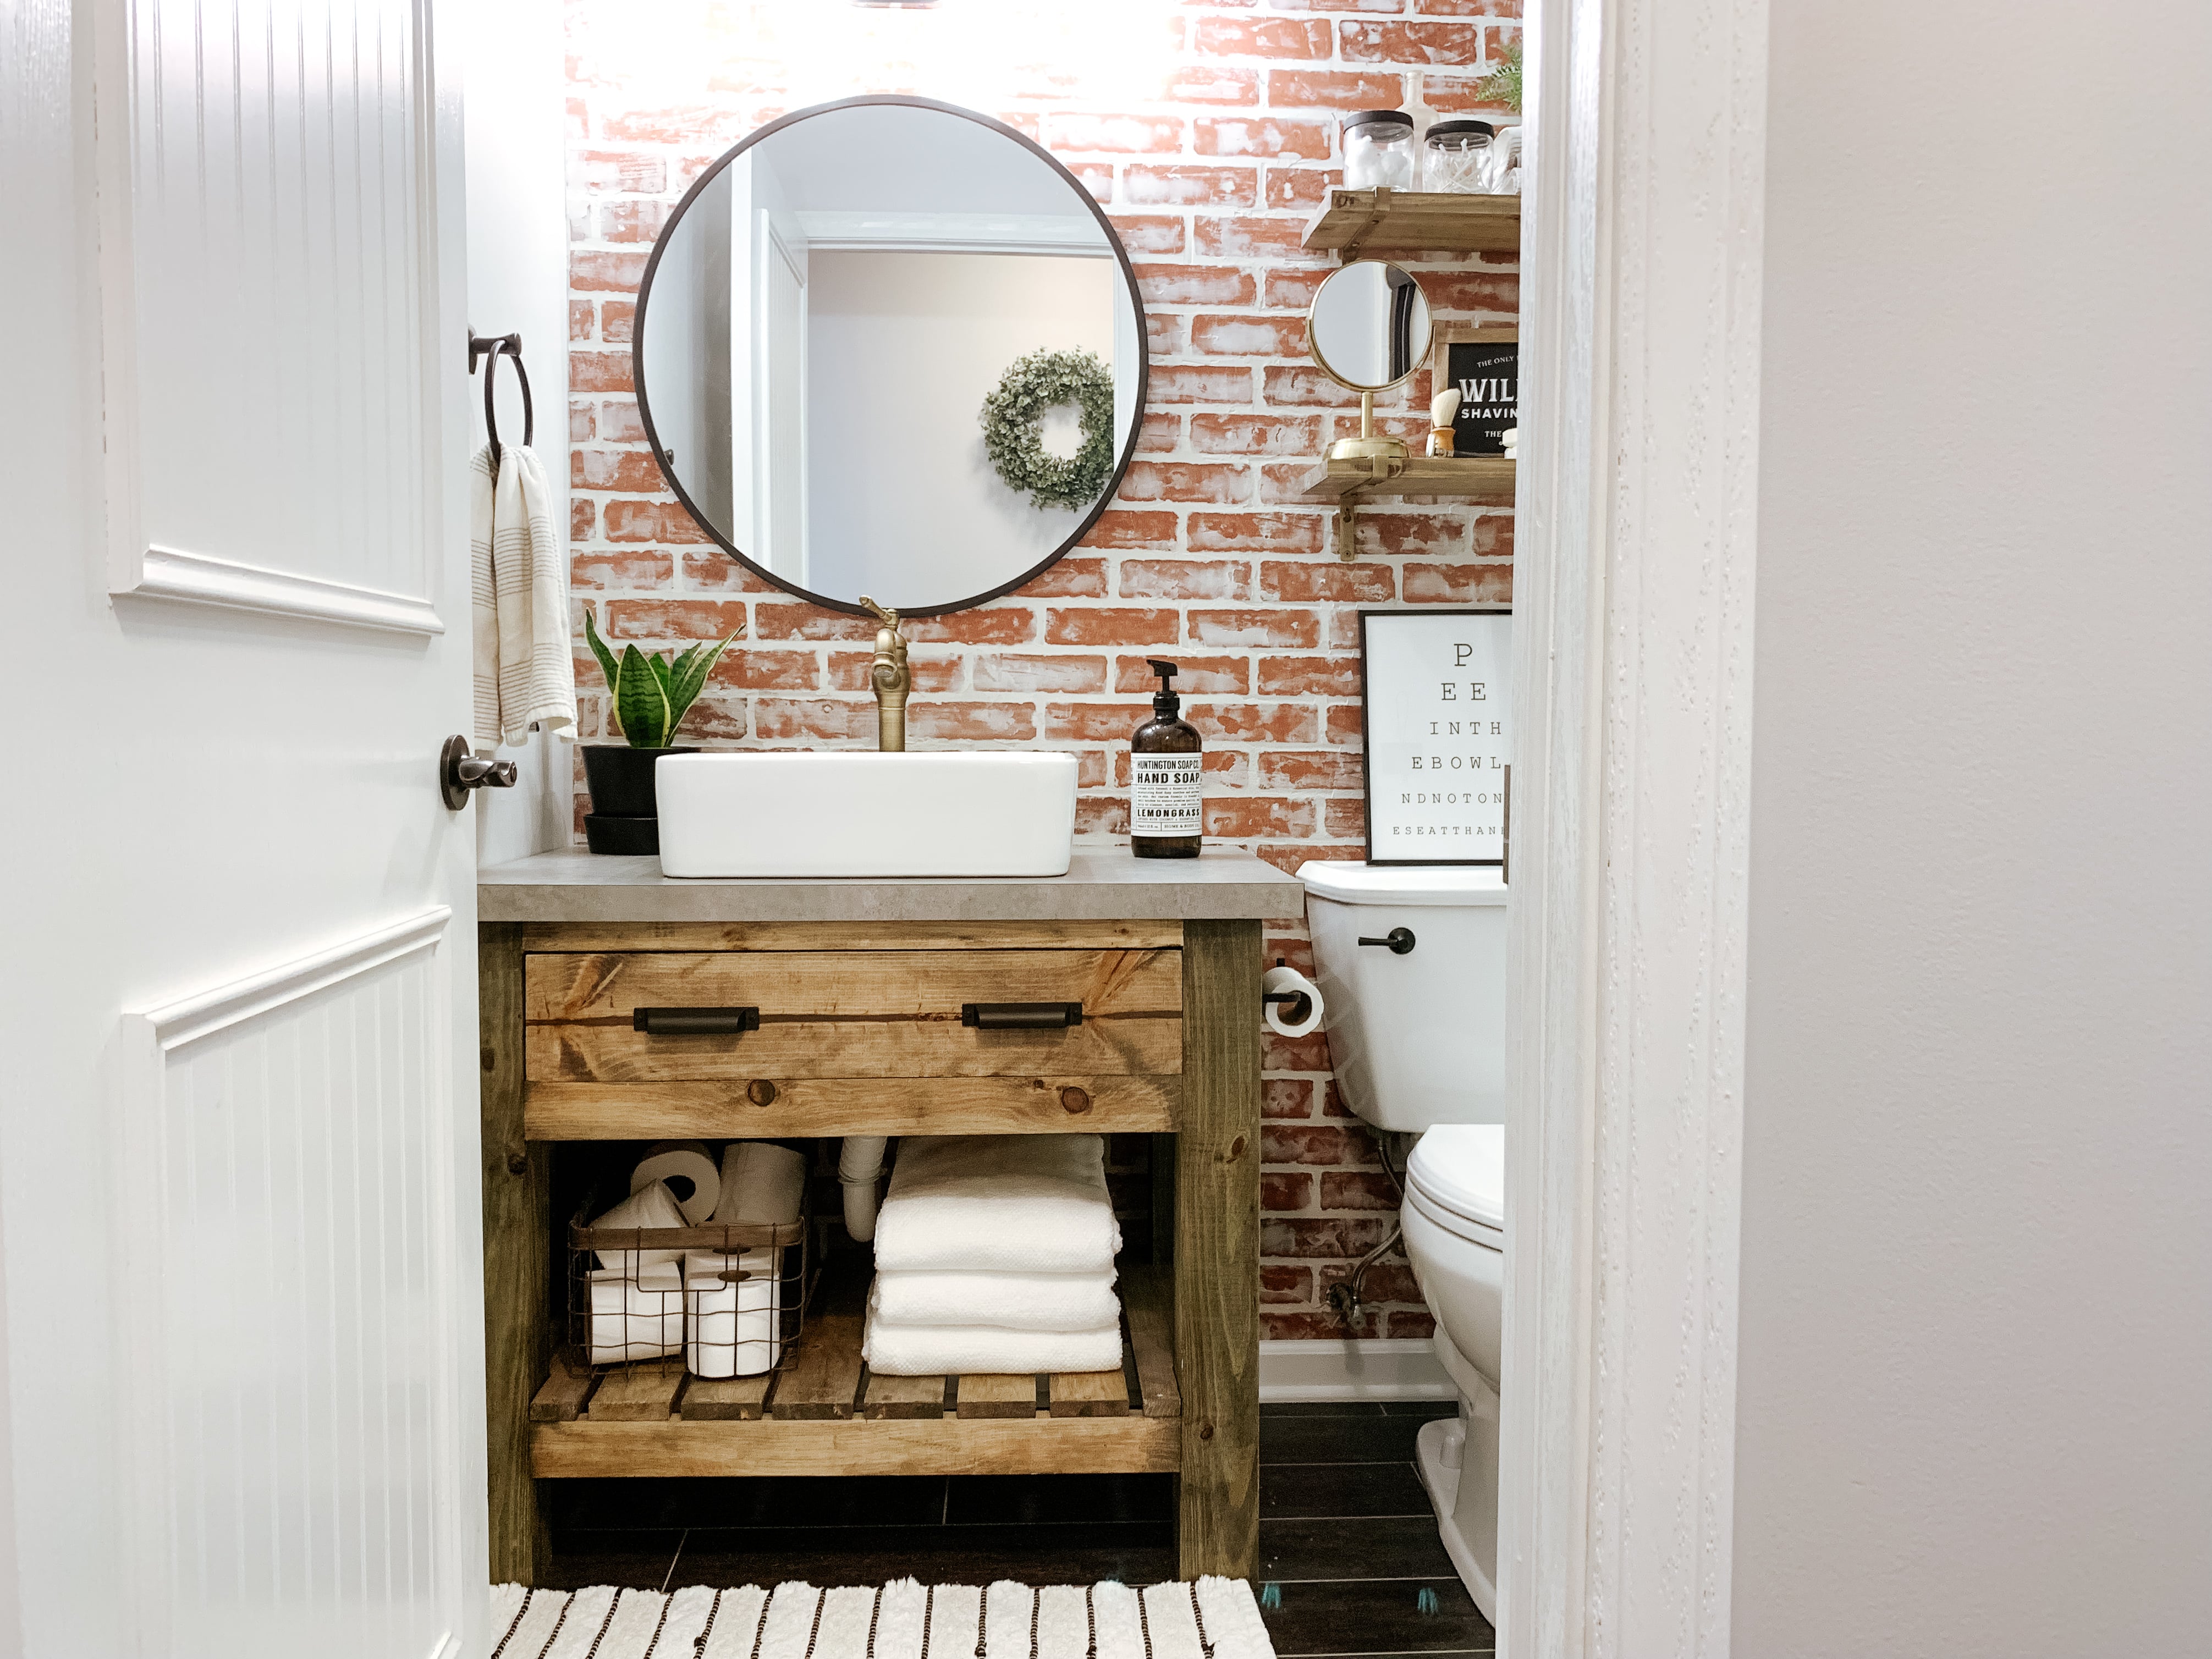
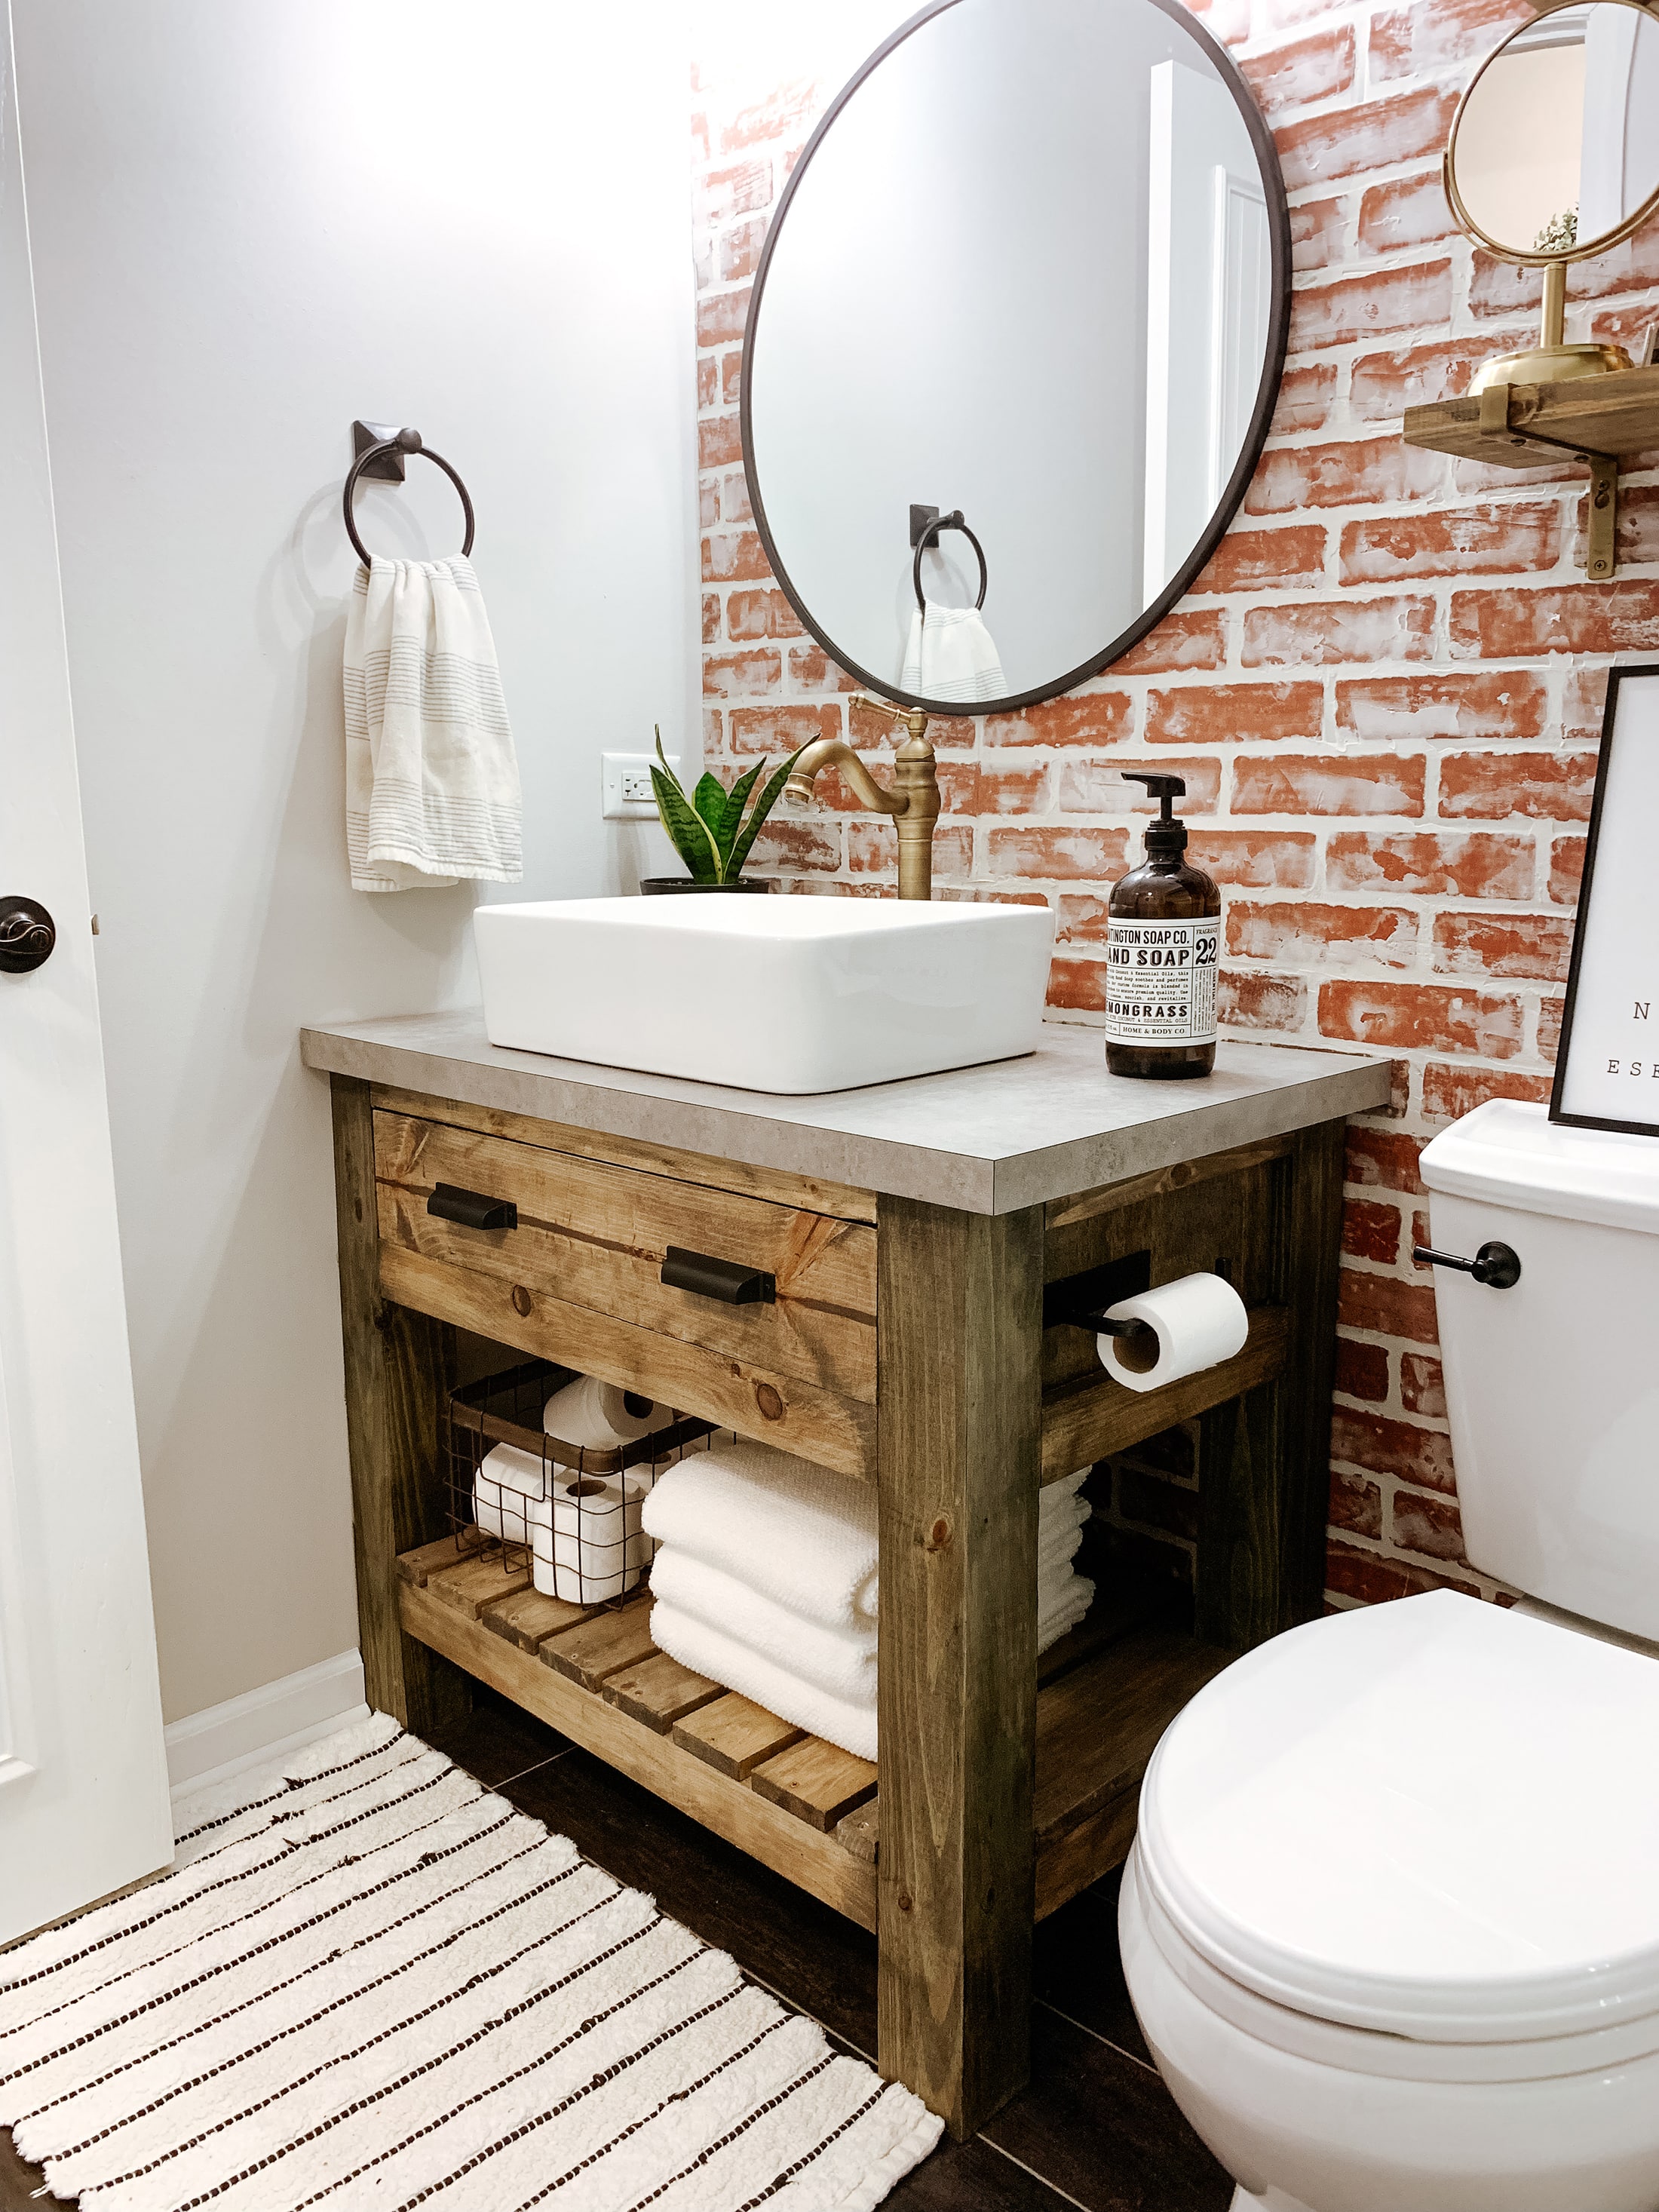
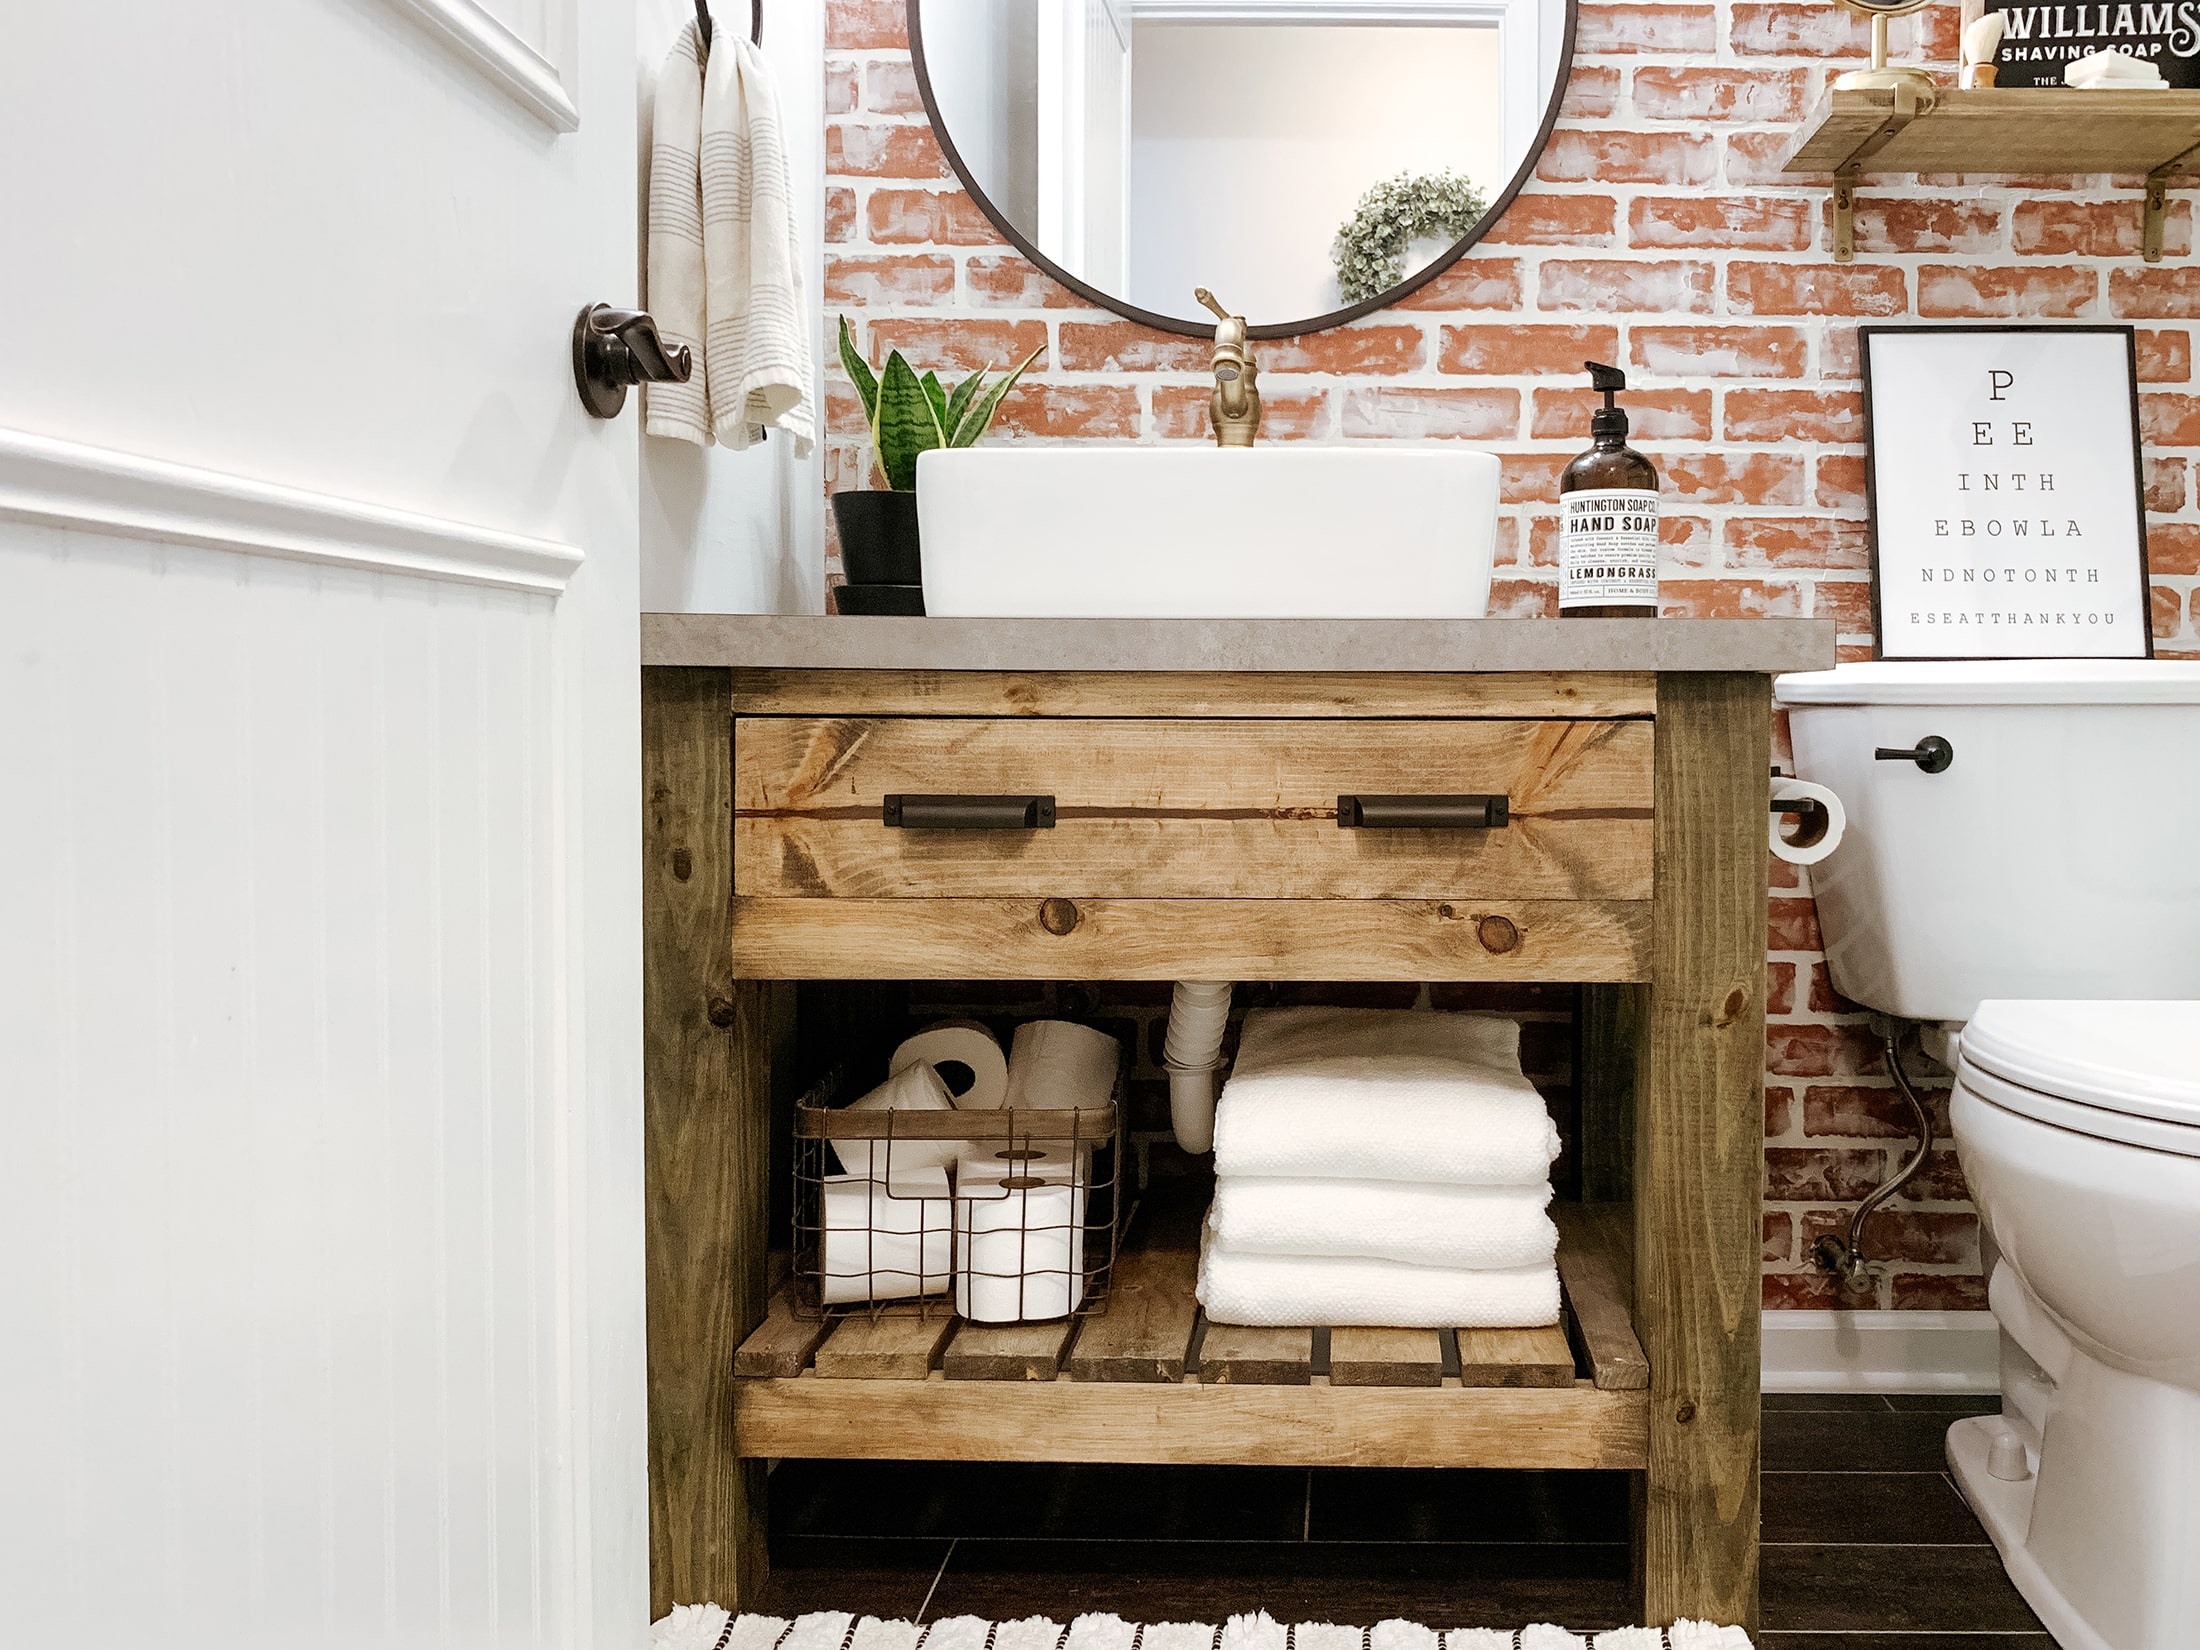
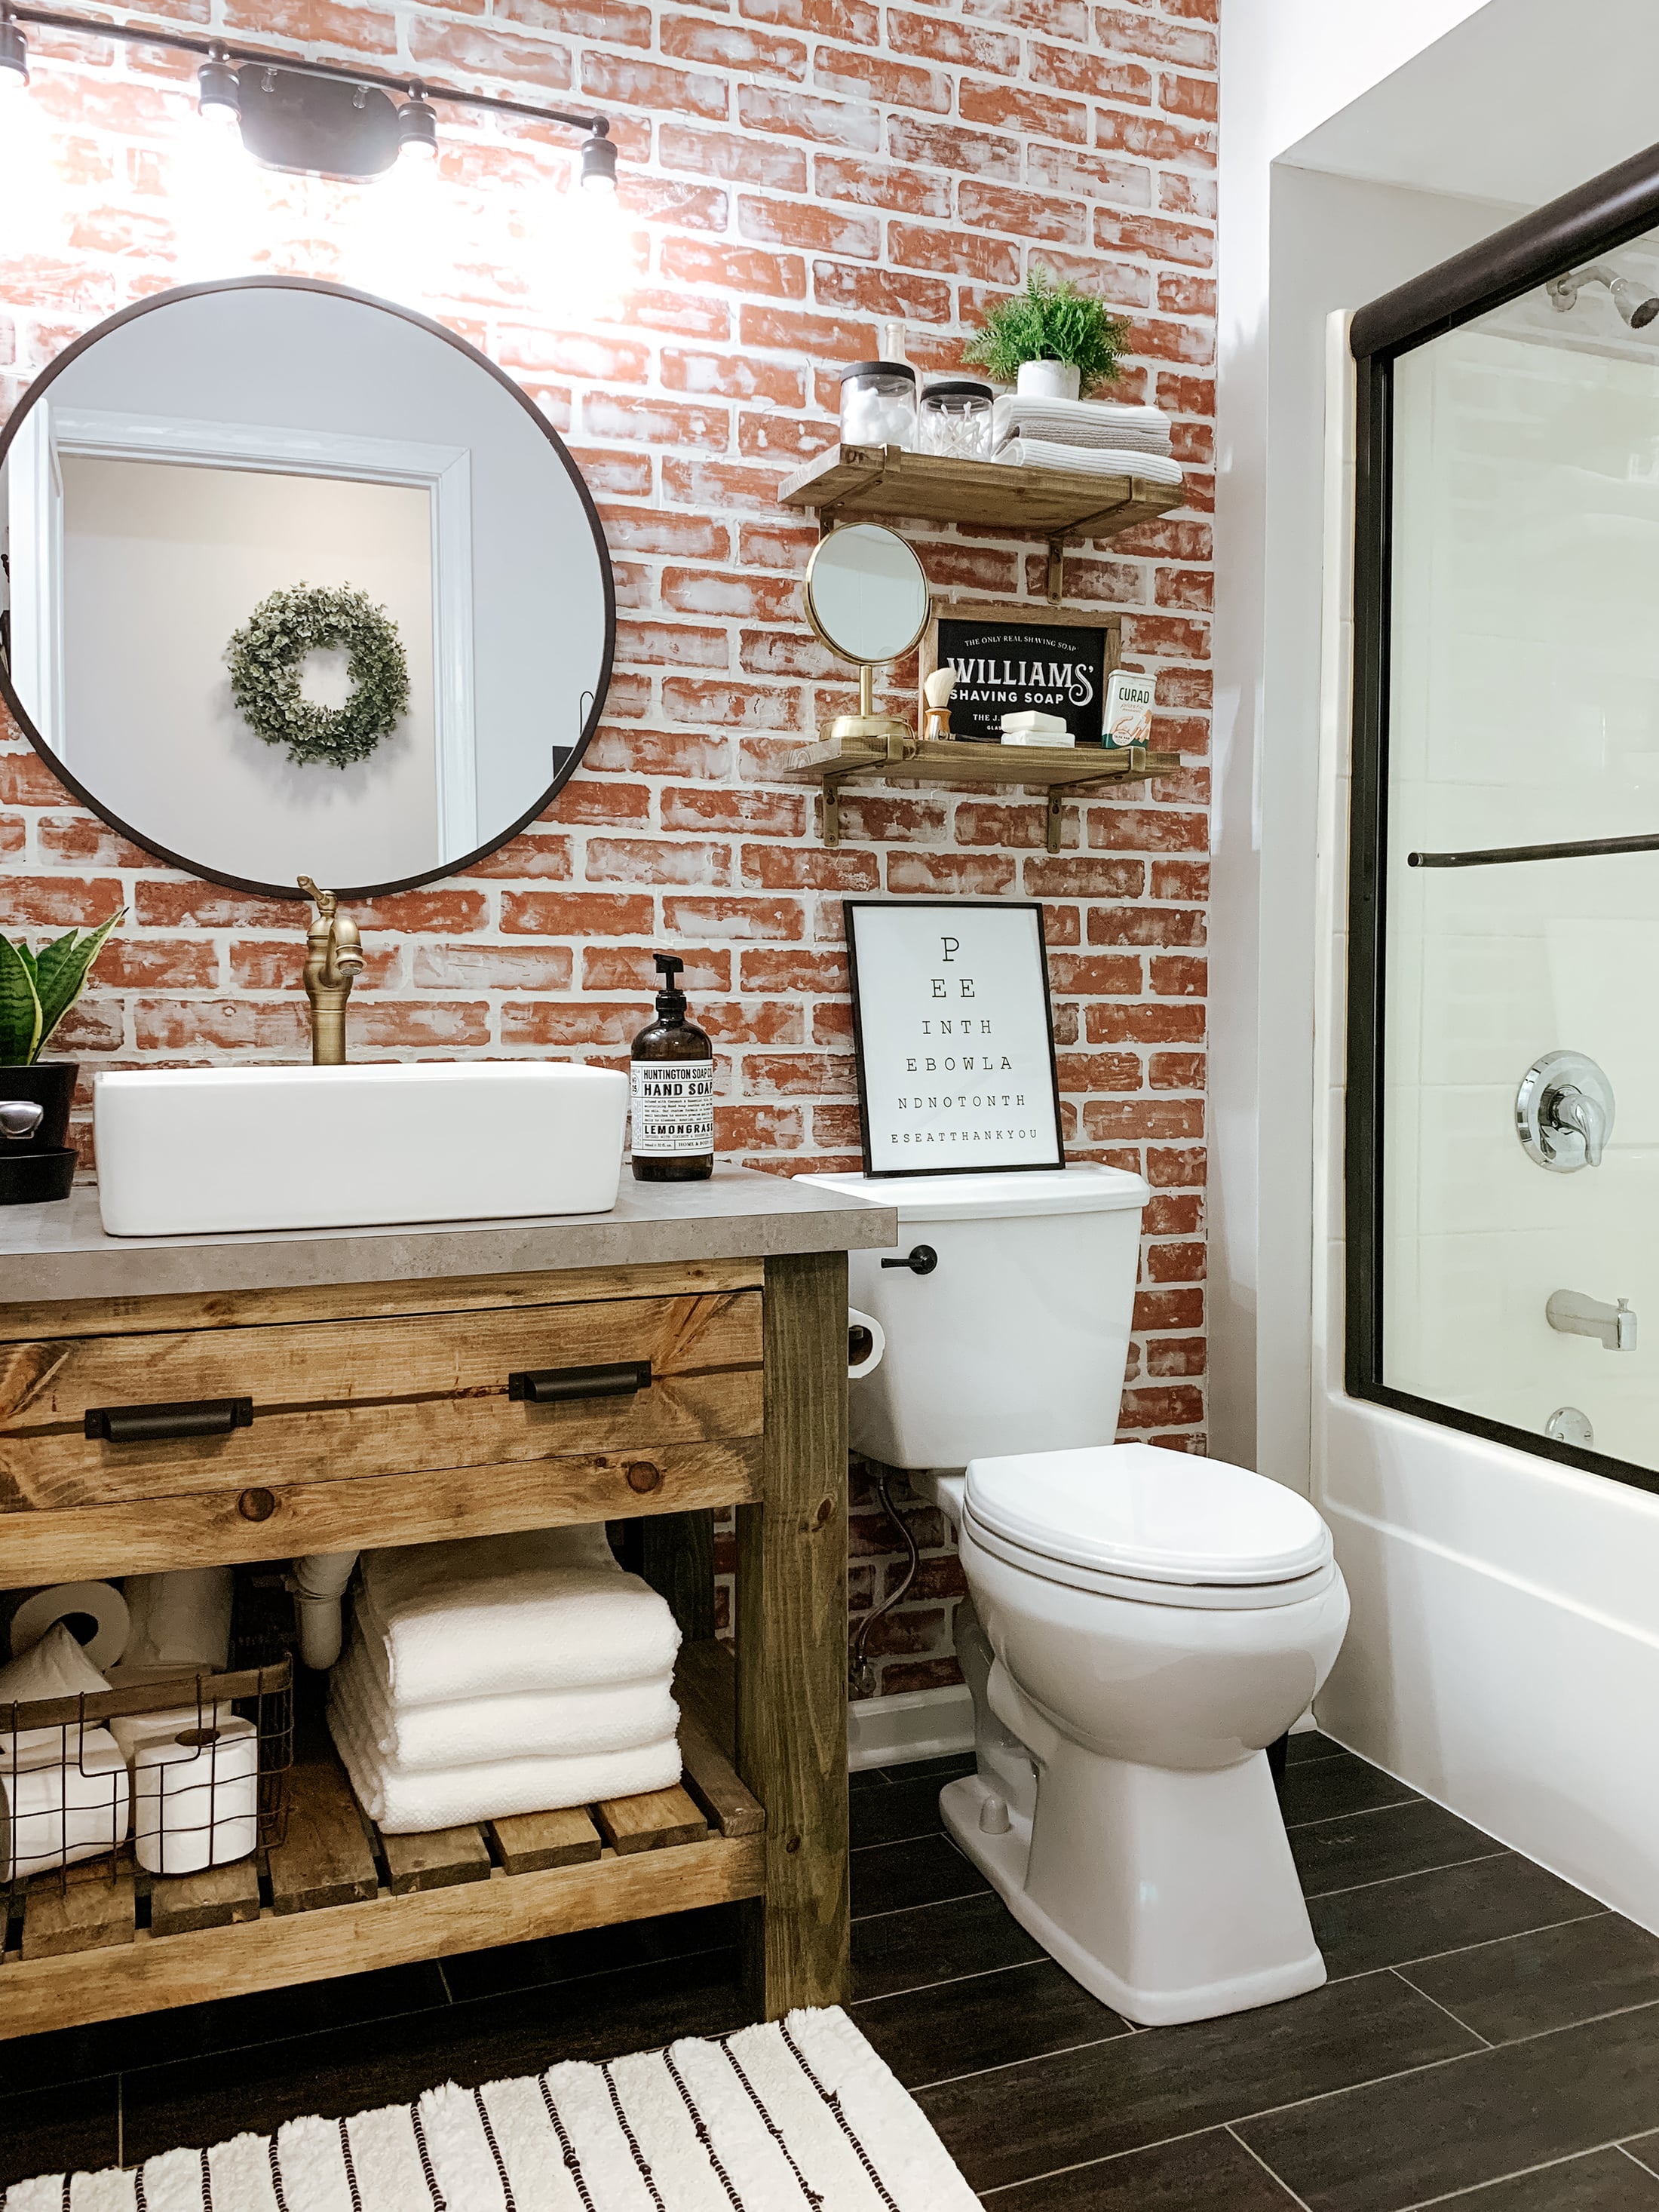
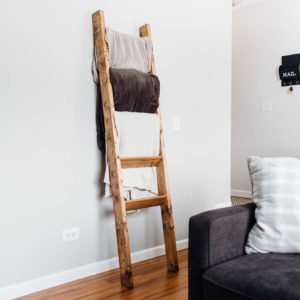
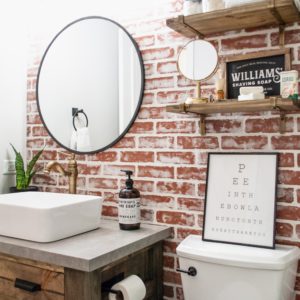
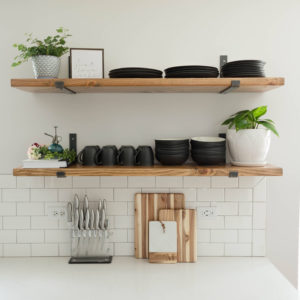
The Final Look
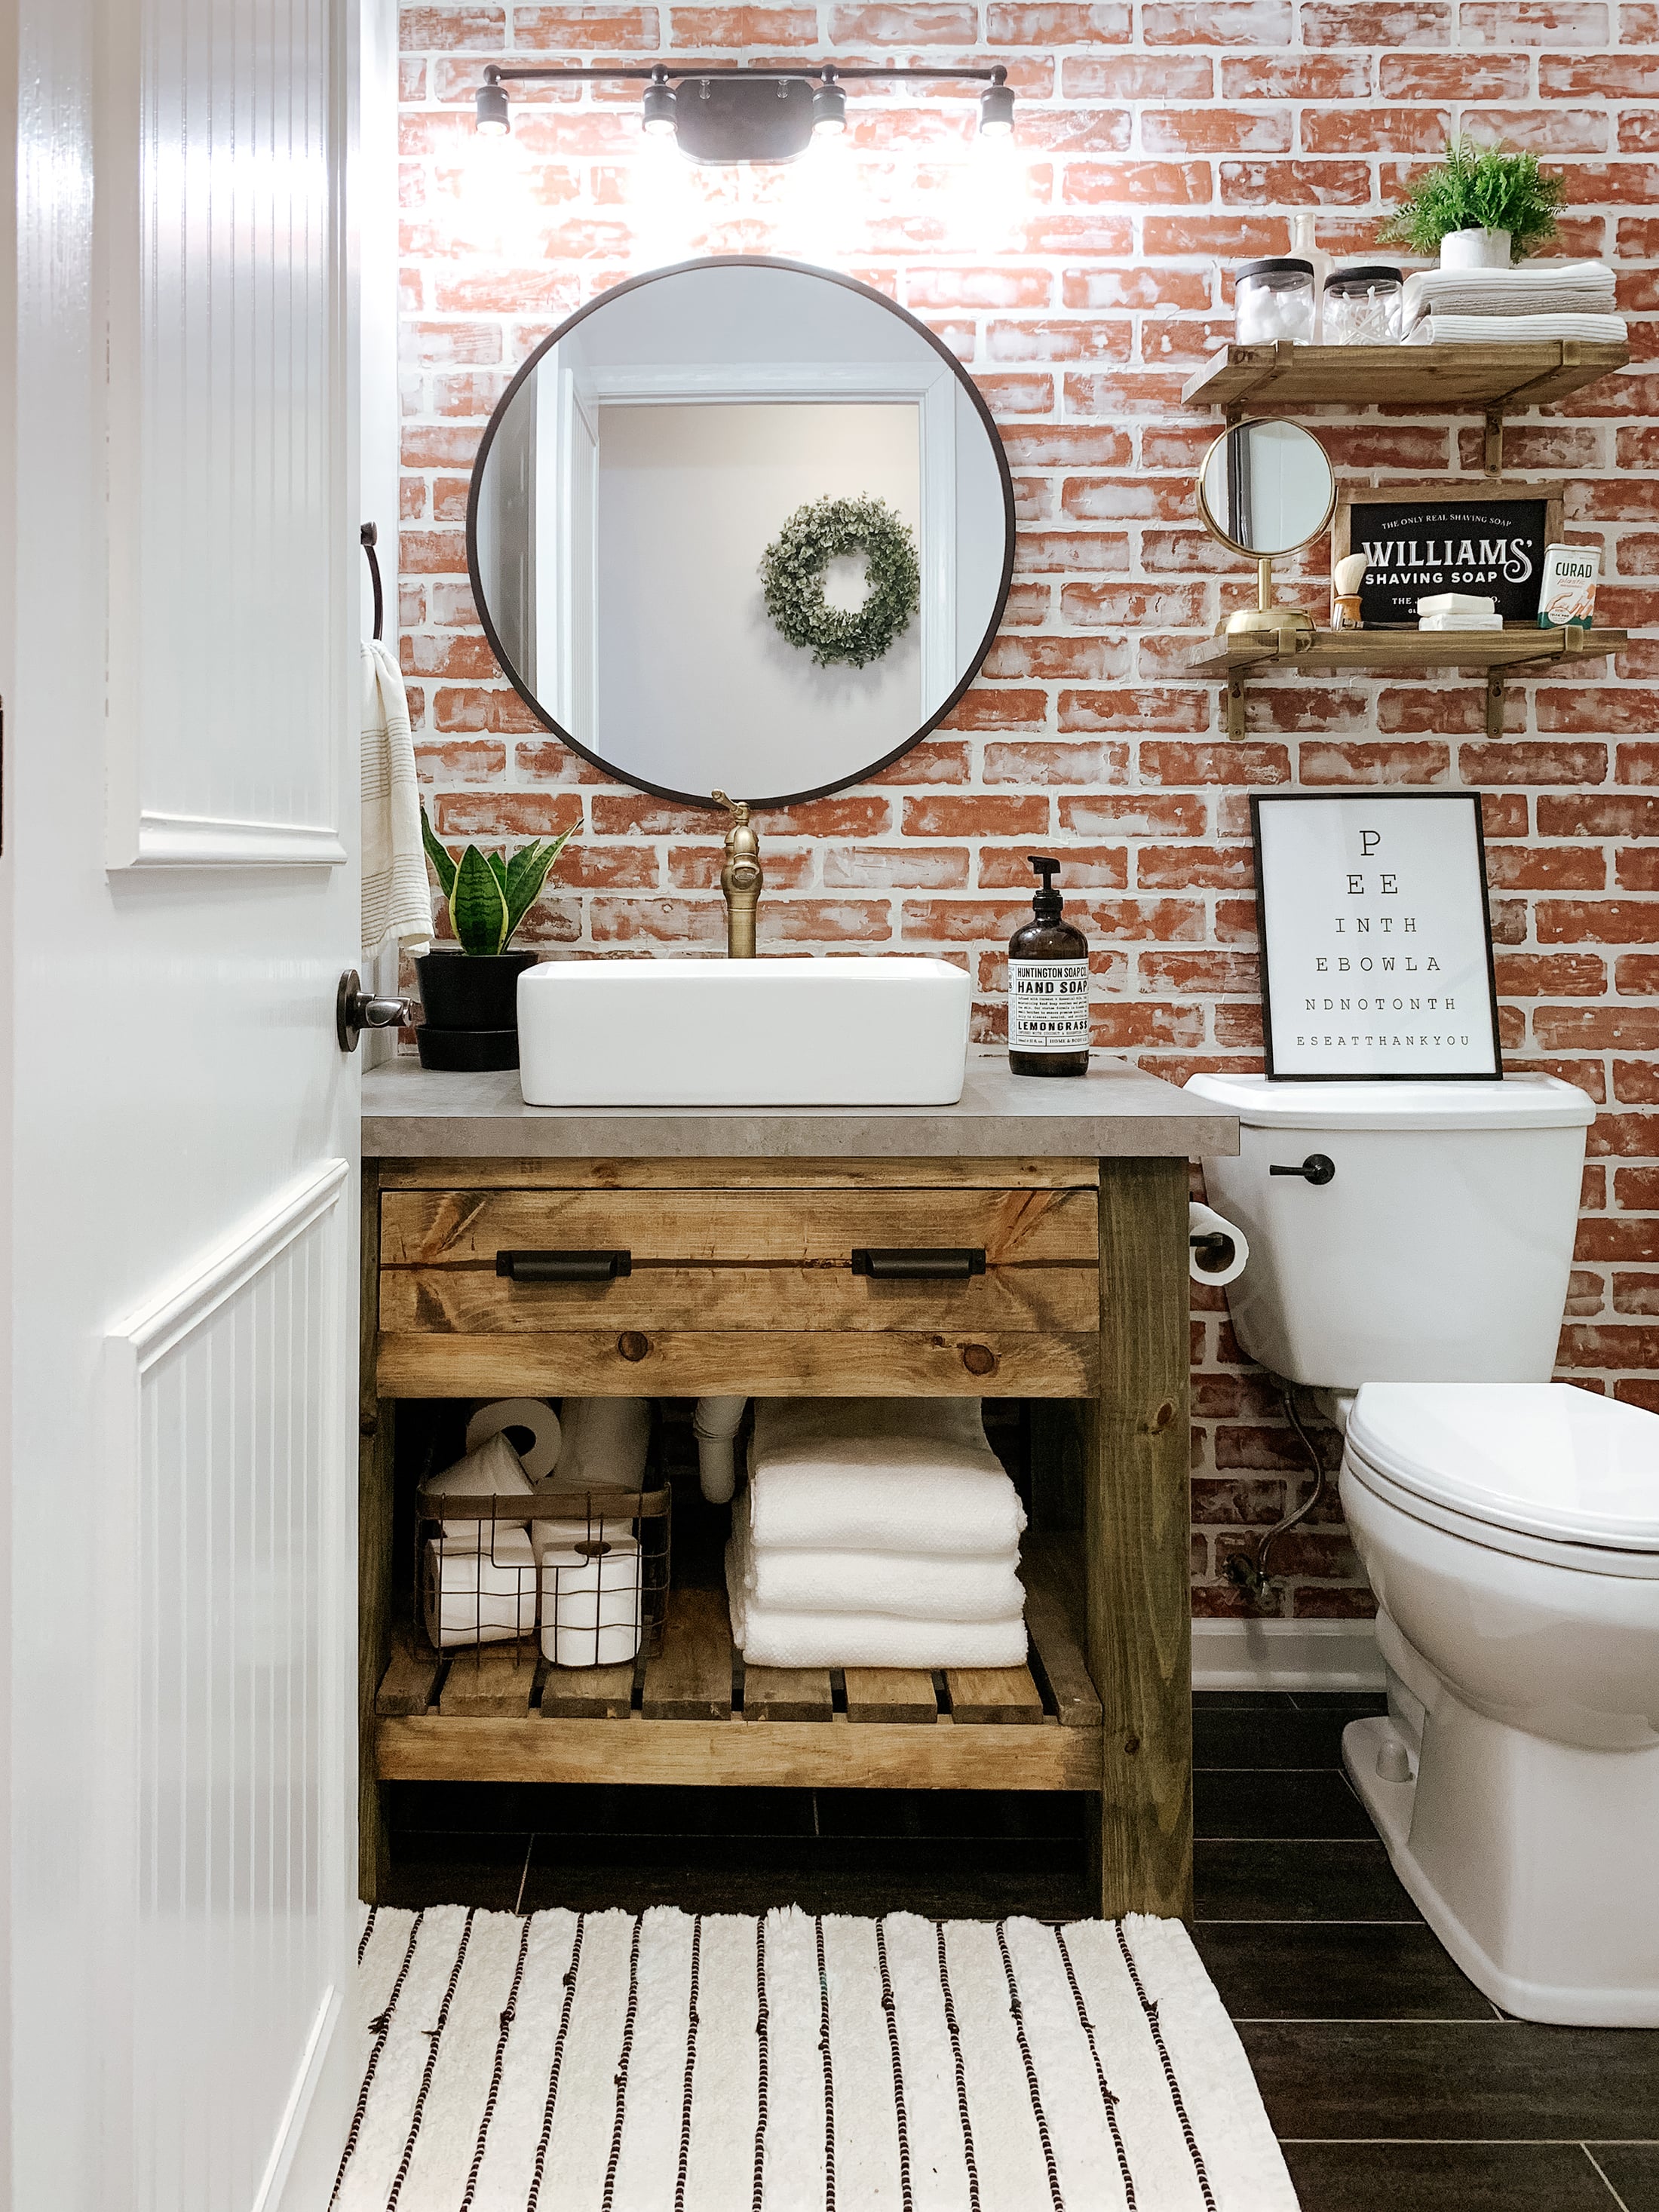
Honestly, I was nervous the bathroom vanity was going to clash with the faux brick wall we created. But, it actually looks perfect together, and does compliment each other!
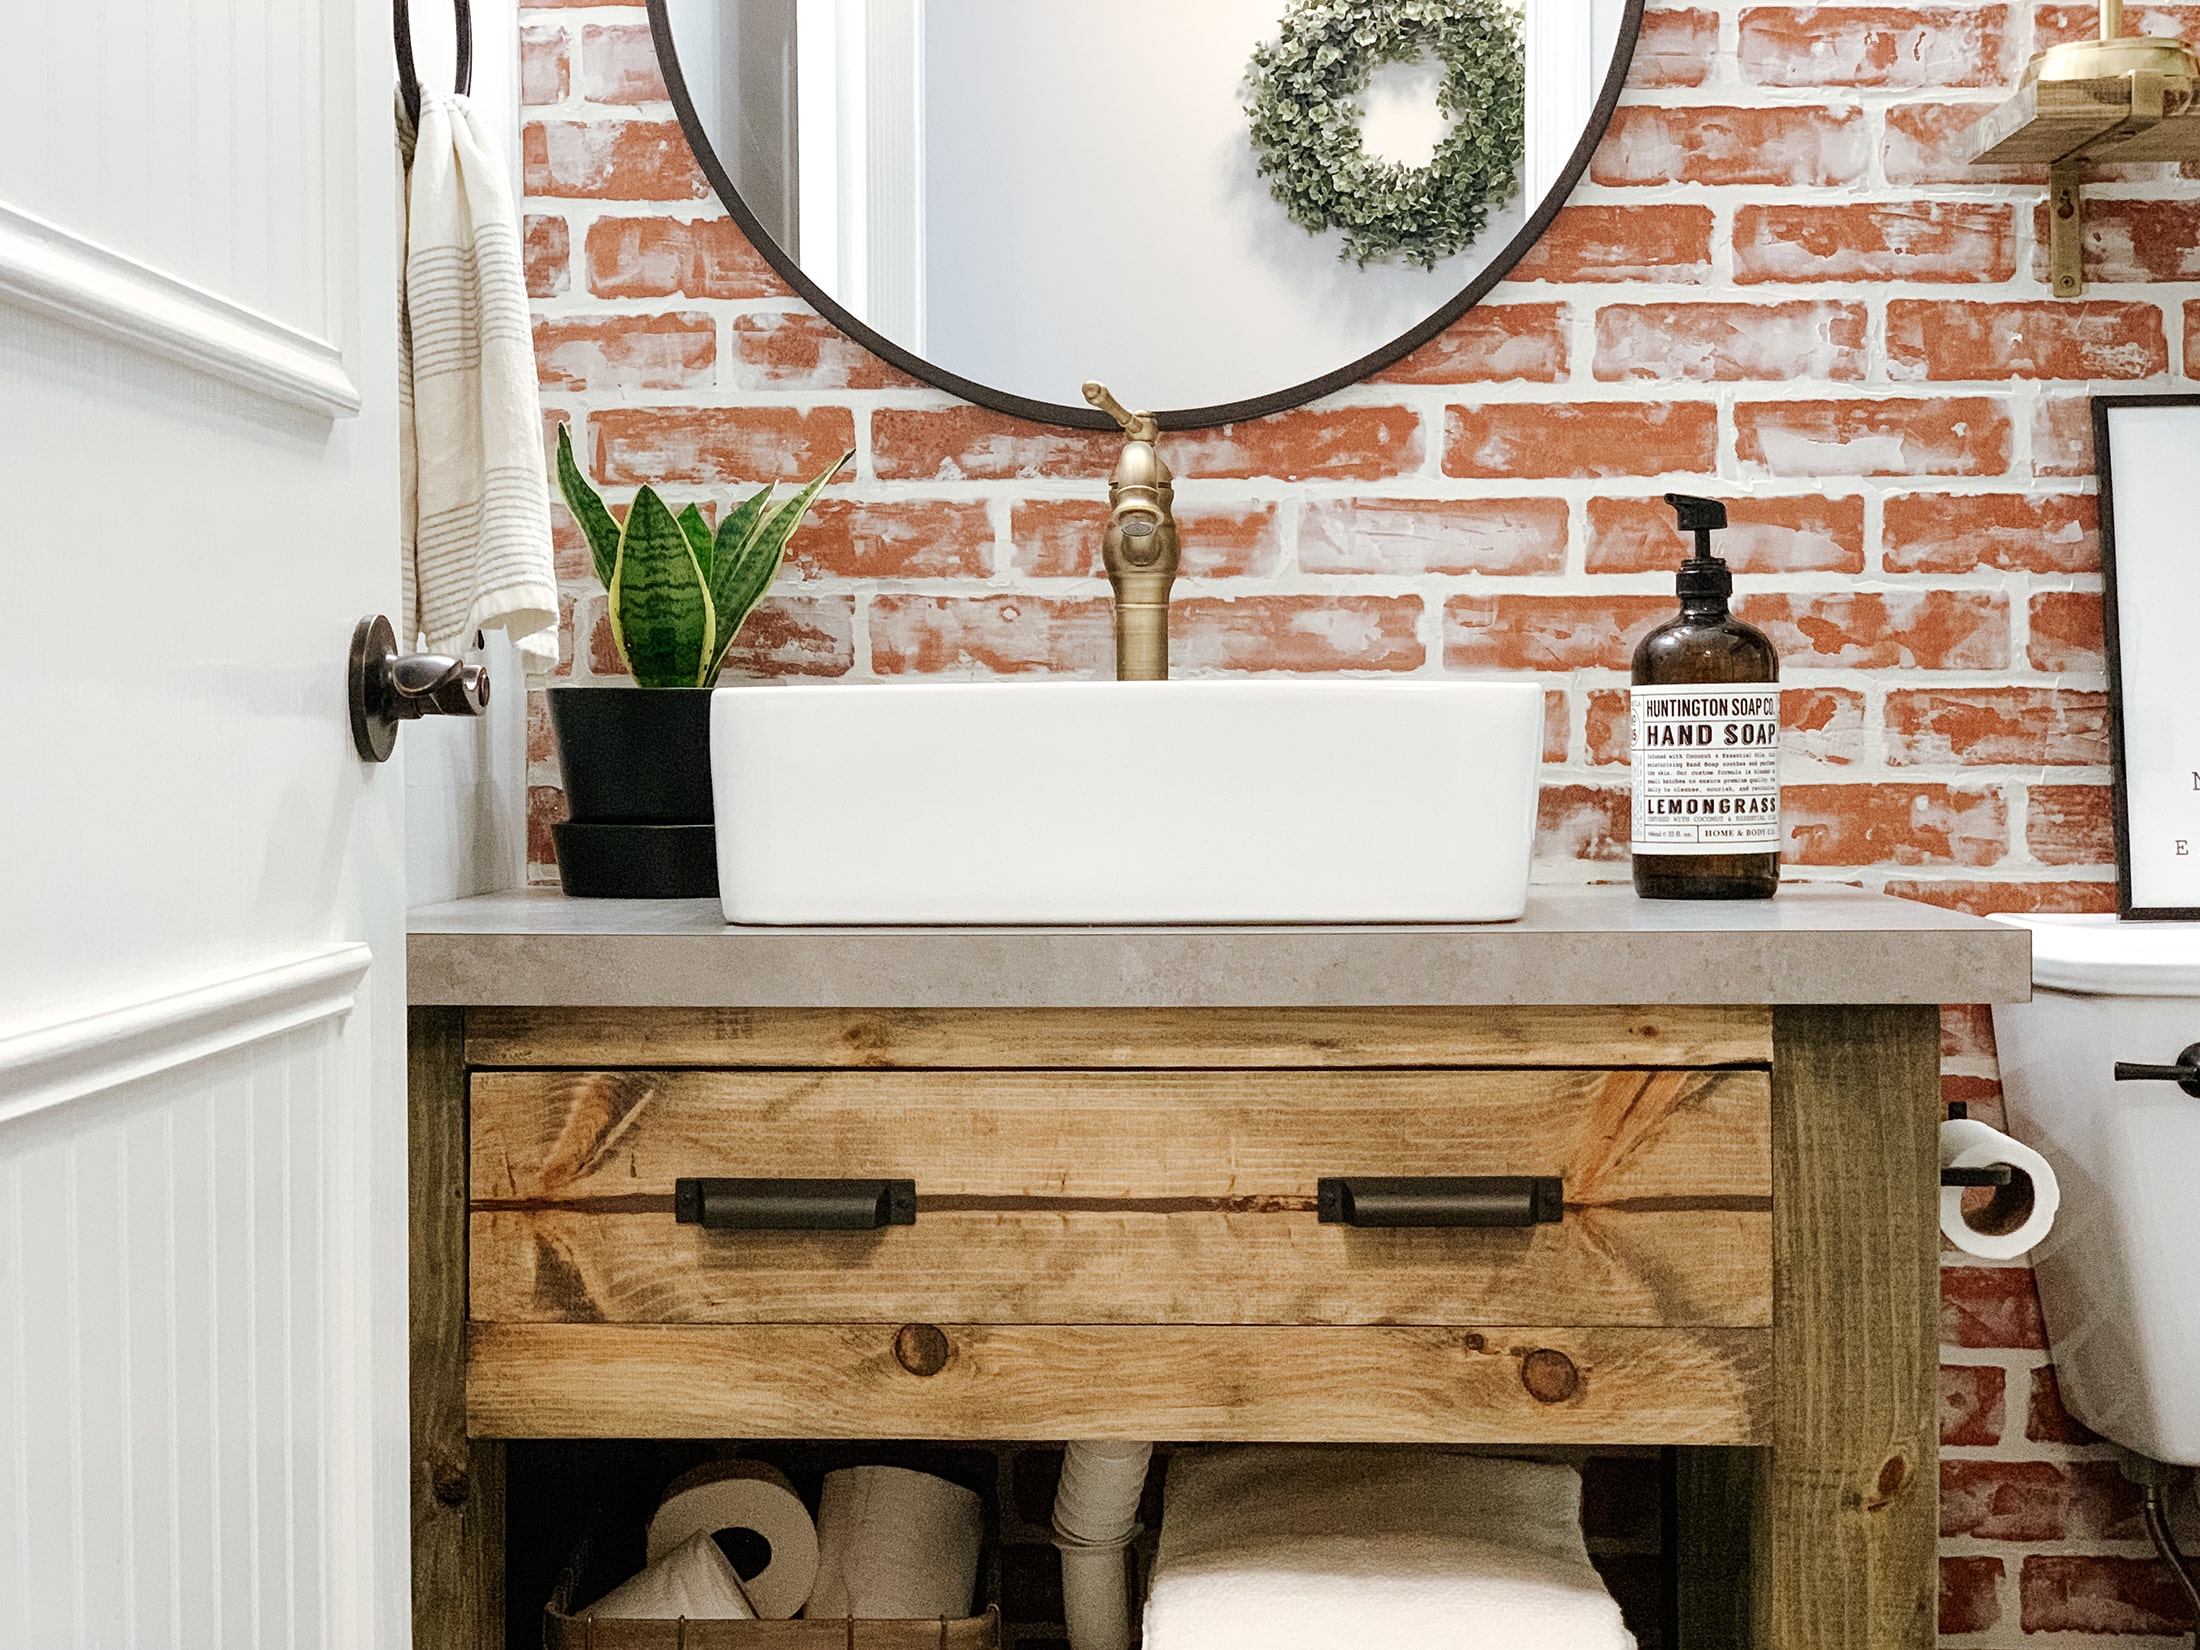
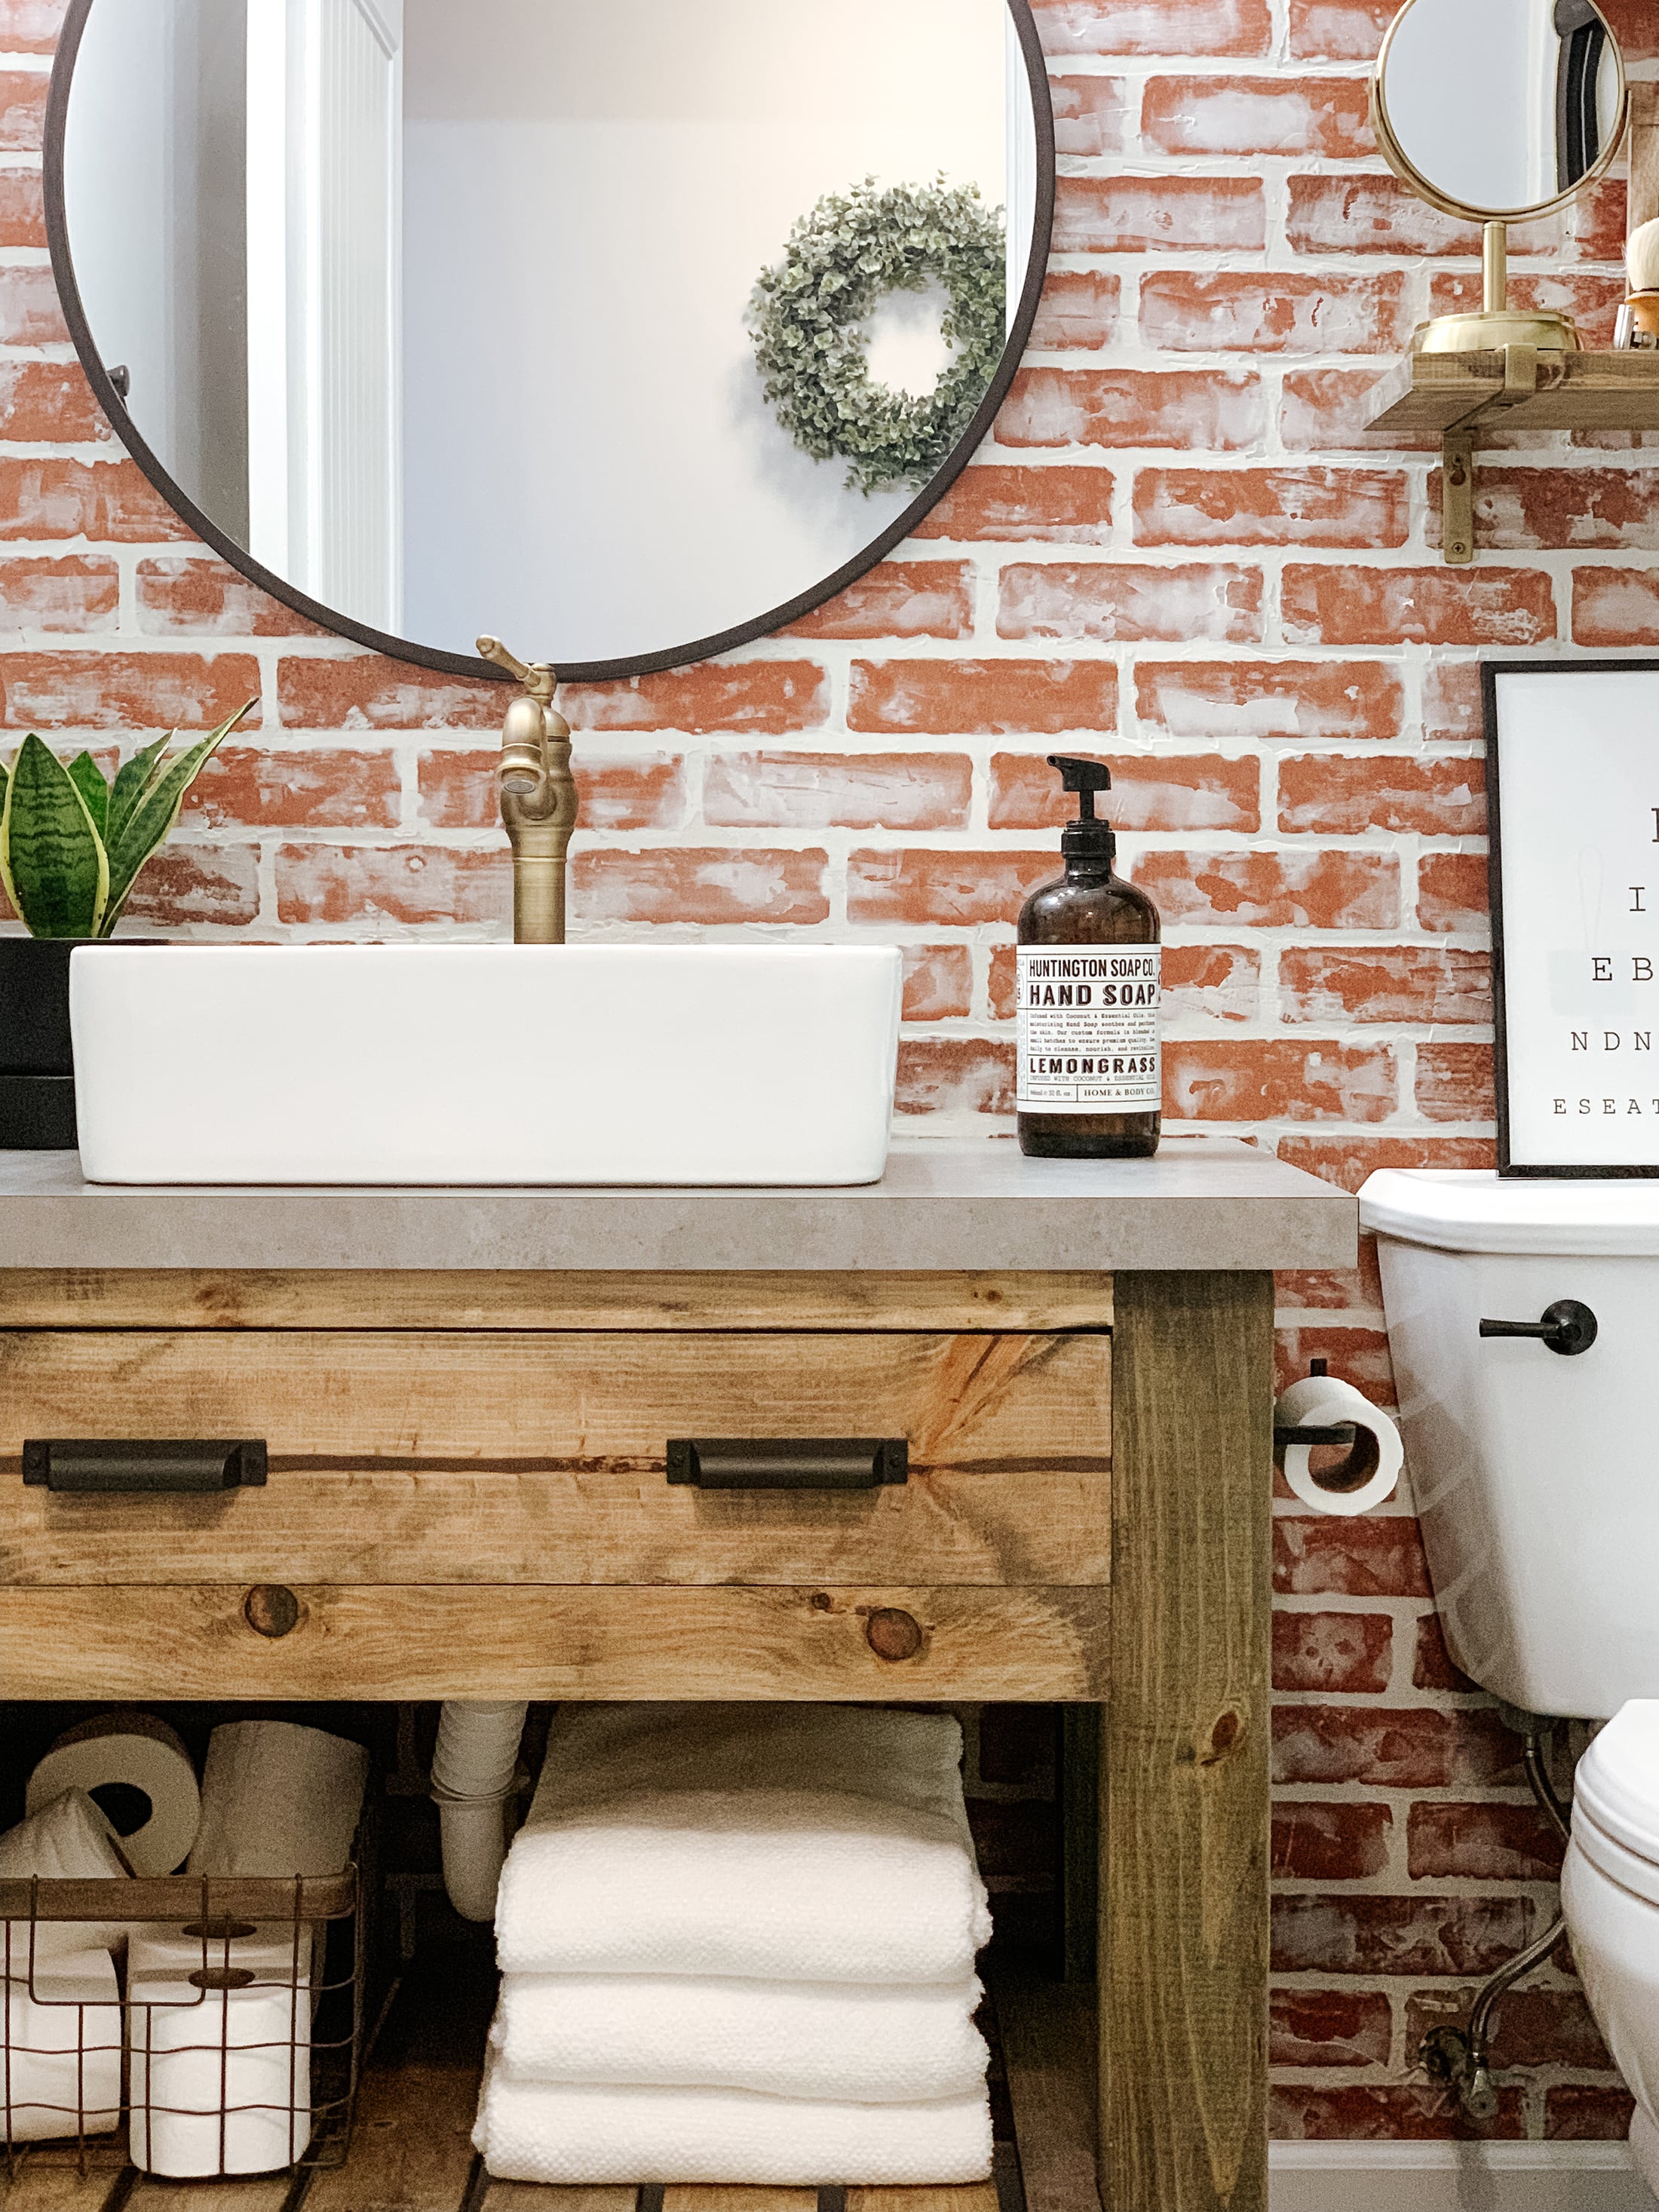
I found these drawer pulls from build.com. They had SO MANY to choose from, it made it difficult to narrow down some styles. However, these were definitely the winner! They have a ton of finish options too.
Does anyone want to take a guess on how many things in this bathroom are spray painted? ?
Source List
Drawer Pulls – Build.com
Sink – Amazon
Faucet – Amazon
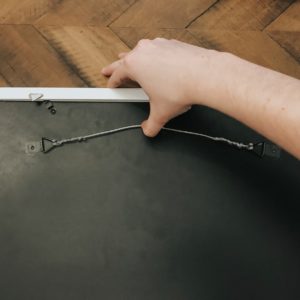
Mirror – Kohls (originally antique brass. available in-store only. here’s a similar mirror)
Toilet Paper Basket – Michaels (available in-store only)
Paint Color – Sherwin Williams Crushed Ice
Floors – Groutable vinyl from Lowe’s
Vanity Light – Wayfair
Rug – Target
Toliet paper holder – Amazon
Shelf Brackets – World Market
Pee In The Bowl Sign – Our Etsy Shop
Little Mirror – Walmart
Hand Soap Jar – World Market
Black glass jars – Amazon
Brick wall – Tutorial here
Vanity Top – Custom Order from Lowe’s
Toilet – Home Depot
If you decide to tackle this DIY bathroom vanity, we’d love to see how it turns out. Also, if you follow us on Instagram, make sure to tag us.! If you have any additional questions, don’t be afraid to ask us in the comments below! 🙂

This post may contain affiliate links where we earn a small commission on your purchases at no additional cost to you.


I love the brick in this photo even more than the one in your old brick tutorial.
What did you do here to get this effect. Did you paint each break the same color and then do a schmear?
Never mind about my question about the brick tutorial. Of course you included it you are a master. You are so talented.
haha! Yes, we do have the tutorial on the brick wall in this bathroom. Super easy to achieve! Thank you so much for your sweet comment!
https://youtu.be/iZSEHc625u4
Finished project!!! Again, thank you.
This is awesome Jon!! It came out great. Thank you so much for sharing!
What stain colour did you use?
Hi Jadie!
We decided to give Miss Mustard Seed’s antiquing wax a try – no staining!
Was it the black/brown color of this antiquing wax?
Hey Wendy!
Yes, that’s correct. It was the darker antiquing wax Miss Mustard Seed offers. 🙂
– Tammy
Ok I just started to put the sides together after using my kreg jig to drill the holes per the book and the 2-1/2” screws didn’t even go into the 4×4. What setting did you use on the jig? My book said to use the 1-1/2 mark.
Hi Del,
Sorry to hear you’re having issues with your Kreg Jig! When using the Kreg Jig make sure you are adjusting your jig & your drill bit depth as well! That might have been the issue. When built this vanity, we referred to the book as well with no issues.
– Tammy
Set the jig to the thickness of wood you are drilling through. The 1X are 3/4″, so you would set the jig and the bit to the 3/4″ mark.
Do you know about how many feet of wood you used to build these?
Hi Eron!
We have all the supplies listed in the PDF in regards to how many boards we bought to build the vanity!
– Tammy
This is my first project like this. It isn’t square and the drawer wont go in. How do I square it up?
Hi Amber,
So sorry we are just seeing your comment now. You most likely will have to go back a few steps to get it to be squared. Sometimes 4×4 are not exactly squared 4x4s, which might have been the issue for you.
Followed all the instructions, measured everything 5 times and cut once, bought the pocket hole jig set and to be quite candid – this project is a complete PITA. The 1 inch wide side boards are a nightmare to run the pocket hole screws into. Zipping 1” thick wood Into 4 x4’s causes all sorts of headaches. The 1x boards splinter, the tow in angle, even with the pocket hole jig tool, causes issues with a small margin of error. I had the front side of the 4×4”s breaking off, etc. Finally got it together, but I would say that the side support boards at least need to be 1.5” or 2” thick to support the surrounding weight/ stress of the 4×4’s. I appreciate the plans and all, but for future DIY’ers – know that this will consume an entire weekend of your time, cost over $200 in wood and materials (before the faucet, vessel sink, vanity top, etc. and a lot of frustration.. Hopefully most can find a box store vanity that works for you, because this project is not for the faint of heart/ average Joe. Good luck!
Hi Brandon,
Sorry to hear you had trouble building this vanity! We had no issues with our wood splitting while using our Kreg jig. I’ve also completed other projects with 1x boards while using our Kreg Jig and didn’t have that issue either. It could have been your screw head size? Not sure, wish we could be of more help with that!
As for the supporting boards, we appreciate hearing your thoughts on that! We believe the additional 1×3’s that are attached below the drawer, along with the bottom shelf supports are more than enough support for the vanity itself. We built this over 2 years ago and the vanity has held up great with no issues!
I use 1x boards all the time. If your boards are splitting most likely you need shorter screws. Remember, 1x boards are actually .75”. I found that using #2 grade pine or fir instead of furring strips helps tremendously. They are straighter, are closer to actual 1×2 inches and made the vanity I built much stronger. This was a very simple build. I am not a pro. I am a gal that makes things because it is too expensive for me to hire someone or custom order.
I love this. My bathroom is small so I had to make a few adjustments but I am very happy with the results.
Hi Pamela!
That is awesome!! We appreciate the feedback 🙂
Hey,
Do you have plans on how to make a smaller version? I have a powder room that I am currently redoing and the issue is the space is so narrow that i’m working with needing a vanity thats only 15 ish inches deep but i have 30 inches of width. I feel like a small width vanity would look goofy but this depth is really throwing me off.
Hey Jenn,
Unfortunately, we do not have any plans for a smaller version! You could just take these plans and adjust the measurements for a 30″ vanity.
Looking forward to doing this tomorrow. What are the dimensions of the sink basin and the countertop. Thank you so much for doing this. Excellent instructions.
Thank you so much! We’re glad to hear the instructions were helpful!
Here is the link to the sink we have: https://rstyle.me/+pVogUTKnOsKMRYy3SsTTZg It’s 19″ by 15″. Our countertop is 37″ wide by 22 1/2″ deep. However, our vanity is right up against the wall, so we removed the additional 1″ overhang for the left side. So if your vanity is not up against any walls, then you’d want to add an additional 1″ in width for overhang.
– Tammy
It came out beautifully. I added a concrete countertop. Thank you so much for the easy to follow instructions. My only feedback would be not to flush the 1xs to the 4×4. Rather bump them in 1/2 inch so your 2.5 inch screws don’t poke through. I loved this project. Trying to share an image of it.